
1. Giriş
The Seltron SGC-sgc16 is an advanced solar differential controller designed for efficient management of solar thermal and combined heating systems. It features a backlit liquid crystal display (LCD) that shows hydraulic schemes and various functional data, ensuring intuitive user interaction through graphical icons. This manual provides detailed instructions for the proper installation, operation, and maintenance of your SGC-sgc16 controller.
2. Təhlükəsizlik Məlumatı
Cihazı quraşdırmazdan və ya işlətməzdən əvvəl bütün təhlükəsizlik təlimatlarını diqqətlə oxuyun. Bu təlimatlara əməl edilməməsi elektrik cərəyanı vurması, yanğın və ya ciddi xəsarətlə nəticələnə bilər.
- Elektrik Təhlükəsizliyi: Installation and wiring must be performed by a qualified electrician in accordance with all local and national electrical codes. Ensure the power supply is disconnected before any wiring or maintenance.
- Ekoloji Şərtlər: Do not expose the controller to direct sunlight, extreme temperatures, high humidity, or corrosive environments.
- İdarəetmə: Fiziki zədələnməmək üçün cihazı ehtiyatla idarə edin.
- İstifadəsi: This device is intended solely for controlling solar thermal and combined heating systems as described in this manual. Any other use is considered improper.
3. Məhsul bitdiview
The Seltron SGC-sgc16 controller features a user-friendly interface with a clear LCD and tactile buttons for navigation and parameter adjustment.
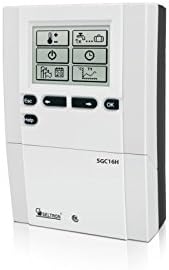
Şəkil 3.1: Ön view of the Seltron SGC-sgc16 Solar Controller. This image shows the main display, navigation buttons (ESC, HELP, OK), and function buttons with graphical icons for temperature, pump status, time, system configuration, and data logging.
3.1. Komponentlər
- LCD displey: Backlit screen for displaying system status, parameters, and hydraulic schemes.
- Naviqasiya düymələri:
- ESC: Exits current menu or cancels an action.
- YARDIM: Kontekstə həssas kömək və ya məlumat verir.
- OK: Confirms selection or enters a menu.
- Up/Down Arrows (implied by icons): For navigating through menus and adjusting values.
- Funksiya nişanları: Represent various system functions and settings, such as temperature, pump operation, time settings, and system configuration.
4. Spesifikasiyalar
Key technical specifications for the Seltron SGC-sgc16 solar controller:
| Spesifikasiya | Dəyər |
|---|---|
| İstehsalçı | SELTRON |
| Maddə Çəkisi | 2 kg (2 Kilograms) |
| ASIN | B01EVAOGW2 |
| İlk Mövcud Tarix | 18 may 2016-ci il |

Figure 4.1: Dimensions of the Seltron SGC-sgc16 Solar Controller. The diagram indicates a height of 163 mm, a width of 113 mm, and a depth of 48 mm.
5. Quraşdırma və Quraşdırma
Installation of the SGC-sgc16 controller should only be performed by qualified personnel, such as a certified electrician or heating technician. Incorrect installation can lead to system malfunction, damage, or safety hazards.
5.1. Montaj
- Choose a dry, well-ventilated location, away from direct sunlight, heat sources, and excessive moisture.
- Ensure sufficient space around the controller for ventilation and access to wiring terminals.
- Mount the controller securely to a wall or panel using appropriate screws and anchors. Refer to the dimension diagram in Section 4 for mounting hole locations.
5.2. Elektrik Əlaqələri
Before making any electrical connections, ensure the main power supply to the heating system is disconnected at the circuit breaker.
- Enerji təchizatı: Connect the controller to a stable power supply according to local electrical regulations.
- Sensor Əlaqələri: Connect temperature sensors (e.g., collector sensor, tank sensor) to the designated terminals. Ensure correct polarity if applicable.
- Pump/Valve Connections: Connect the solar pump(s) and any control valves to the appropriate output terminals. Verify that the connected devices' power ratings do not exceed the controller's output capacity.
- Torpaqlama: Ensure the controller is properly grounded to prevent electrical hazards.
After all connections are made, double-check wiring for correctness and security before restoring power.
6. Əməliyyat Təlimatları
The SGC-sgc16 controller is designed for intuitive operation. Upon initial power-up, the controller may guide you through a setup wizard to configure basic system parameters.
6.1. Initial Power-Up and Basic Settings
- Güc Aktivdir: Restore power to the controller. The display will illuminate.
- Dil seçimi: If prompted, select your preferred language using the navigation buttons and confirm with OK.
- Tarix və Saat: Set the current date and time. This is crucial for functions like holiday modes or timed operations.
- Hydraulic Scheme Selection: The controller comes with pre-installed hydraulic schemes. Select the scheme that matches your solar and heating system configuration. This is typically represented graphically on the display.
6.2. Menyu Naviqasiyası
Use the buttons on the front panel to navigate through the menus:
- OK düyməsi: Enters a menu or confirms a selection/value.
- ESC düyməsi: Returns to the previous menu level or cancels an input.
- Arrow Buttons (implied): Navigate up/down through menu options or increase/decrease values.
- HELP düyməsi: Provides information about the currently displayed parameter or menu item.
6.3. Parametr Tənzimlənməsi
To adjust a parameter (e.g., differential temperature, maximum tank temperature):
- Navigate to the desired parameter using the arrow buttons.
- Press OK to enter edit mode for that parameter. The value may start blinking.
- Use the arrow buttons to change the value.
- Press OK to save the new value and exit edit mode. Press ESC to discard changes.
6.4. Monitorinq Sistemi Status
The main display provides real-time information about your system. You can typically view:
- Current temperatures from all connected sensors.
- Status of pumps and valves (on/off).
- System operating mode.
- Error messages or warnings.
7. Baxım
The Seltron SGC-sgc16 controller requires minimal maintenance to ensure long-term reliable operation.
7.1. Təmizləmə
- Wipe the exterior of the controller with a soft, dry, or slightly damp parça.
- Do not use abrasive cleaners, solvents, or chemical sprays, as these can damage the casing və ya ekran.
- Cihaza mayenin daxil olmadığından əmin olun.
7.2. System Checks
- Bütün naqil birləşmələrini vaxtaşırı olaraq möhkəmlik və aşınma və ya zədələnmə əlamətləri üçün yoxlayın.
- Monitor the system's performance via the controller's display to ensure it is operating within expected parameters.
- Ensure sensors are securely in place and not damaged.
For any internal maintenance or repairs, contact a qualified service technician. Do not attempt to open the controller casinözün.
8. Giderme
This section provides solutions to common issues you might encounter with your SGC-sgc16 controller. For problems not listed here, or if solutions do not resolve the issue, contact Seltron customer support or a qualified technician.
| Problem | Mümkün Səbəb | Həll |
|---|---|---|
| Nəzarətçinin ekranı boşdur. | No power supply; loose connection; internal fault. | Check power supply to the controller. Verify all electrical connections. If power is present and connections are secure, contact support. |
| System not heating or pump not running. | Incorrect temperature differential settings; faulty sensor; pump malfunction; air in system. | Check differential temperature settings. Verify sensor readings on display. Inspect pump for operation. Bleed air from the system if necessary. |
| Ekranda səhv mesajı. | Sensor fault; communication error; system parameter out of range. | Note the error code/message. Refer to the HELP function on the controller or consult the full technical manual for specific error codes. Check sensor connections. |
| Yanlış temperatur göstəriciləri. | Faulty sensor; sensor not properly installed; wiring issue. | Ensure sensors are correctly positioned and making good contact. Check sensor wiring for damage or loose connections. Replace faulty sensors if necessary. |
9. Utilizasiya
This product contains electronic components and should not be disposed of with household waste. Please dispose of the device in accordance with local regulations for electronic waste. Contact your local authorities or recycling center for information on proper disposal methods.