
Amazon Əsasları K001575
Amazon Basics LCD Computer Monitor Stand Riser User Manual
Model: K001575 | Brand: Amazon Basics
1. Giriş
This user manual provides comprehensive instructions for the assembly, operation, maintenance, and troubleshooting of your Amazon Basics LCD Computer Monitor Free-Standing Desk Stand Riser. Designed to enhance your ergonomic workspace, this stand allows for flexible adjustment of your monitor to achieve optimal viewbucaqlar və rahatlıq.

Şəkil 1.1: Ön view of the Amazon Basics LCD Computer Monitor Stand Riser.
2. Xüsusiyyətlər
- Hündürlük tənzimlənməsi: Set the height of your LCD for a comfortable computing experience.
- Multi-directional Movement: With fingertip effort, raise or lower your display, pan left/right, tilt, and rotate.
- Çəki tutumu: Supports monitors weighing between 6-16 pounds.
- Ekran ölçüsü uyğunluğu: Designed for screens up to 24 inches.
- Şaquli Hündürlük Tənzimlənməsi: Offers 5 inches of monitor height adjustability.
- Fırlanma: Monitor can be used in portrait or landscape orientation (360° rotation).
- Range Tilt: +25/-5 degree tilt capability.
- Pan aralığı: 270° right/left pan from the base.
- VESA Uyğunluğu: Supports VESA 100 x 100 mm and 75 x 75 mm mounting patterns.
- Kabel İdarəetmə: Integrated cable pass-through channel near the base keeps cables organized.
3. Paketin məzmunu
Please ensure all components are present before beginning assembly:
- Monitor Stand Base and Arm Assembly
- VESA Montaj Plitəsi
- Mounting Screws (various sizes for VESA 75x75mm and 100x100mm)
- Allen Key (for adjustments and assembly)

Figure 3.1: Typical components included with the monitor stand.
4. Quraşdırma Təlimatları
- Stend hazırlayın: Place the monitor stand base on a stable, flat surface. Ensure the Allen key is accessible, often stored at the bottom of the base.
- VESA lövhəsini monitora əlavə edin: Carefully lay your monitor face down on a soft, clean surface to prevent scratches. Align the VESA mounting plate with the screw holes on the back of your monitor. Use the appropriate mounting screws (M4 or M5, depending on your monitor) to secure the plate to the monitor. Do not overtighten.
- Mount Monitor to Stand: With the VESA plate attached to your monitor, carefully lift the monitor and slide the VESA plate onto the arm of the stand. Ensure it clicks securely into place.
- Adjust Tension (if necessary): If the monitor sags or is too stiff to adjust, use the included Allen key to adjust the tension screws on the arm. These are typically located near the VESA plate attachment point or along the arm's pivot points. Turn clockwise to increase tension (stiffer movement) and counter-clockwise to decrease tension (looser movement).
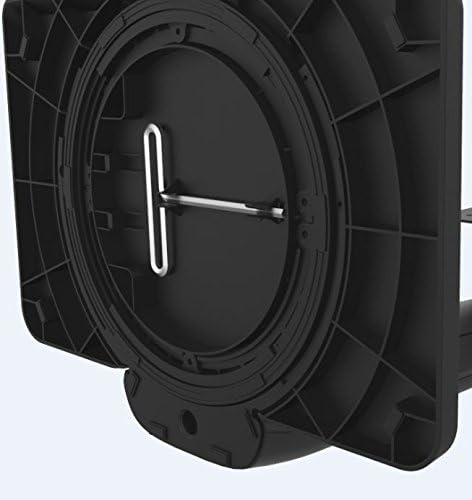
Figure 4.1: Allen key storage on the underside of the stand base.
5. Əməliyyat Təlimatları
The Amazon Basics LCD Monitor Riser offers a range of adjustments for optimal viewrahatlıq:
- Hündürlük tənzimlənməsi: Gently push or pull the monitor up or down to your desired height. The stand is designed to hold its position once released.
- Tilt tənzimlənməsi: Grasp the top and bottom edges of your monitor and gently tilt it forward or backward to achieve the perfect viewbucaq.
- Pan Ayarlama: Rotate the entire stand base left or right on your desk for horizontal viewtənzimləmələr.
- Rotation (Portrait/Landscape): Rotate the monitor 360 degrees to switch between landscape and portrait orientations. Ensure no cables are tangled during rotation.

Figure 5.1: Monitor on stand in landscape orientation.

Figure 5.2: Monitor on stand in portrait orientation, side view.
5.1. Rəsmi Məhsul Videosu
Video 5.1: An official product video demonstrating the features and adjustments of the Amazon Basics LCD Monitor Stand Adjustable Riser.
6. Baxım
- Təmizləmə: Stendini silmək üçün yumşaq, quru bir parça istifadə edin. İnadkar izlər üçün bir az damp Mülayim sabunlu parça istifadə edilə bilər və sonra qurudulmalıdır. Aşındırıcı təmizləyicilərdən və ya həlledicilərdən istifadə etməyin.
- Daimi yoxlamalar: Periodically check all screws and connections to ensure they are secure. Retighten if necessary using the provided Allen key.
- Kabel İdarəetmə: Ensure cables are routed neatly through the cable pass-through channel to prevent strain or damage.
7. Giderme
- Monitor Sags or Won't Stay Up:
This indicates that the tension on the arm is too loose. Use the Allen key to tighten the tension screws on the arm until the monitor holds its position securely. Refer to Section 4, Step 4 for guidance.
- Monitor is Too Stiff to Adjust:
The tension on the arm may be too tight. Use the Allen key to loosen the tension screws slightly until movement is smooth but still holds position.
- Monitor Yelləncəkləri:
Ensure the stand is placed on a stable, flat surface. Check that all assembly screws are tightened securely, including those attaching the VESA plate to the monitor and the monitor to the stand.
- Cables are Tangled:
Utilize the integrated cable pass-through channel at the base of the stand to route cables neatly. This prevents tangling and keeps your workspace tidy.
8. Spesifikasiyalar
| Atribut | Dəyər |
|---|---|
| Model nömrəsi | K001575 |
| Brend | Amazon Əsasları |
| Material | Alüminium |
| Rəng | Qara |
| Maddə Çəkisi | 5 funt (2.27 kq) |
| Məhsul Ölçüləri (UxGxY) | 12 x 10.2 x 15.8 düym (30.5 x 25.9 x 40.1 sm) |
| Max Screen Size Supported | 24 düym |
| Weight Adjustable Range | 6-16 pounds (2.7-7.2 kg) |
| Hündürlüyün tənzimlənməsi | 5 düym (12.7 sm) |
| Tilt Bucağı | +25/-5 dərəcə |
| Pan açı | 270 degrees (right/left from base) |
| Fırlanma | 360 degrees (portrait/landscape) |
| VESA Uyğunluğu | 75x75mm, 100x100mm |
9. Zəmanət və Dəstək
This product is backed by an Amazon Basics 1-Year Limited Warranty. For detailed warranty information or technical support, please refer to the official Amazon Basics websaytına daxil olun və ya birbaşa Amazon müştəri xidmətləri ilə əlaqə saxlayın.
Onlayn dəstək: ziyarət edin Amazon Müştəri Xidmətləri
Ask a question about this manual
Ask about setup, troubleshooting, compatibility, parts, safety, or missing instructions. Manuals+ will review the question and use this page’s manual context to help answer it.