
1. Giriş
This manual provides detailed instructions for the safe and efficient installation, operation, and maintenance of your RAGGIE RG-PT30 MPPT Solar Charge Controller. Please read this manual thoroughly before attempting any installation or operation to ensure optimal performance and longevity of the device.
2. Təhlükəsizlik Təlimatları
- Ensure all connections are correct and secure before applying power. Incorrect wiring can damage the controller and connected devices.
- Always connect the battery first, then the solar panel, and finally the load. Disconnect in the reverse order: load, then solar panel, then battery.
- Do not disassemble or attempt to repair the controller yourself. Refer to qualified personnel for service.
- Install the controller in a well-ventilated area, away from direct sunlight, high temperatures, and moisture.
- Use appropriate circuit breakers or fuses for the battery and solar panel circuits.
- Wear protective eyewear when working with batteries.
3. Məhsul bitdiview
The RAGGIE RG-PT30 is an advanced Maximum Power Point Tracking (MPPT) solar charge controller designed to optimize the power harvest from your solar panels and efficiently charge your battery bank. It supports 12V and 24V battery systems and features a 30A charging capacity, an intuitive LED display, and multiple USB output ports for charging external devices.
3.1 Əsas Xüsusiyyətlər
- MPPT (Maximum Power Point Tracking) Technology for enhanced charging efficiency.
- Automatic 12V/24V system voltage tanınma.
- 30A maximum charge current.
- LED screen display for real-time monitoring of input, battery, and output status.
- Four 5V 2A USB output ports for device charging.
- Comprehensive electronic protection functions.
3.2 Komponentin İdentifikasiyası

Şəkil 1: Ön View of the RAGGIE RG-PT30 Controller. This image shows the front panel of the solar charge controller, featuring the LED display at the top, two control buttons (MENU and POWER) below the display, and four 5V 2A USB output ports at the bottom right. The main terminals for solar input, battery, and load are located at the very bottom.
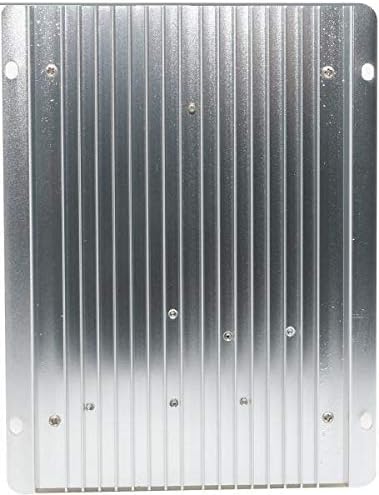
Şəkil 2: Geri View of the RAGGIE RG-PT30 Controller. This image displays the rear side of the solar charge controller, characterized by its metallic heat sink fins. These fins are designed to dissipate heat generated during operation, ensuring the controller maintains optimal temperature and performance.
4. Quraşdırma və Quraşdırma
4.1 Nəzarətçinin quraşdırılması
- Choose a dry, well-ventilated location, protected from direct sunlight and moisture.
- Mount the controller vertically on a non-flammable surface to allow for proper heat dissipation.
- Ensure there is sufficient clearance around the controller for air circulation.
4.2 Naqil birləşmələri
Follow the connection order strictly to prevent damage to the controller or system components. Use appropriate wire gauges for your system's current and distance.
- Batareyanı birləşdirin: Connect the positive and negative terminals of the battery to the corresponding battery terminals on the controller. The controller will automatically detect the system voltage (12V və ya 24V).
- Günəş panelini birləşdirin: Connect the positive and negative terminals of the solar panel(s) to the corresponding solar input terminals on the controller.
- Connect the DC Load (Optional): Connect the positive and negative terminals of your DC load to the corresponding load terminals on the controller.
Important: Ensure correct polarity for all connections. Reverse polarity can cause permanent damage.
5. Əməliyyat Təlimatları
5.1 LED ekran
The LED screen provides real-time information about your solar system:
- Giriş: Cild göstərirtage and current from the solar panel.
- BATARYA: Batareyanın həcmini göstərirtage və şarj cərəyanı.
- Çıxış: Indicates the load voltage və cari.
5.2 Düymə funksiyaları
- MENU düyməsi: Press to cycle through different display parameters or enter settings mode.
- Güc düyməsi: Press to turn the DC load output ON/OFF. Long press may enter or exit certain settings.
5.3 USB çıxışı
The four 5V 2A USB ports can be used to charge compatible electronic devices. These ports are active when the controller is powered and the battery has sufficient charge.
6. Baxım
- Daimi Yoxlama: Bütün naqil birləşmələrini vaxtaşırı möhkəmlik və korroziya üçün yoxlayın.
- Təmizləmə: Kontrolleri təmiz, toz və zibildən təmiz saxlayın. Təmizləmək üçün quru bir parça istifadə edin.
- Havalandırma: Ensure that the ventilation openings and heat sink fins are not obstructed.
- Batareyanın yoxlanılması: Regularly check the battery's state of charge and electrolyte level (for flooded batteries).
7. Giderme
| Problem | Mümkün Səbəb | Həll |
|---|---|---|
| No display/Controller not powering on | Batareya qoşulmayıb və ya səs səviyyəsi aşağıdırtage; tərs qütblük. | Batareya bağlantılarını və cild yoxlayıntage. Düzgün polyarlığı təmin edin. |
| Batareya doldurulmur | Solar panel not connected; low solar input; faulty panel/wiring. | Check solar panel connections. Verify solar panel output voltage. Ensure sufficient sunlight. |
| Yükləmə işləmir | Load output turned off; overload; faulty load. | Press POWER button to turn on load. Reduce load. Check load device. |
| USB portları işləmir | Batareya həcmitage too low; controller fault. | Ensure battery is adequately charged. If problem persists, contact support. |
8. Spesifikasiyalar
| Parametr | Dəyər |
|---|---|
| Model | RG-PT30 |
| Brend | RAGGIE |
| Şarj rejimi | MPPT (Maximum Power Point Tracking) |
| Sistem Cildtage | 12V / 24V Auto Recognition |
| Maksimum şarj cərəyanı | 30A |
| Ekran növü | LED Ekran |
| USB çıxışı | 4 x 5V / 2A |
| ASIN | B07PC3TNCB |
| İlk Əlçatan Tarix | 3 mart 2019-cü il |
9. Zəmanət və Dəstək
For warranty information or technical support, please refer to the documentation provided with your purchase or contact your retailer. Keep your purchase receipt as proof of purchase.