
1. Giriş
Aldığınız üçün təşəkkür edirikasing the Klipsch Reference Premiere RP-1400SW 14-inch High Excursion Subwoofer. This subwoofer is designed to deliver powerful and accurate low-frequency sound, enhancing your home theater or music listening experience. This manual provides essential information for proper setup, operation, and care of your new subwoofer.

Figure 1.1: Klipsch Reference Premiere RP-1400SW Subwoofer (Grille Removed)
2. Əhəmiyyətli Təhlükəsizlik Məlumatı
Please read all safety instructions before operating this product. Keep these instructions for future reference.
- Güc mənbəyi: Connect the subwoofer only to a power supply of the type described in the operating instructions or as marked on the appliance.
- Havalandırma: Düzgün havalandırma təmin edin. Heç bir ventilyasiya açılışını bağlamayın. İstehsalçının göstərişlərinə uyğun olaraq quraşdırın.
- İstilik: Radiatorlar, istilik registrləri, sobalar və ya digər aparatlar (o cümlədən) kimi istilik mənbələrinin yaxınlığında quraşdırmayın. ampistilik əmələ gətirən qaldırıcılar).
- Su və nəm: Bu cihazı suyun və ya nəmin yaxınlığında istifadə etməyin.
- Təmizləmə: Yalnız quru parça ilə təmizləyin.
- Xidmət: Bütün xidmətlər üçün ixtisaslı xidmət personalına müraciət edin. Aparat hər hansı şəkildə zədələndikdə, məsələn, enerji təchizatı kabeli və ya tıxacı zədələndikdə, maye töküldükdə və ya cihazın içərisinə əşyalar düşdükdə, cihaz yağışa və ya nəmə məruz qaldıqda, normal işləmədikdə xidmət tələb olunur. , ya da atılıb.
- Ağır Obyekt: This subwoofer is heavy (85 lbs). Exercise caution when moving to prevent injury.
3. Qutuda nə var
Bütün komponentlərin mövcud olduğunu yoxlayın:
- Klipsch Reference Premiere RP-1400SW Subwoofer
- Elektrik kabeli
- Təlimat kitabçası (bu sənəd)
4. Quraşdırma
4.1 Sabvuferin Yerləşdirilməsi
The Klipsch RP-1400SW features a front-firing driver and Aerofoil front slot port, allowing for flexible placement within your room. Experiment with different locations to find the optimal bass response for your listening environment. Generally, corner placement can enhance bass output, while placement along a wall can provide a more balanced sound. The shock-absorbing rubber feet help isolate the subwoofer from the floor.

Figure 4.1: Front-Firing Driver and Aerofoil Front Slot Port

Figure 4.2: Subwoofer Design Features (Rounded Corners, Shock-Absorbing Feet)
4.2 Əlaqələr
Your RP-1400SW subwoofer offers both wired and wireless connectivity options.

Figure 4.3: Subwoofer Rear Panel Connections and Controls
- Wired Connection (RCA/LFE):
Connect an RCA cable from the LFE output of your AV receiver to the LFE input on the subwoofer's rear panel. If your receiver does not have an LFE output, use a standard RCA stereo cable to connect the receiver's pre-out (subwoofer output) to both the left and right RCA inputs on the subwoofer.
- Wireless Connection (Optional WA-2 Kit):
For wireless operation, you can connect your subwoofer with a Klipsch WA-2 Wireless Subwoofer Kit (sold separately). This allows for flexible placement without the need for long RCA cables. Refer to the WA-2 kit's instructions for pairing and setup.

Figure 4.4: Wireless Connectivity with Optional WA-2 Kit
- Enerji bağlantısı:
Once audio connections are made, plug the supplied power cord into the subwoofer's power inlet and then into a suitable wall outlet.
5. Sabvuferinizi İşlətmək
5.1 Nəzarət üzərindəview
The rear panel of your subwoofer features several controls to fine-tune its performance:

Figure 5.1: Easy-to-Use Controls on Rear Panel
- GAIN (Volume): Adjusts the output level of the subwoofer. Start with a low setting and gradually increase until the bass blends seamlessly with your main speakers.
- LOW-PASS (Crossover): This control sets the upper frequency limit for the subwoofer. If using an AV receiver with LFE output, set this to LFE (or bypass if available on your receiver). If connecting via stereo RCA, adjust this to blend with your main speakers' low-frequency cutoff.
- FAZA (0°/180°): Adjusts the phase of the subwoofer output relative to your main speakers. Experiment with both settings to find the one that provides the most impactful and coherent bass.
- POWER (ON/AUTO/OFF):
- AÇIQ: Subwoofer remains continuously on.
- AVTO: Subwoofer automatically turns on when an audio signal is detected and enters a low-power standby mode after a period of inactivity.
- QAPALI: Subwoofer is powered off.
The 1/2-watt standby mode in AUTO setting ensures exceptional efficiency and reduces energy costs.
5.2 İlkin Yandırma və Tənzimləmə
- Bütün əlaqələrin təhlükəsiz olduğundan əmin olun.
- Set the GAIN control to its minimum position.
- Set the LOW-PASS control to LFE if using an AV receiver, or to a suitable frequency (e.g., 80Hz) if connecting via stereo RCA.
- Set the PHASE switch to 0°.
- Set the POWER switch to AUTO.
- Play some audio with significant bass content. Gradually increase the GAIN control until the subwoofer output blends with your main speakers.
- Experiment with the PHASE switch (0° vs. 180°) to determine which setting provides the most impactful and seamless bass response in your listening position.
For optimal performance, consider using your AV receiver's automatic room correction system (if available) after initial setup.
5.3 Product Video: Reference Premiere Subwoofers
Video 5.1: An official Klipsch video showcasing the features and design of the Reference Premiere Subwoofers, including the RP-1400SW. This video highlights advanced acoustics, balanced performance, front-firing Cerametallic woofers, high-efficiency Class D amplifier, front-firing slot port, detailed design, and easy-to-use controls.
6. Baxım
To ensure the longevity and optimal performance of your Klipsch RP-1400SW subwoofer, follow these simple maintenance guidelines:
- Təmizləmə: Dust the cabinet regularly with a dry, soft cloth. Avoid using abrasive cleaners, solvents, or strong detergents, as these can damage the ebony vinyl finish.
- Yerləşdirmə: Avoid placing the subwoofer in direct sunlight or near heat sources, which can cause discoloration or damage to the cabinet.
- Havalandırma: arxada olduğundan əmin olun amplifier panel has adequate airflow. Do not block the heat sink.
- Barmaqlıq: The durable woven cloth grille can be gently cleaned with a soft brush or vacuum cleaner attachment to remove dust.
7. Giderme
If you experience issues with your subwoofer, consult the following table for common problems and solutions:
| Problem | Mümkün Səbəb | Həll |
|---|---|---|
| Sabvuferdən səs gəlmir |
|
|
| Zəif və ya təhrif edilmiş bas |
|
|
| Subwoofer hums or buzzes |
|
|
If the problem persists after trying these solutions, please contact Klipsch customer support.
8. Spesifikasiyalar
Key technical specifications for the Klipsch Reference Premiere RP-1400SW Subwoofer:
| Xüsusiyyət | Detal |
|---|---|
| Model nömrəsi | RP-1400SW |
| Brend | Klipsch |
| Dinamik növü | Sabvufer |
| Vuferin diametri | 14 düym |
| Audio sürücü növü | Dynamic Driver (Cerametallic) |
| Dinamikin Maksimum Çıxış Gücü | 600 Vt |
| RMS Gücü | 500 Vt |
| Tezliyə cavab | 20Hz - 1kHz (approximate, based on A+ content) |
| Bağlantı texnologiyası | Wired RCA, LFE, and WA-2 Wireless Port |
| Səs Çıxış Modu | Stereo, Ətraf Səs |
| Montaj növü | Mərtəbə daimi |
| Qoruyucu material | Taxta |
| Rəng | Qara |
| Güc mənbəyi | Kabelli Elektrik |
| Element Ölçüləri (D x G x Y) | 25.67"D x 20"W x 21.34"H |
| Maddə Çəkisi | 85 funt sterlinq |
| UPC | 743878047424 |
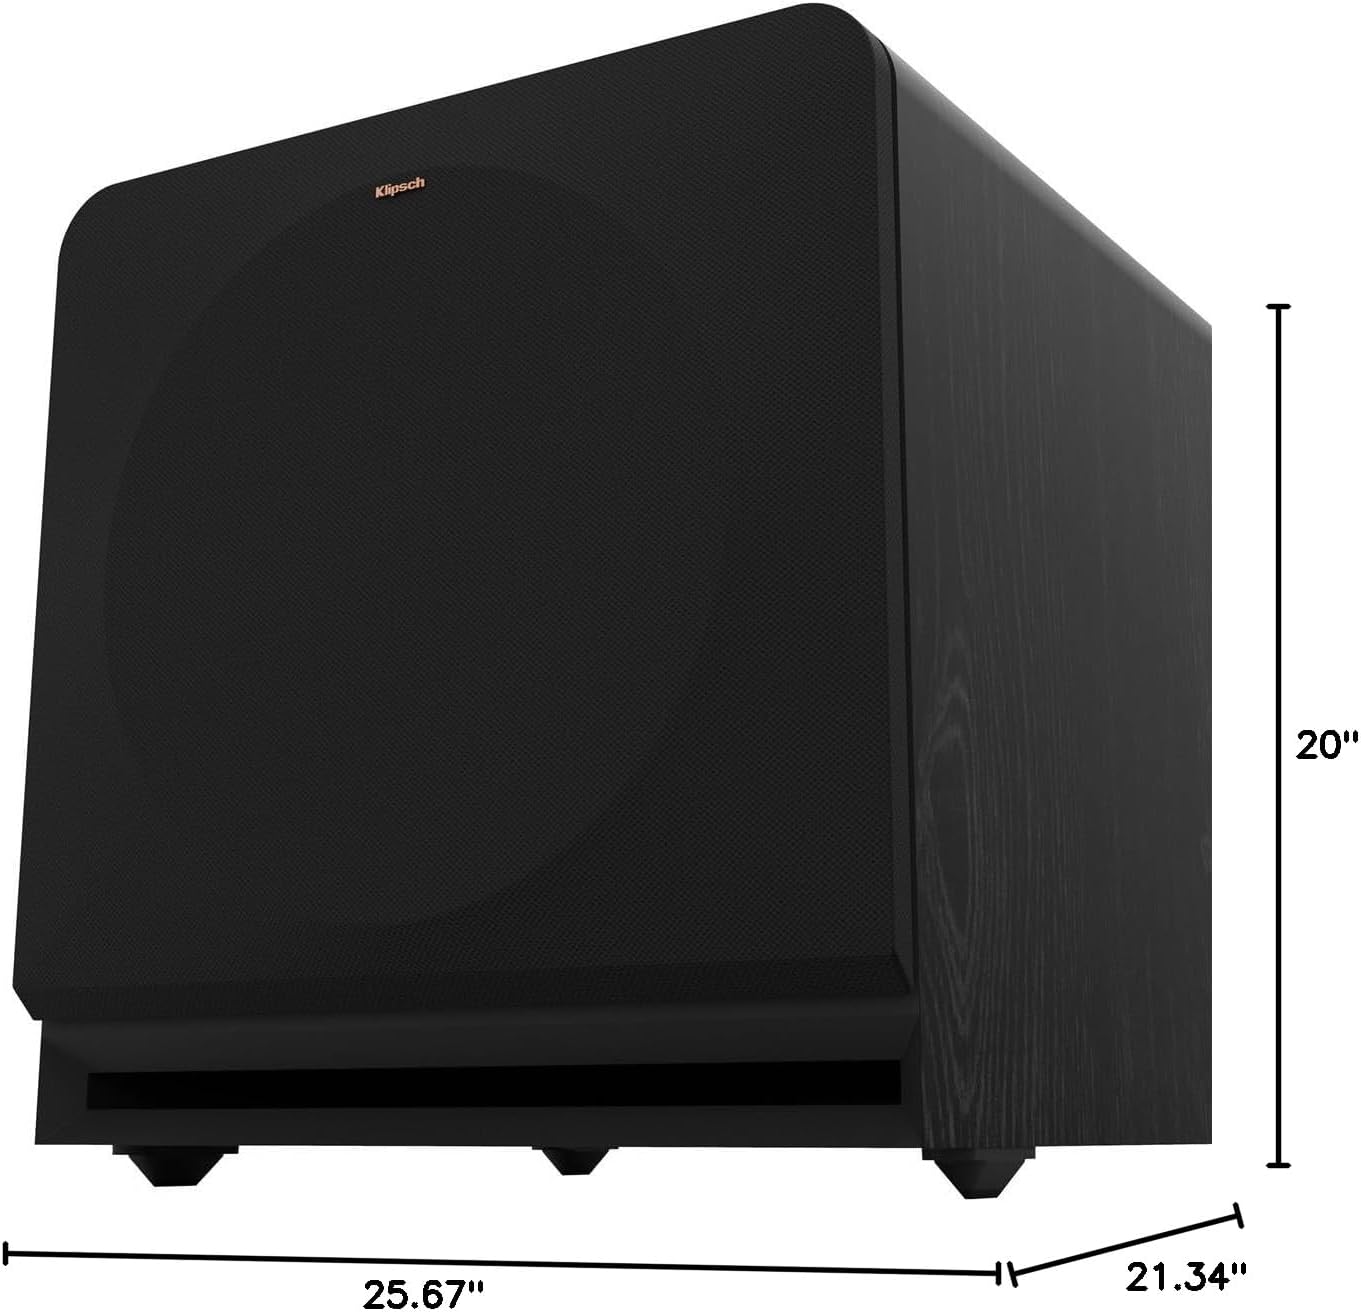
Figure 8.1: Subwoofer Dimensions
9. Zəmanət və dəstək
9.1 Zəmanət Məlumatı
The Klipsch Reference Premiere RP-1400SW Subwoofer comes with a limited warranty:
- Elektronika: İki (2) il
- Woofer, Cabinet, and Non-Electrical Mechanics: Beş (5) il
Please retain your proof of purchase for warranty claims. For full warranty terms and conditions, refer to the official Klipsch websayt və ya müştəri dəstəyi ilə əlaqə saxlayın.
9.2 Müştəri dəstəyi
For further assistance, technical support, or warranty inquiries, please visit the official Klipsch website or contact their customer service department. Contact details can typically be found on the Klipsch websaytın "Dəstək" və ya "Bizimlə Əlaqə" bölməsində.