1. Giriş
This manual provides detailed instructions for the installation, operation, and maintenance of your darkFlash Aquarius Mesh Computer Case. Please read this manual thoroughly before beginning installation to ensure proper setup and safe use of your new computer chassis.
2. Təhlükəsizlik Məlumatı
Həmişə aşağıdakı təhlükəsizlik tədbirlərinə əməl edin:
- Disconnect all power sources before installing or removing any components.
- Komponentlərə elektrostatik boşalmanın (ESD) zərər verməsinin qarşısını almaq üçün antistatik bilək qayışı taxın.
- Handle components carefully to avoid physical damage.
- Kiçik hissələri və alətləri uşaqlardan uzaq tutun.
- Ensure proper ventilation around the computer case.
3. Paketin məzmunu
Bütün əşyaların paketinizdə olduğunu yoxlayın:
- darkFlash Aquarius Mesh Computer Case
- Aksesuar qutusu (vintlər, dayaqlar, kabel bağları və s.)
- İstifadəçi Təlimatı (bu sənəd)
4. Quraşdırma və Quraşdırma
Follow these steps for proper component installation.
4.1. İşin hazırlanması
Before installing components, remove the side panels. The Aquarius Mesh case typically features a tempered glass side panel and a solid metal panel.
- Locate the thumbscrews on the rear of the case securing the side panels.
- Unscrew the thumbscrews and carefully slide the panels backward, then lift them off.

Şəkil 1: Ön və yan view of the darkFlash Aquarius Mesh case. Note the mesh front panel and tempered glass side panel.

Şəkil 2: Arxa view of the darkFlash Aquarius Mesh case, showing expansion slots and rear fan mount.
4.2. Ana platanın quraşdırılması
The Aquarius Mesh supports ATX, Micro-ATX, and Mini-ITX motherboards.
- Install the I/O shield into the cutout at the rear of the case.
- Align your motherboard with the pre-installed standoffs. Ensure the I/O ports align with the I/O shield.
- Ana platanı aksesuar qutusundan müvafiq vintlərlə bərkidin.
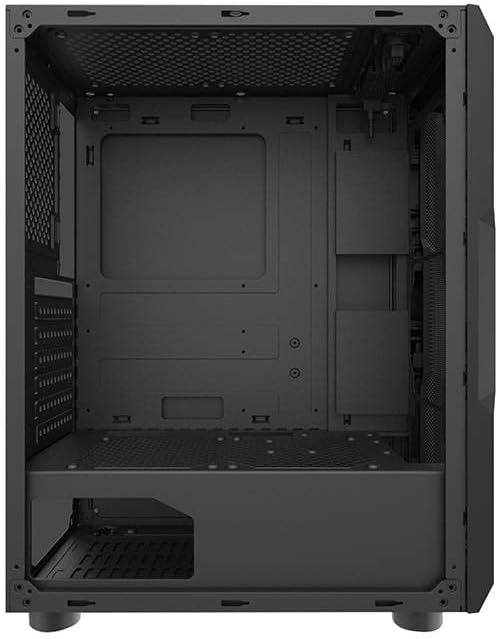
Şəkil 3: Daxili view of the darkFlash Aquarius Mesh case, highlighting the motherboard tray and cable routing options.
4.3. Enerji təchizatı blokunun (PSU) quraşdırılması
The PSU mounts at the bottom rear of the case.
- Slide the PSU into its designated compartment from the rear of the case.
- Align the screw holes and secure the PSU with screws.
4.4. Saxlama Diskinin Quraşdırılması
The case provides mounting options for 3.5-inch HDDs and 2.5-inch SSDs.
- 3.5 düymlük sərt disklər: Locate the drive cage usually beneath the PSU shroud or behind the motherboard tray. Slide the HDD into the bay and secure it with screws.
- 2.5 düymlük SSD-lər: Mount SSDs to dedicated brackets behind the motherboard tray or on the PSU shroud. Secure with screws.

Şəkil 4: Arxa salon view of the darkFlash Aquarius Mesh case, showing the motherboard cutout and potential SSD mounting points.
4.5. Expansion Card Installation (e.g., GPU)
- Korpusun arxa hissəsindən lazımi genişləndirmə yuvası örtüklərini çıxarın.
- Insert the expansion card into the appropriate PCIe slot on the motherboard.
- Secure the card with the provided screws or retention clips.
4.6. Kabel idarəetməsi
Utilize the cable routing cutouts and tie-down points behind the motherboard tray to organize cables. This improves airflow and aesthetics.
4.7. Reassembling the Case
Once all components are installed and cables are managed:
- Carefully reattach the side panels, ensuring they slide into place correctly.
- Secure the side panels with the thumbscrews.
5. Əməliyyat Təlimatları
After assembly, connect your peripherals and power cable.
- Connect your monitor, keyboard, mouse, and other peripherals to the motherboard's I/O ports.
- Elektrik kabelini PSU və divar rozetkasına qoşun.
- Press the power button located on the top panel of the case to start your computer.

Şəkil 5: Üst view of the darkFlash Aquarius Mesh case, showing the front I/O panel with power button, reset button, USB ports, and audio jacks.
6. Baxım
Kompüterinizin komponentlərinin müntəzəm texniki xidməti onların optimal işləməsini və uzunömürlülüyünü təmin etməyə kömək edir.
- Toz Filtrləri: The Aquarius Mesh case features removable dust filters (e.g., on the front, top, and bottom). Regularly remove and clean these filters with water and mild soap, or by vacuuming, to maintain good airflow. Ensure they are completely dry before reinstallation.
- Daxili Təmizlik: Periodically open the case and use compressed air to remove dust buildup from fans, heatsinks, and other components.
- Xarici Təmizlik: Xarici səthləri yumşaq bir parça ilə silin, damp parça. Sərt kimyəvi maddələrdən çəkinin.
7. Giderme
Problemlərlə qarşılaşsanız, aşağıdakı ümumi həlləri nəzərdən keçirin:
- Güc yoxdur:
- PSU açarının 'ON' vəziyyətində olduğundan əmin olun.
- Anakart və komponentlərə qoşulan bütün güc əlaqələrini yoxlayın.
- Verify the power cable is securely plugged into the wall outlet and PSU.
- Fırlanmayan azarkeşlər:
- Check fan connections to the motherboard or fan controller.
- Ensure fans are not obstructed by cables or dust.
- Ön Panel Giriş/Çıxış İşləmir:
- Verify that the front panel connectors (USB, audio, power/reset switches) are correctly connected to the motherboard headers. Refer to your motherboard manual for header locations.
8. Spesifikasiyalar
| Xüsusiyyət | Detal |
|---|---|
| Brend | darkFlash |
| Model nömrəsi | Aquarius Mesh |
| Case Tipi | Orta Qüllə |
| Material | Alaşımlı Polad |
| Rəng | Qara |
| Soyutma üsulu | Hava |
| Tövsiyə olunan istifadə | Kompüter |
| Hard Drive Form Factor | 3.5 düym |
9. Zəmanət və Dəstək
For warranty information or technical support, please refer to the official darkFlash websaytına daxil olun və ya müştəri xidmətləri ilə əlaqə saxlayın. Zəmanət iddiaları üçün satınalma sübutunuzu saxlayın.
Əlavə yardım üçün müraciət edə bilərsiniz darkFlash official websayt.