
1. Giriş
This manual provides comprehensive instructions for the Vrabocry LM091 RGBCCT 4 Zone Touch RF Remote Control. This remote is designed to control RGBCCT LED strips and bulbs, offering intuitive control over color, brightness, and color temperature. Please read this manual thoroughly before use to ensure proper operation and to maximize the product's lifespan.
2. Məhsul bitdiview
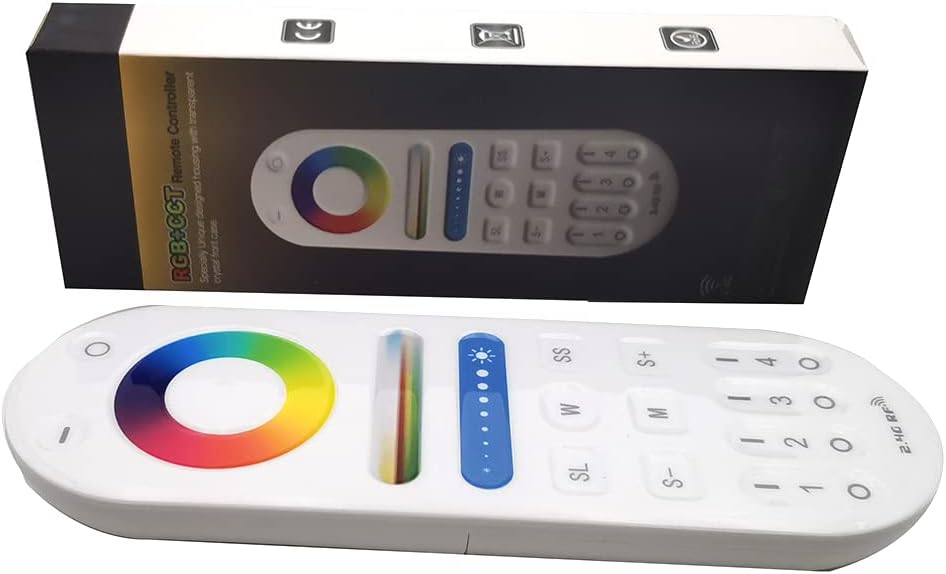
Image 1: The Vrabocry LM091 RGBCCT remote control shown alongside its product packaging.
2.1 Əsas Xüsusiyyətlər
- RGBCCT Control: Capable of controlling RGBCCT 6-pin (V+, R, G, B, WW, CW) LED strips and bulbs.
- 4 Zonalı Nəzarət: Manage up to four distinct lighting zones independently or simultaneously.
- Touch Color Ring: Intuitive color selection via a sensitive touch color ring.
- Brightness and Color Temperature Adjustment: Fine-tune lighting intensity and white light temperature (warm white to cool white).
- 2.4GHz RF Transmission: Reliable wireless control with a range of up to 98 feet (30 meters).
- Uyğunluq: Works with various Mi-Boxer/Mi-Light RGBCCT series controllers such as WL5, LS2, FUT045, FUT039, and others.
- Erqonomik Dizayn: Tutmaq və idarə etmək rahatdır.
2.2 Uzaqdan İdarəetmə Düzəldicisi

Şəkil 2: Ön view of the LM091 remote control, showing the touch color ring, brightness slider, and various control buttons.
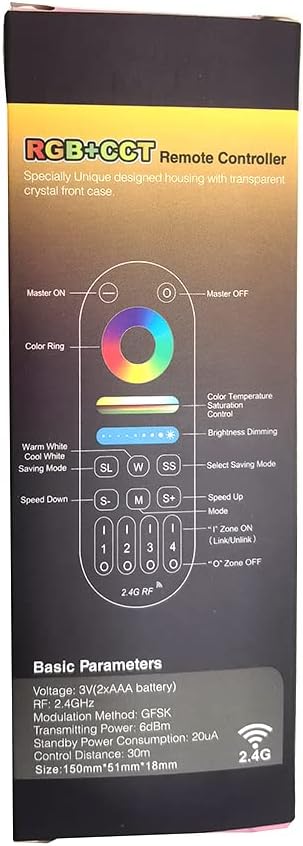
Image 3: A detailed diagram illustrating the functions of each button on the LM091 remote control, as depicted on its packaging.
3. Quraşdırma
3.1 Batareyanın quraşdırılması
- Pultun arxasındakı batareya bölməsinin qapağını tapın.
- Qapağı sürüşdürərək açın.
- Düzgün qütblüyü (+ və -) təmin edərək iki AAA batareyası taxın.
- Batareya bölməsinin qapağını dəyişdirin.

Image 4: The back of the LM091 remote control with the battery compartment open, showing where to insert AAA batteries.
3.2 Uzaqdan idarəetmənin qoşalaşdırılması
To control your LED lights, the remote control must be paired with a compatible RGBCCT controller (e.g., Mi-Boxer/Mi-Light series). The pairing process typically involves the following steps:
- Ensure your LED controller is powered off.
- Power on the LED controller. Within 3 seconds of powering on, press the desired zone number button (1, 2, 3, or 4) on the LM091 remote control three times.
- The connected LED lights should flash three times to indicate successful pairing.
- If pairing fails, power off the controller and repeat the process.
Cütlənmə: To unpair, power on the LED controller. Within 3 seconds, press the desired zone number button five times. The lights should flash six times to confirm unpairing.
4. Əməliyyat Təlimatları
The LM091 remote control allows for precise adjustment of your RGBCCT LED lighting. Refer to Image 3 for button identification.
- Master ON/OFF: Press the 'Master ON' button (top right) to turn all paired lights on. Press the 'Master OFF' button (top left) to turn all paired lights off.
- Zona seçimi: Press buttons '1', '2', '3', or '4' to select a specific lighting zone. Once a zone is selected, all subsequent commands will apply only to that zone. To control all zones simultaneously, press the 'Master ON' button.
- Rəng Üzük: Touch the color ring to select any static color.
- Rəng Temperaturuna Nəzarət: Use the 'W' (Warm White) and 'SS' (Cool White) buttons to adjust the color temperature of the white light. This function requires a CCT (Dual White) 3-wire LED strip (V+, WW, CW) or an RGBCCT strip.
- Parlaqlığın Qaralması: Use the brightness slider to increase or decrease the light intensity. The 'S+' and 'S-' buttons can also be used for fine-tuning brightness.
- Mode Selection (M): Press the 'M' button to cycle through various dynamic lighting modes.
- Speed Adjustment (S+/S-): When a dynamic mode is active, use the 'S+' and 'S-' buttons to increase or decrease the speed of the mode.
- Saving Mode (SL): The 'SL' button may be used to save or recall custom lighting settings, depending on the connected controller's capabilities.
5. Baxım
- Təmizləmə: Pultu yumşaq, quru parça ilə silin. Aşındırıcı təmizləyicilərdən və ya həlledicilərdən istifadə etməyin.
- Batareyanın dəyişdirilməsi: Replace batteries when the remote's response becomes sluggish or inconsistent. Always use new AAA batteries and dispose of old batteries responsibly.
- Yaddaş: Pultu quru yerdə, birbaşa günəş işığından və həddindən artıq temperaturdan uzaqda saxlayın.
6. Giderme
| Problem | Mümkün Səbəb | Həll |
|---|---|---|
| Uzaqdan cavab vermir | Low or dead batteries. Remote is out of range. Not paired correctly. | Replace batteries. Move closer to the LED controller. Re-pair the remote control with the LED controller (refer to Section 3.2). |
| Lights not changing color/brightness | Incorrect zone selected. Controller not compatible with RGBCCT. | Ensure the correct zone is selected or press 'Master ON'. Verify that your LED controller and strip are RGBCCT compatible. |
| Color temperature adjustment not working | LED strip is not CCT or RGBCCT. | This function requires a CCT (Dual White) 3-wire LED strip (V+, WW, CW) or an RGBCCT strip. Ensure your strip supports this feature. |
7. Spesifikasiyalar
- Model: LM091
- Cildtage: 3V (2 x AAA Batteries)
- Transmissiya Tezliyi: 2.4 GHz
- Modulyasiya metodu: GFSK
- Ötürmə Gücü: 6dBm
- Gözləmə rejimində enerji istehlakı: 20uA
- Nəzarət məsafəsi: 98 fut (30 metr) qədər
- İşləmə temperaturu: -20°C - 60°C (-4°F - 140°F)
- Dəstəklənən Cihazların Maks. Sayı: 1 (per remote, but one controller can be controlled by four remotes)
- Düymələrin sayı: 4 (zone buttons) + other control buttons
- Nəzarətçi növü: Remote control, Touch
8. Zəmanət və Dəstək
For warranty information and technical support, please refer to the documentation provided with your purchase or contact Vrabocry customer service through the retailer where the product was purchased. Keep your proof of purchase for any warranty claims.