
Giriş
This manual provides detailed instructions for the installation, operation, and maintenance of the IXITAB STC-3008, STC-3018, and STC-3028 series of digital temperature and humidity controllers. These devices are designed for precise control in various applications, including aquariums, terrariums, incubators, and industrial temperature/humidity control systems.
Məhsul Variantları
- STC-3008: Dual Digital Temperature Controller with two temperature probes.
- STC-3018: Dual Digital Temperature Controller with two temperature probes.
- STC-3028: Digital Temperature and Humidity Controller with one combined temperature and humidity sensor.
Əsas Xüsusiyyətlər
- Dual display for simultaneous monitoring of two temperatures or temperature and humidity.
- Two independent relay outputs for controlling heating/cooling or humidification/dehumidification devices.
- Wide range of power supply options (AC 110V/220V, DC 12V/24V) depending on the model.
- High precision sensors for accurate readings.
- User-friendly interface for setting parameters.
Təhlükəsizlik tədbirləri
To ensure safe operation and prevent damage to the device, please observe the following precautions:
- Hər hansı bir naqil çəkmədən və ya təmirdən əvvəl həmişə elektrik enerjisini ayırın.
- Enerji təchizatı voltage matches the requirements of your specific controller model.
- Strictly distinguish the interface of the relay, sensor, and power connections to avoid short circuits or damage.
- Bütün naqillərin etibarlı və düzgün izolyasiya edildiyinə əmin olun.
- Keep the sensor and power wires separate and maintain a proper distance to prevent interference.
- Cihazı suya və ya həddindən artıq nəmə məruz qoymayın.
 Şəkil: Üst view of the STC-3018 controller showing the display, buttons, and a label with wiring instructions and safety notes. The label indicates power supply options (110-220VAC, 12V, 24V) and relay outputs (10A/220VAC). A temperature probe is connected to the device.
Məhsul Bitdiview
Komponentlər
- Main Controller Unit (with digital displays and control buttons)
- Temperature Sensor (for STC-3008/3018 models)
- Temperature and Humidity Sensor (for STC-3028 model)
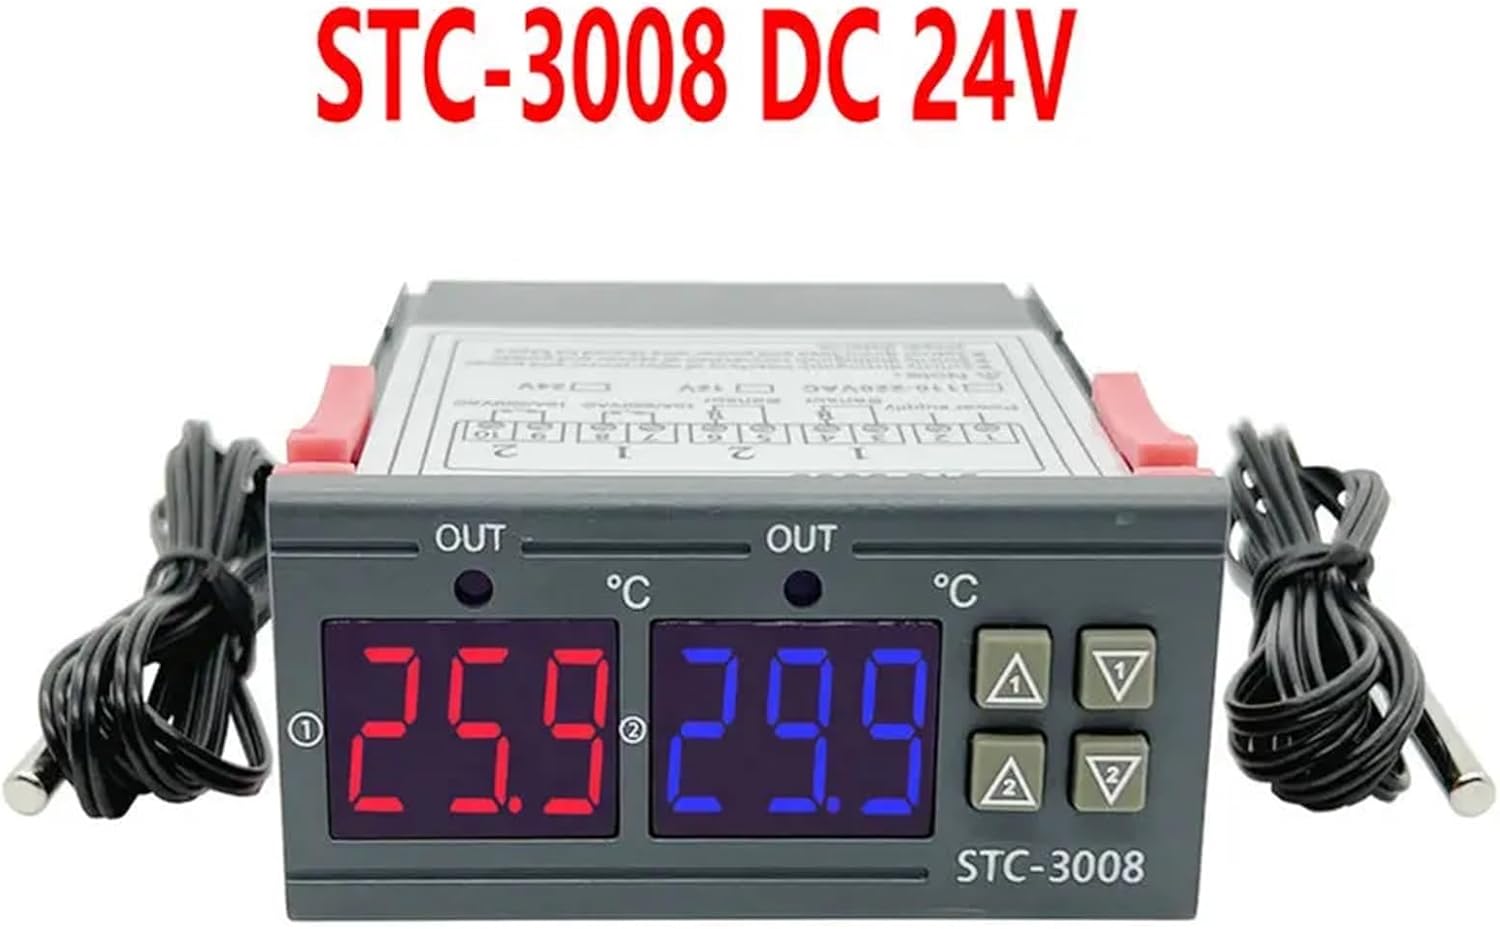 Şəkil: Ön view of the STC-3008 DC 24V model, featuring two digital displays (red and blue) showing temperature readings, and two connected temperature probes. The model name "STC-3008" is visible on the front panel.
 Image: A collage showing three different models: STC-3018 (top left), STC-3008 (top right and bottom left), and STC-3028 (bottom right). Each model is shown with its respective sensor, highlighting the visual differences and sensor types (temperature probe for 3008/3018, combined temperature/humidity sensor for 3028).
 Şəkil: Yaxın plan view of the STC-3028 model, showcasing its dual digital display for temperature and humidity, along with the connected combined temperature and humidity sensor.
Spesifikasiyalar
| Parametr | Dəyər |
|---|---|
| Model | STC-3008, STC-3018, STC-3028 |
| Enerji təchizatı | AC 110V/220V, DC 12V/24V (model dependent) |
| Temperatur Ölçmə Aralığı | -50°C - 110°C (-58°F - 230°F) |
| Humidity Measurement Range (STC-3028) | 0% RH - 99% RH |
| Output Relay Capacity | 10A/220VAC |
| Sensor növü | NTC sensor (temperature), integrated sensor (humidity for STC-3028) |
| Ölçülər | Approx. 1.18 x 0.79 x 0.39 inches (main unit) |
| Maddə Çəkisi | təqribən. 1.76 unsiya |
| Mənşə ölkəsi | Çin |
Quraşdırma və naqillər
Əhəmiyyətli: Ensure power is disconnected before performing any wiring to prevent electric shock or damage to the device.
Naqil diaqramı
 Image: Detailed wiring diagram for the STC-3018 model. It illustrates connections for power supply (110V/AC220V, 12V, 24V), two sensor inputs, and two relay outputs (10A/220VAC). Examples of connected loads like a refrigerator, fan, and water heater are shown.
Kablolama addımları
- Enerji təchizatı: Connect the appropriate power supply (AC 110V/220V or DC 12V/24V) to terminals 1 and 2. Verify that the voltage matches your specific controller model.
- Sensorlar: Connect the temperature sensors to terminals 3 and 4, and 5 and 6 (for STC-3008/3018). For the STC-3028, connect the combined temperature/humidity sensor to its designated terminals.
- Çıxış releləri: Connect your heating/cooling or humidification/dehumidification devices to terminals 7 and 8 (Relay 1) and 9 and 10 (Relay 2). These are dry contacts, meaning they act as switches, and your load will require its own power source.
- Montaj: The controller is designed for panel mounting. Insert the unit into a suitable cutout and secure it using the integrated clips on the sides.
Əməliyyat Təlimatları
Düymə funksiyaları
- Set düyməsi: Parametr təyinetmə rejiminə daxil olmaq və seçimləri təsdiqləmək üçün istifadə olunur.
- Yuxarı (▲) Düyməsi: Increases values, navigates through menu options.
- Aşağı (▼) Düyməsi: Decreases values, navigates through menu options.
- Rst Button: üçün qısa basın view current settings; long press (3 seconds) to reset to factory default settings.
Temperature/Humidity Setting
 Image: A visual guide demonstrating the temperature and humidity setting process on the STC-3028 model. It shows how to set starting and stopping values for both temperature (heating/cooling) and humidity (humidification/dehumidification) using the control buttons.
- Setting Starting Temperature/Humidity: uzun basın Yuxarı (▲) button for 3 seconds. The starting value on the display will flash. Use the Yuxarı (▲) or Aşağı (▼) buttons to adjust to your desired starting value. Press the Set təsdiq etmək və çıxmaq üçün düymə.
- Setting Stopping Temperature/Humidity: uzun basın Aşağı (▼) button for 3 seconds. The stopping value on the display will flash. Use the Yuxarı (▲) or Aşağı (▼) buttons to adjust to your desired stopping value. Press the Set təsdiq etmək və çıxmaq üçün düymə.
- Zavod parametrlərinə yenidən qurun: uzun basın Rst button for 3 seconds until the display shows "888" or similar indication of reset.
The controller will automatically activate or deactivate the connected relays based on the set starting and stopping values to maintain the desired temperature or humidity range. For temperature control, if the starting temperature is lower than the stopping temperature, it operates in heating mode. If the starting temperature is higher than the stopping temperature, it operates in cooling mode. Similar logic applies to humidity control for humidification/dehumidification.
Baxım
Proper maintenance ensures the longevity and accuracy of your controller:
- Cihazı təmiz və toz və zibildən təmiz saxlayın. Təmizləmək üçün yumşaq, quru bir parça istifadə edin.
- Həddindən artıq istiləşmənin qarşısını almaq üçün cihazın ətrafında adekvat havalandırma təmin edin.
- Bütün naqil birləşmələrinin etibarlı və korroziyadan azad olduğundan əmin olmaq üçün vaxtaşırı yoxlayın.
- Avoid exposing the unit or sensors to extreme temperatures, high humidity, or corrosive environments outside their specified operating ranges.
- Do not attempt to disassemble the unit beyond what is described in this manual.
Problemlərin aradan qaldırılması
If you encounter issues with your controller, refer to the table below for common problems and solutions:
| Problem | Mümkün Səbəb | Həll |
|---|---|---|
| Ekran işləmir | No power, incorrect wiring, faulty unit. | Check power supply connections. Verify wiring against the diagram. If problem persists, contact support. |
| Relay not switching | Incorrect temperature/humidity settings, faulty relay, load issue. | Review your set starting and stopping values. Check the wiring to the load device. Test the load device independently. |
| Səhv oxunuşlar | Sensor damaged, sensor not properly placed, environmental interference. | Inspect sensor for physical damage. Ensure sensor is in the correct environment and not obstructed. Avoid placing sensor near heat sources or drafts. |
| "LLL" or "HHH" on display | Sensor open circuit (LLL) or short circuit (HHH). | Check sensor connection for looseness or damage. Replace sensor if it appears faulty. |
| Display shows "--- " | Sensor not connected or faulty. | Ensure sensor is securely connected. Replace sensor if necessary. |
Zəmanət və Dəstək
For warranty information or technical support regarding your IXITAB STC-3008, STC-3018, or STC-3028 controller, please refer to the documentation provided with your product at the time of purchase or contact IXITAB customer service through the platform where you purchased the item.
When contacting support, please be prepared to provide your product model number (STC-3008, STC-3018, or STC-3028) and details of your purchase.