
1. Giriş
This manual provides detailed instructions for the setup, operation, and maintenance of your Raynic CR1029 Digital Date Clock. Please read this manual thoroughly before using the device to ensure proper functionality and to maximize your user experience. This clock is designed to display time, date, and day of the week clearly, offering various customization options for alarms, reminders, and display themes.
2. Paketin məzmunu
Bütün əşyaların paketinizdə olduğunu yoxlayın:
- Raynic CR1029 Digital Date Clock
- AC Güc Adapteri
- USB kabel
- İstifadəçi Təlimatı (bu sənəd)

Image: The Raynic CR1029 Digital Date Clock, AC power adapter, USB cable, and user manual are shown as included items.
3. Məhsul bitdiview
The Raynic CR1029 Digital Date Clock features a clear display and multiple functions to assist with daily time management and reminders.

Image: A white-framed digital clock displaying 'TUESDAY LATE EVENING 8:30 PM OCTOBER 7 2025' with a moon icon, indicating its primary function as a date and time display.
Əsas Xüsusiyyətlər:
- Çoxfunksiyalı Ekran: Combines time-keeping and date tracking.
- Aydın Oxunma: Large, easy-to-read digital display.
- Özelleştirilebilir Mövzular: 12 distinct display themes to personalize the clock's appearance.
- Extensive Alarms: Up to 20 programmable alarms with 18 customizable ringtones.
- Schedule Reminders: Up to 20 customizable reminders for various daily tasks.
- Semi-Automatic Dimming: Adjusts brightness based on ambient light or user-defined time periods.
- Vaxt formatları: Supports 12-hour and 24-hour time display.
- Avtomatik DST: Yaz saatına avtomatik uyğunlaşır.
- Çoxdilli Dəstək: Available in 6 languages (English, French, Italian, German, Spanish, Japanese).
- Digital Photo Frame Function: Displays personal photos via USB or TF card.
- Batareya ehtiyat nüsxəsi: Maintains settings during power outages (batteries not included).
4. Quraşdırma
4.1 Cihazı işə salmaq
- Connect the USB cable to the clock's power input port.
- AC güc adapterini standart elektrik rozetkasına qoşun.
- The clock will power on automatically.

Image: The clock is shown connected to an AC power outlet, illustrating its primary power source. Another image shows the battery compartment on the back, indicating the option for battery backup.
4.2 Installing Battery Backup (Optional)
Elektrik təchizatı zamanı fasiləsiz işləmək üçüntages, ehtiyat batareyaları quraşdırın.
- Saatın arxasındakı batareya bölməsini tapın.
- Bölmənin qapağını açın.
- Düzgün qütblüyü (+/-) təmin edərək iki AAA batareya (daxil deyil) daxil edin.
- Batareya bölməsinin qapağını bağlayın.
5. Əməliyyat Təlimatları
Saat arxa tərəfdəki düymələrdən və ya daxil olan pultdan istifadə etməklə idarə edilə bilər.
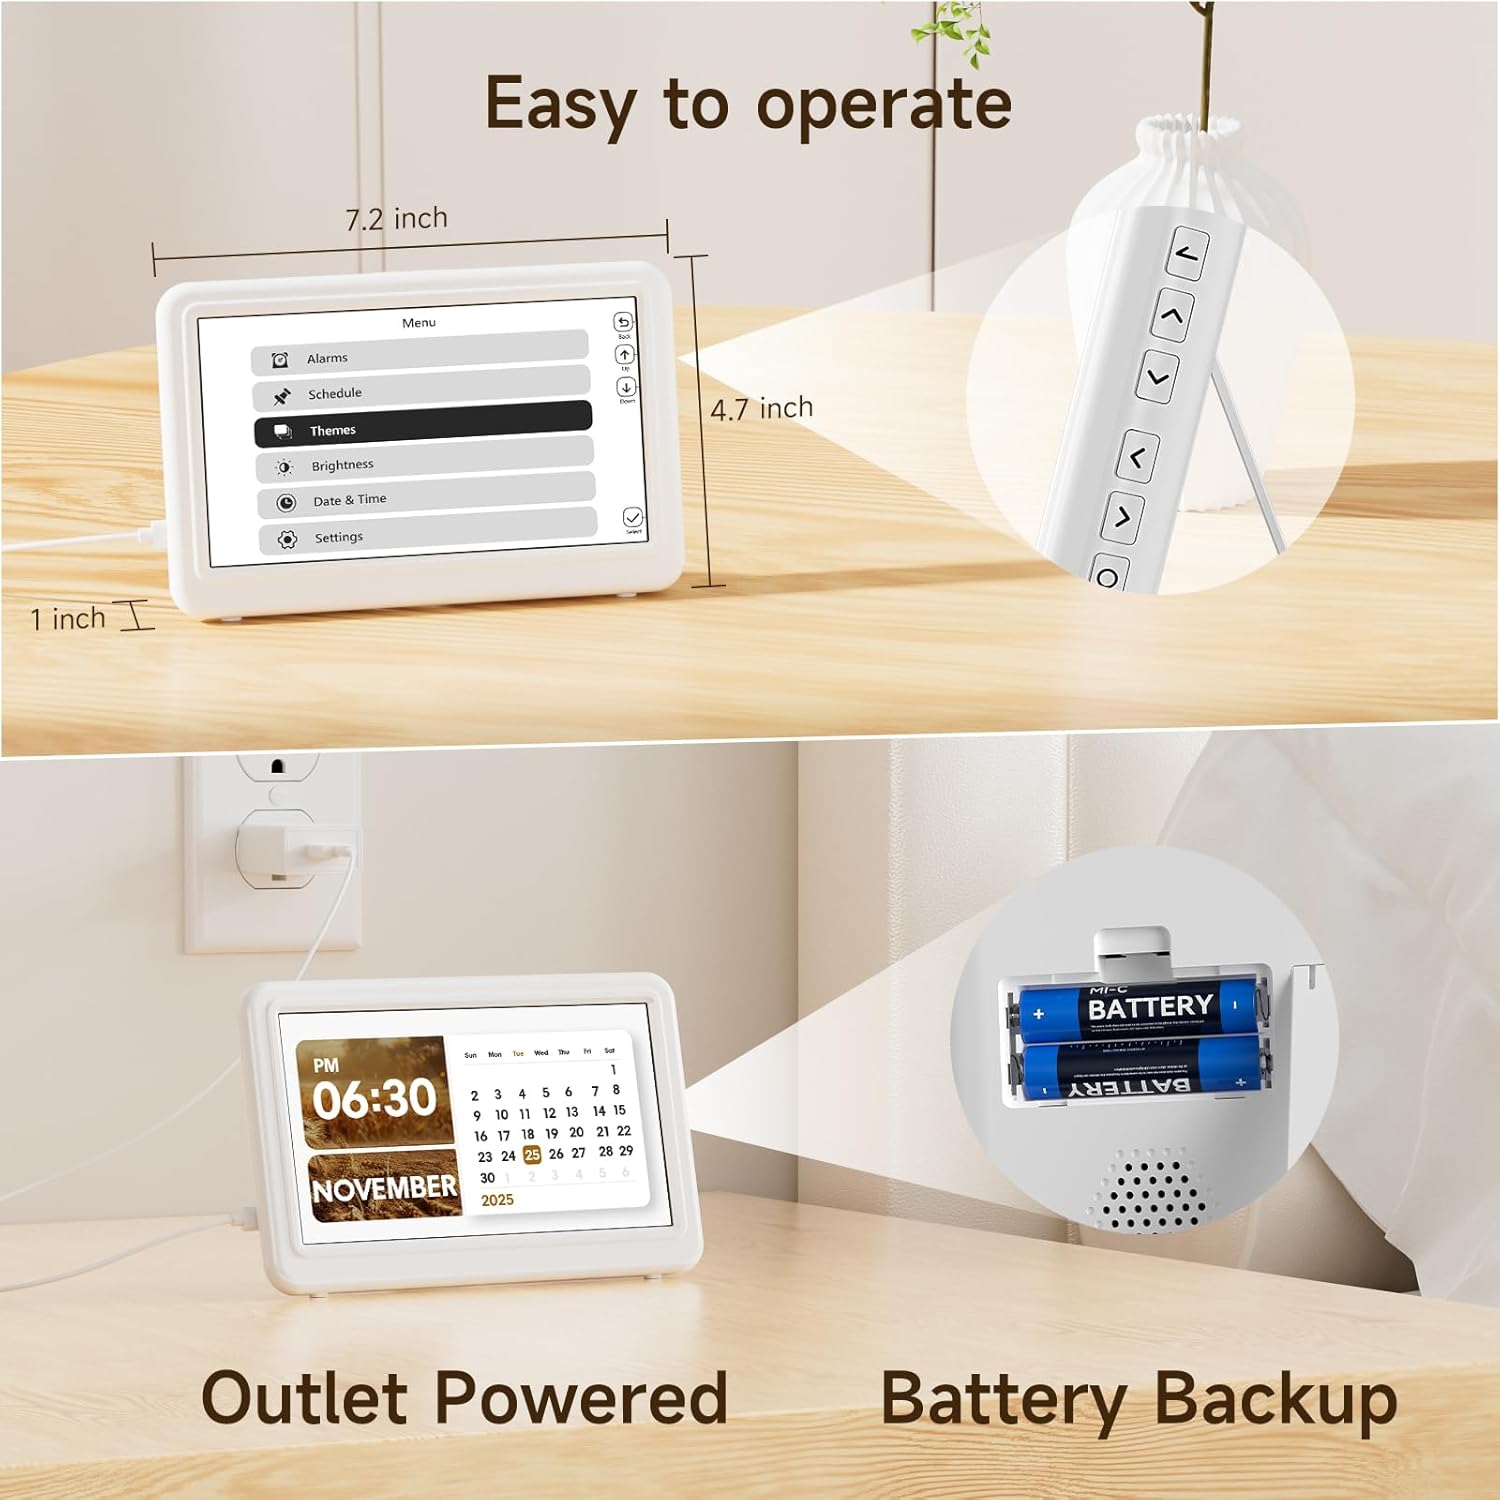
Image: The Raynic clock is shown with its remote control, highlighting its ease of operation. Dimensions of the clock (7.2 inches wide, 4.7 inches high, 1 inch thick) are also indicated.
5.1 Vaxt və Tarixin qurulması
- Access the 'Date & Time' settings from the main menu.
- Use the navigation buttons on the remote or back of the clock to adjust hours, minutes, year, month, and day.
- Confirm each setting to save.
5.2 Managing Alarms
The clock supports up to 20 alarms.
- Navigate to the 'Alarms' section in the menu.
- Select 'Add new alarm' or choose an existing alarm to edit.
- Set the alarm time, recurrence (e.g., daily, weekdays), and desired ringtone from 18 available options.
- Zəruri hallarda həyəcan siqnalını aktivləşdirin və ya söndürün.

Image: A person is shown sleeping peacefully, while the Raynic clock displays an alarm setting interface, indicating its alarm functionality with up to 20 settings and various ringtones.
5.3 Setting Reminders
The clock supports up to 20 reminders for various activities.
- Go to the 'Schedule' or 'Reminders' menu.
- Select 'Add new reminder' and input the reminder text, time, and frequency.
- Confirm to save the reminder.
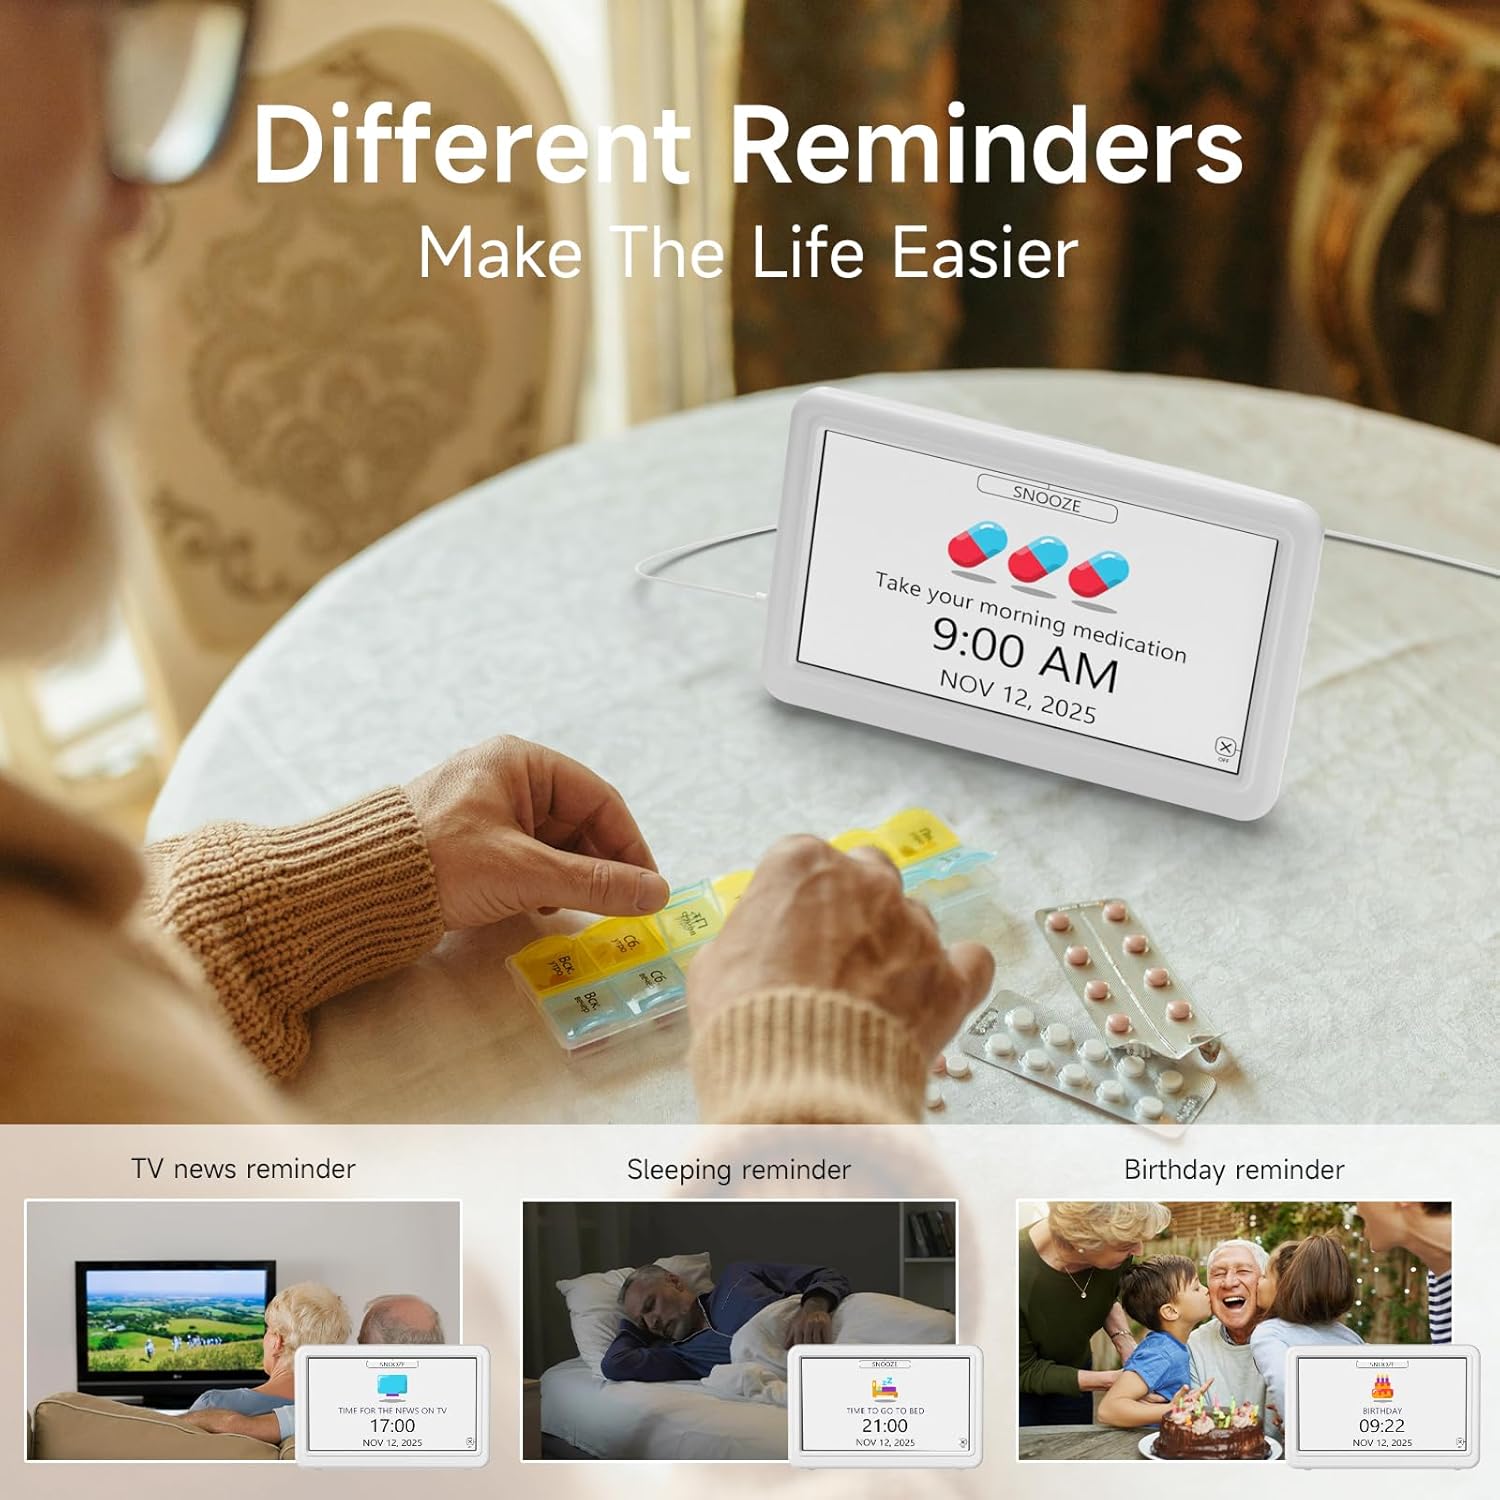
Image: The clock displays a 'Take your morning medication' reminder. Surrounding images depict various reminder use cases such as TV news, sleeping, and birthday reminders, emphasizing the clock's utility for daily scheduling.
5.4 Ekran Mövzularının Dəyişdirilməsi
Choose from 12 different display themes to customize the clock's appearance.
- Access the 'Themes' option in the menu.
- Browse through the available themes using the navigation buttons.
- Select your preferred theme to apply it.

Image: The Raynic clock is shown with a 'THURSDAY MORNING 10:30 AM DECEMBER 25 2025' display. Above it, 12 different display themes are previewed, including Minimalist, Urban Tempo, Round Dial, Seasonal Calendar, Time Album, and Dynamic Prompts.
5.5 Parlaqlığın tənzimlənməsi
The clock features semi-automatic dimming and 10 levels of manual brightness adjustment.
- Go to the 'Brightness' settings in the menu.
- You can choose between automatic dimming (default 7:00 AM-7:00 PM for day, 7:00 PM-7:00 AM for night) or manual adjustment.
- For manual adjustment, select a brightness level from 10% to 100%.

Image: A slider indicates 10 levels of brightness from 10% to 100%. The clock is shown in two states: a bright display for daytime (7:00 AM-7:00 PM) and a dimmer display for nighttime (7:00 PM-7:00 AM), illustrating the semi-automatic dimming feature.
5.6 Setting 12/24 Hour Format and Auto DST
- In the 'Date & Time' or 'Settings' menu, locate the option for 'Time Format'.
- Select either '12H' or '24H' as preferred.
- Ensure 'Auto DST' is enabled for automatic Daylight Saving Time adjustments.

Image: Three clocks are displayed side-by-side, showing '1:30 PM' (12H format), '13:30' (24H format), and '14:30' with 'DST' indicated, demonstrating the clock's ability to switch between time formats and handle Daylight Saving Time.
5.7 Dil seçimi
The clock supports 6 languages.
- Navigate to 'Settings' and then 'Language'.
- Choose from English, French, Italian, German, Spanish, or Japanese.

Image: Flags representing English, French, Italian, German, Spanish, and Japanese are displayed, indicating the clock's multi-language support. The clock itself shows 'THURSDAY NOON 12:00 PM DECEMBER 25 2025'.
5.8 Digital Photo Frame Function
The clock can display photos from a USB drive or TF card.
- Insert a USB drive or TF card containing image files təyin edilmiş limana daxil edin.
- Access the 'Time Album' or 'Photo Frame' option in the menu.
- Configure settings such as slideshow interval and display order.

Image: The Raynic clock displays a scenic landscape photo, demonstrating its digital photo frame capability. Icons for USB and TF card indicate supported media types.
5.9 One-Click Sleep Mode
To quickly turn off the display for undisturbed sleep:
- Press the dedicated 'Sleep' button on the remote control or the corresponding button on the back of the clock.
- The screen will turn off. Press any button to reactivate the display.

Image: The clock is shown displaying a photo, and an arrow indicates pressing a button to activate '1 Click Sleep Mode', which turns the screen black.
6. Baxım
To ensure the longevity and optimal performance of your Raynic Digital Date Clock, follow these maintenance guidelines:
- Təmizləmə: Use a soft, dry cloth to gently wipe the screen and body of the clock. Avoid abrasive cleaners or solvents that may damage the surface.
- Yerləşdirmə: Saatı sabit, düz bir səthə qoyun. Birbaşa günəş işığından, həddindən artıq temperaturdan və yüksək rütubətdən çəkinin.
- Güc: Always use the provided AC power adapter. If using battery backup, replace batteries annually or when low power is indicated.
7. Giderme
If you encounter issues with your Raynic Digital Date Clock, refer to the following common problems and solutions:
| Problem | Mümkün Səbəb | Həll |
|---|---|---|
| Saat işə düşmür. | Enerji təchizatı yoxdur və ya adapter nasazdır. | Ensure the AC adapter is securely plugged into both the clock and a working power outlet. Test the outlet with another device. |
| Ekran çox tutqun və ya çox parlaqdır. | Brightness settings incorrect or automatic dimming active. | Adjust brightness manually in the 'Brightness' settings. Check if 'Auto Dimming' is enabled and adjust its time periods if necessary. |
| Alarms or reminders do not sound. | Alarm/reminder disabled or volume too low. | Verify that the specific alarm/reminder is enabled in the settings. Check the system volume level. |
| Saat və ya tarix yanlışdır. | Manual setting error or DST issue. | Re-enter the correct time and date in the 'Date & Time' settings. Ensure 'Auto DST' is enabled if applicable to your region. |
| Digital photo frame not displaying images. | Səhv file format, unsupported media, or loose connection. | Ensure images are in a supported format (e.g., JPEG). Check that the USB drive or TF card is properly inserted. Try a different USB drive or TF card. |
8. Spesifikasiyalar
| Xüsusiyyət | Detal |
|---|---|
| Brend | Raynic |
| Model nömrəsi | CR1029 |
| Ekran növü | Rəqəmsal |
| Rəng | Ağ |
| Məhsul Ölçüləri | 14.01"W x 7.4"H |
| Maddə Çəkisi | 11.7 unsiya |
| Güc mənbəyi | AC Adapter Powered |
| Batareyanın ehtiyat nüsxəsi | Bəli (Batareyalar daxil deyil) |
| Material | Akrilonitril Butadien Stirol (ABS) |
| Montaj növü | Stolüstü |
| Xüsusi Xüsusiyyətlər | 12 Themes, 20 Alarms, 20 Reminders, Semi-Automatic Dimming, 12/24 Hours, Auto DST, Digital Photo Frame, Multi-Language Support |
9. Zəmanət və Dəstək
The Raynic CR1029 Digital Date Clock comes with a limited warranty. For specific warranty terms and conditions, please refer to the documentation included with your purchase or contact Raynic customer support.
For technical assistance, troubleshooting not covered in this manual, or other inquiries, please visit the official Raynic websaytına daxil olun və ya müştəri xidməti şöbəsi ilə əlaqə saxlayın.