1. Giriş
This manual provides comprehensive instructions for the installation, operation, and programming of the Elektrobock PT712 digital thermostat. Designed for precise control of underfloor heating systems, the PT712 offers advanced features to optimize comfort and energy efficiency in your home or office.
Please read this manual carefully before installation and use to ensure proper function and to prevent any damage to the device or heating system. Keep this manual for future reference.

Şəkil 1: Ön view of the Elektrobock PT712 Digital Thermostat, highlighting its clear display and European manufacturing origin.
2. Əsas Xüsusiyyətlər
The Elektrobock PT712 thermostat is equipped with several features designed for user convenience and efficient heating control:
- Böyük arxa işıqlı LCD displey: Provides clear visibility of temperature, time, and program settings.
- Programmable Weekly Schedule: Allows for 2 weekly programs with up to 6 temperature changes per day, offering flexible heating control.
- Adjustable Hysteresis: Customizable temperature differential from 0.1°C to 5°C for precise temperature management.
- İş rejimləri: Includes Auto, Manual, Off, and Holiday modes to suit various needs.
- Maximum Floor Temperature Limit: Prevents overheating of the floor.
- Tez temperatur tənzimlənməsi: Easily modify the desired temperature temporarily.
- Operating Hours Information: Tracks the total time the heating system has been active.
- Child Lock / Key Lock: Parametrlərdə icazəsiz dəyişikliklərin qarşısını alır.
- Güc Ehtiyatı: Integrated NiMH battery provides over 100 hours of power reserve during outages, maintaining settings.
- Asan Plug-in Quraşdırılması: Designed for straightforward setup.
- Eleqant Dizayn: Integrates seamlessly with modern interiors.
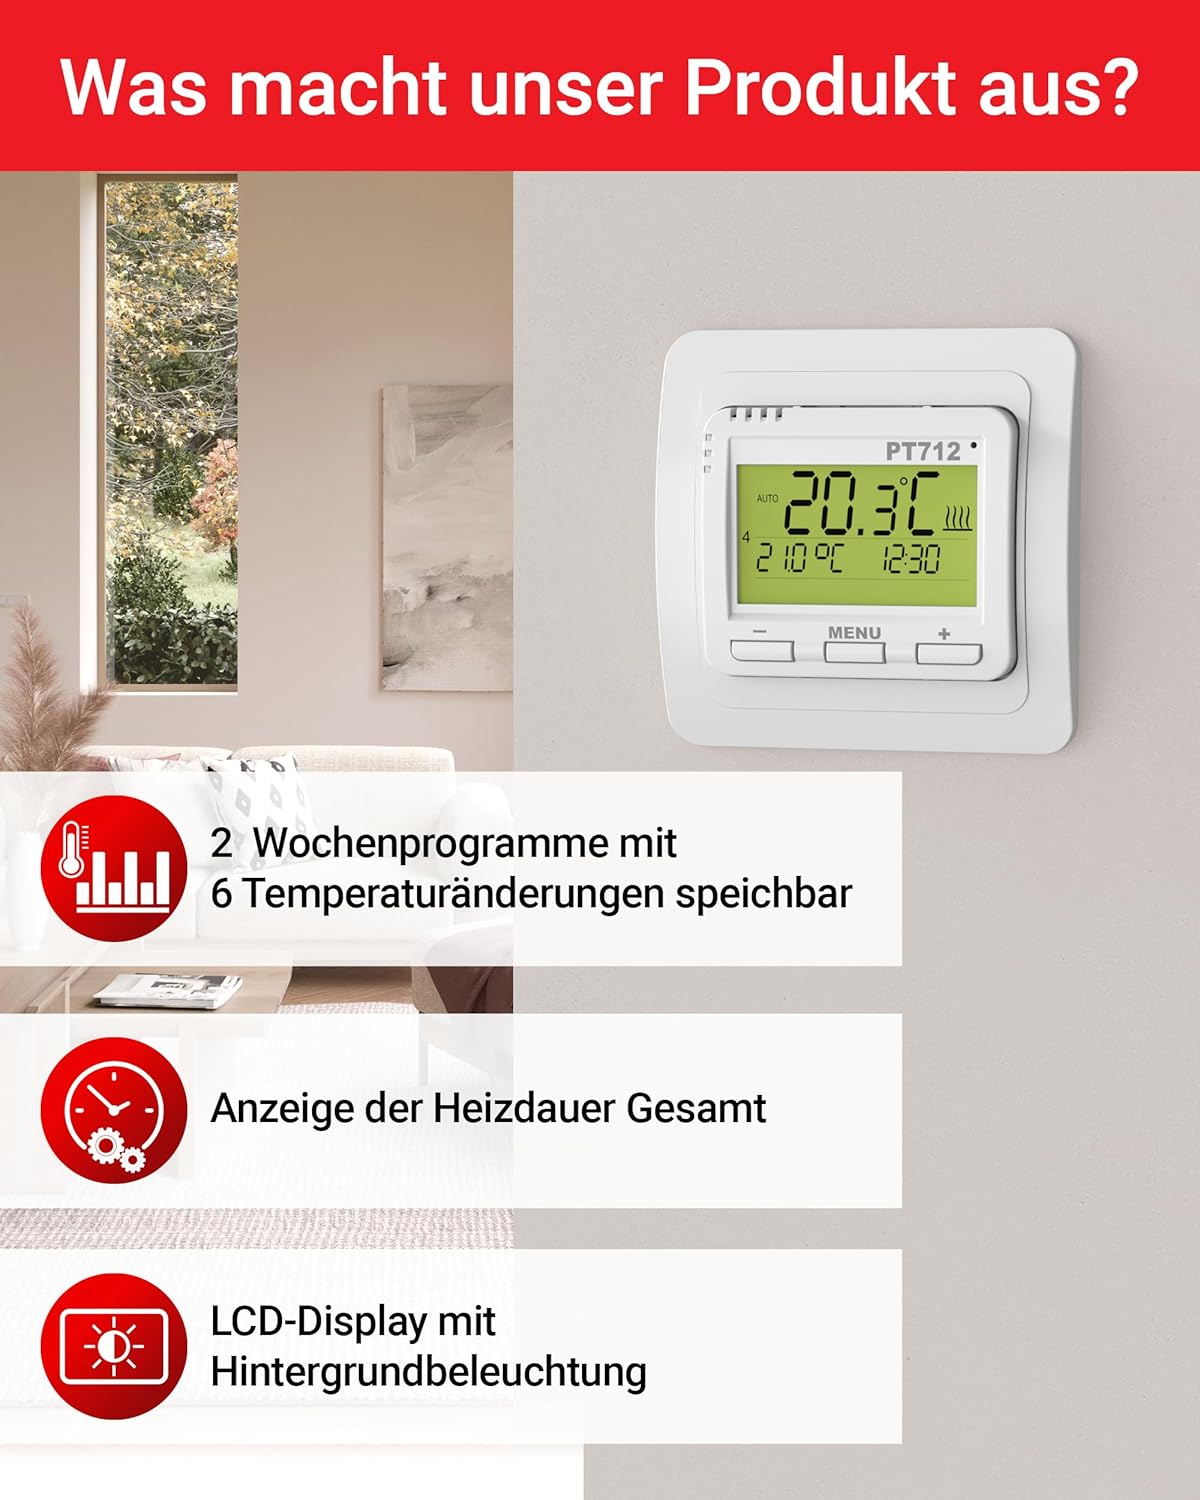
Figure 2: Visual representation of key features including programmable schedules and display characteristics.

Figure 3: Additional features such as external sensor compatibility, child lock, and hysteresis adjustment.
3. Texniki spesifikasiyalar
| Parametr | Dəyər |
|---|---|
| Enerji təchizatı | 230 V / 50 Hz |
| Number of Settable Temperatures | gündə 6 |
| Histerezis | 0.1 °C ilə 5 °C arasında |
| Minimum Programming Time | 10 dəqiqə |
| Temperatur Tənzimləmə Aralığı | 3 °C ilə 99.5 °C arasında |
| Temperaturun Tənzimlənməsi Addımı | 0.5 °C |
| Minimum Indication | 0.1 °C |
| Dəqiqlik | ± 0.5 °C |
| Power Reserve (NiMH) | 100 saatdan çox |
| Mühafizə sinfi | IP20 (free contacts) |
| Maksimum yük | 12 A, 2760 Vt |
| İşləmə temperaturu | 0 °C ilə 40 °C arasında |
| Ölçülər (U x G x Y) | 14 x 9 x 25 sm |
| Çəki | 160 qram |
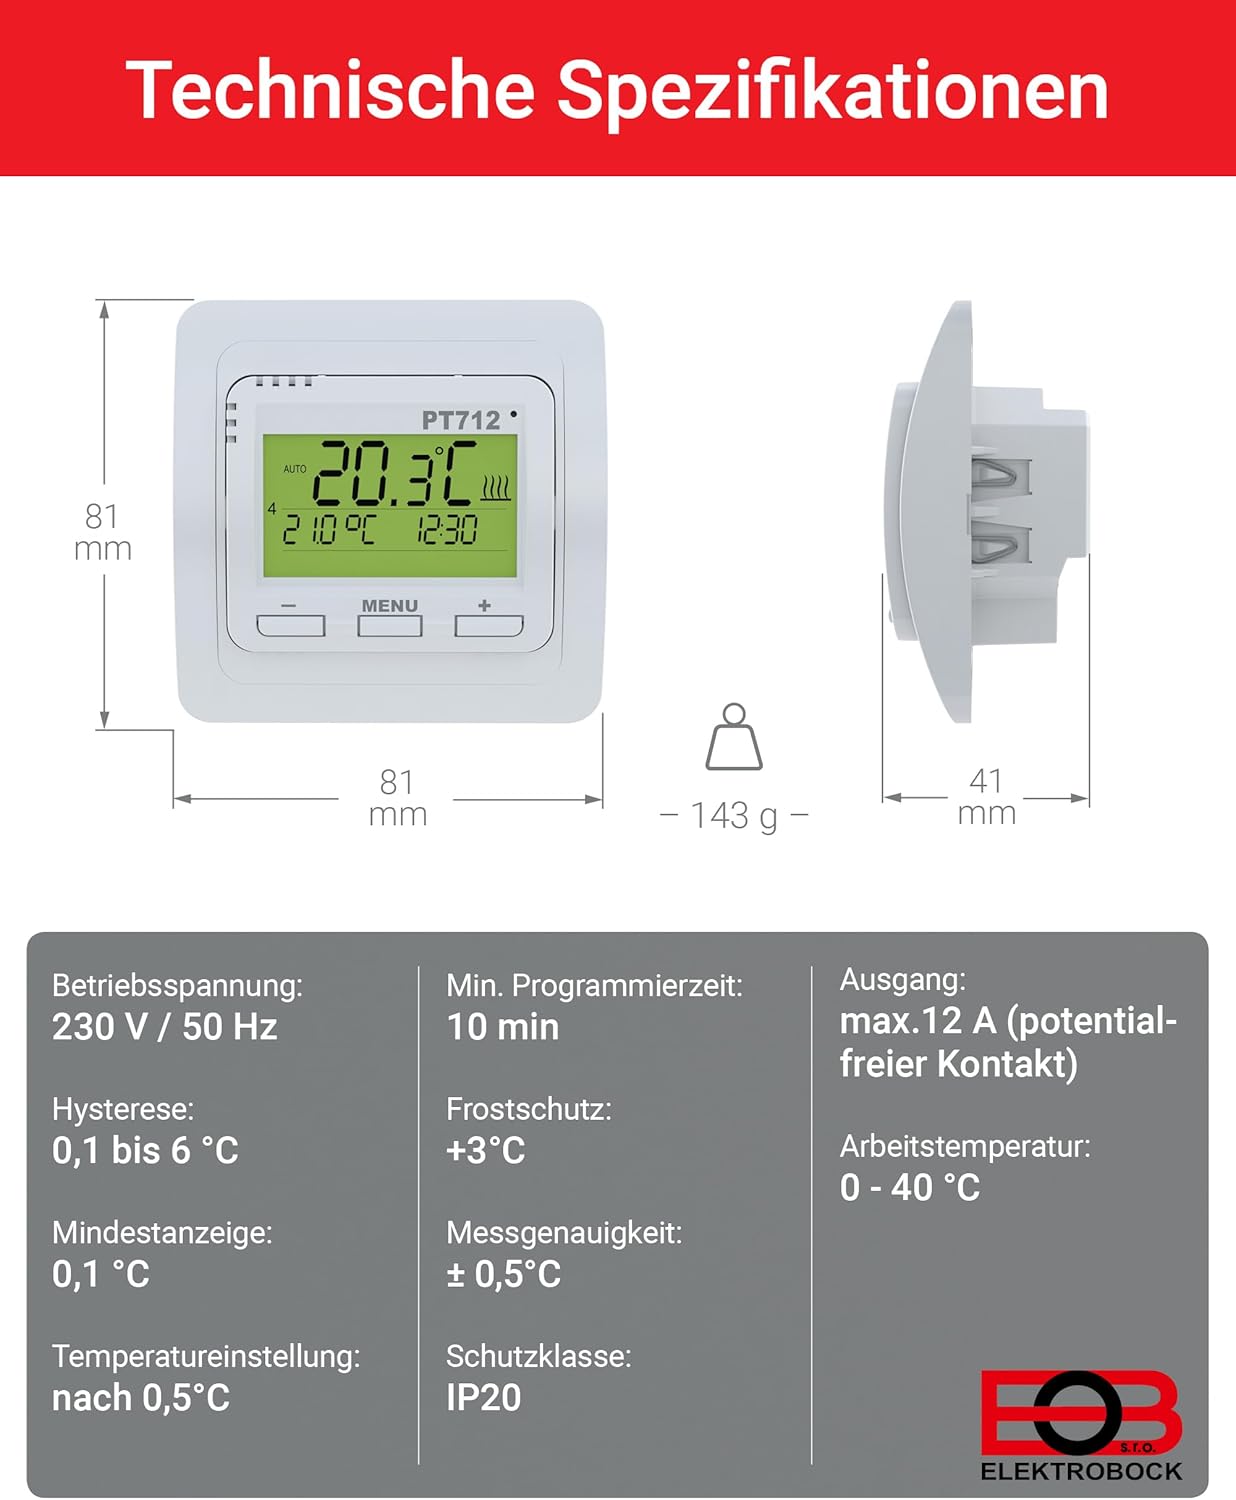
Figure 4: Detailed technical specifications and physical dimensions of the PT712 thermostat.
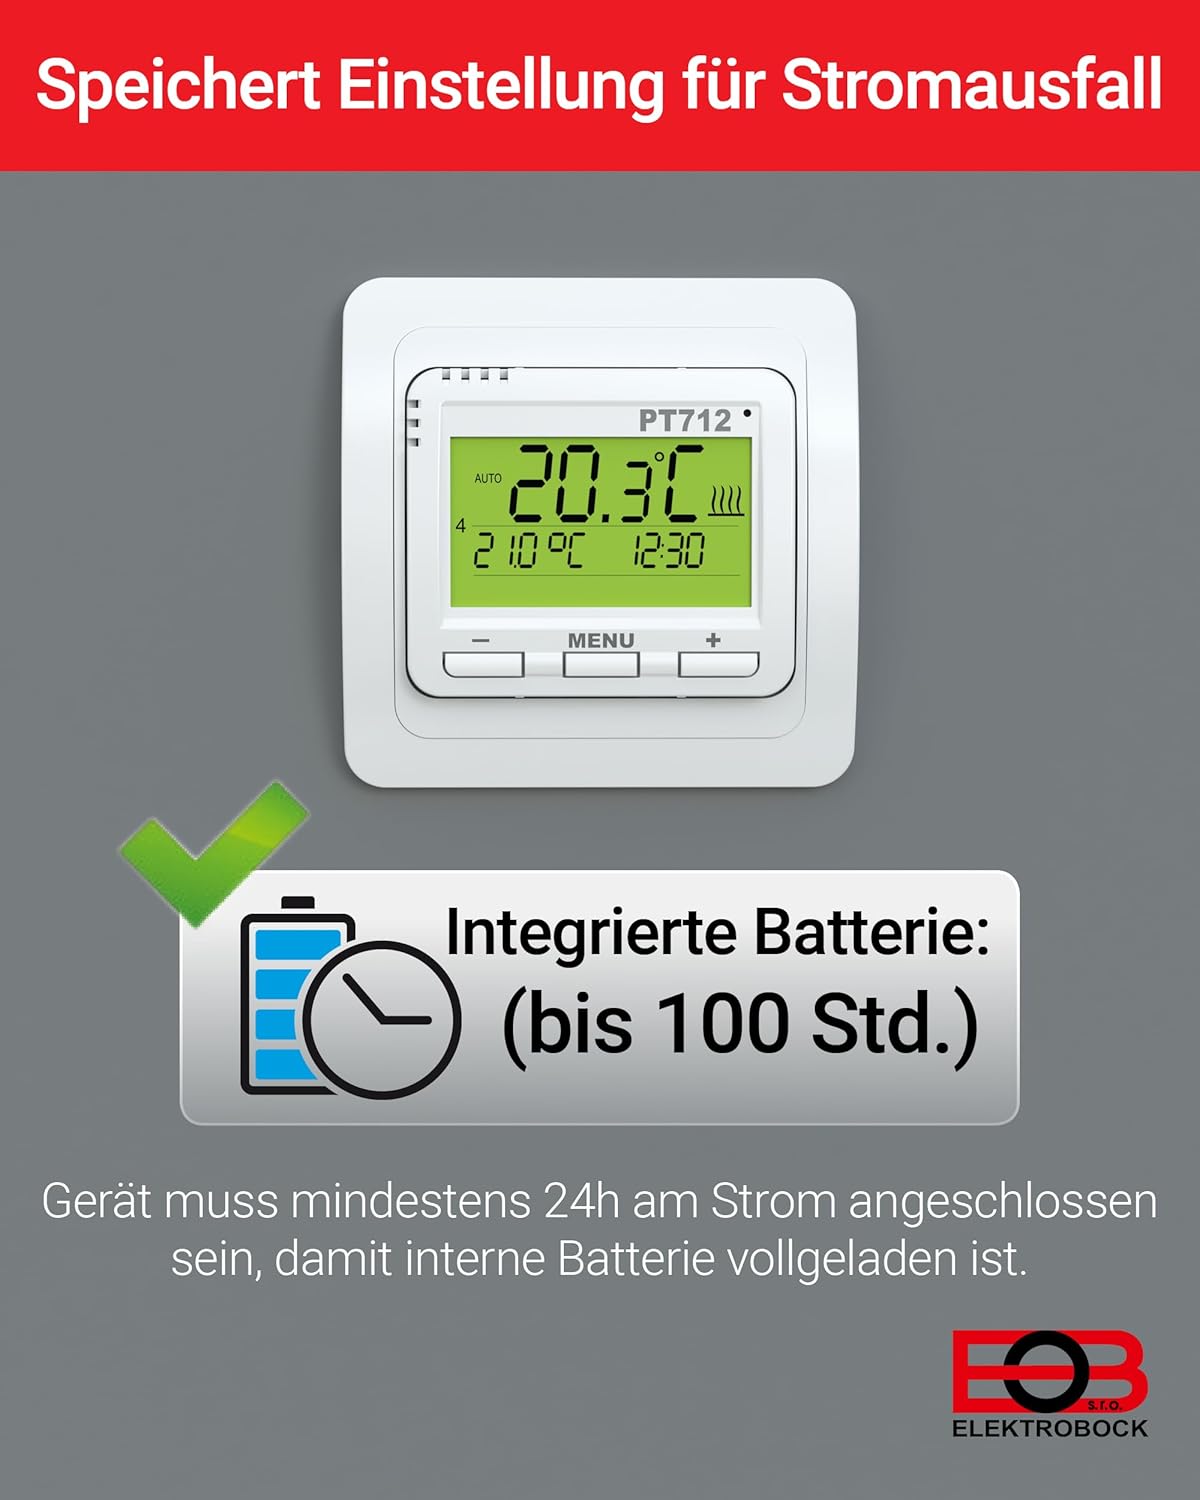
Figure 5: The thermostat features an integrated battery for power reserve, ensuring settings are retained during power outages. The device must be connected to power for at least 24 hours for the internal battery to be fully charged.
4. Quraşdırma
The Elektrobock PT712 thermostat is designed for easy plug-in installation, typically as a flush-mount unit. Professional installation by a qualified electrician is recommended to ensure safety and compliance with local electrical codes.
4.1 Təhlükəsizlik tədbirləri
- Always disconnect power to the heating circuit at the main breaker before beginning any installation work.
- Ensure the wiring matches the specifications of the thermostat (230V/50Hz).
- The device has a protection class of IP20, meaning it is protected against solid objects larger than 12.5mm but has no protection against water. Install in a dry location.
4.2 Quraşdırma
The PT712 is suitable for flush-mount installation in a standard wall box with a diameter of 68mm or greater.
- Prepare the wall box and ensure all necessary wiring (power supply, heating element connection, and optional external sensor) is accessible.
- Connect the electrical wires to the appropriate terminals on the back of the thermostat according to the wiring diagram provided in the full product documentation (not included in this manual).
- Carefully insert the thermostat into the wall box and secure it using the mounting screws.
- Attach the front cover or frame of the thermostat.
- Restore power to the heating circuit.

Figure 6: Illustration of the flush-mount installation process for the PT712 thermostat, suitable for standard wall boxes.
4.3 Uyğunluq
The Elektrobock PT712 thermostat is designed for use with various electric heating systems, including:
- Döşəmə Elektrikli İstilik
- İnfraqırmızı istilik panelləri
- Elektrikli Radiatorlar

Figure 7: The PT712 thermostat is compatible with various electric heating solutions.
5. Əməliyyat
The PT712 thermostat features a user-friendly interface with a clear LCD display and intuitive buttons for navigation and setting adjustments.
5.1 Üzərində göstərinview
The LCD display shows the current room temperature, set temperature, time, active program mode, and heating status indicators. Refer to the full product manual for a detailed diagram of all display icons.

Figure 8: A close-up of the thermostat's display, showing essential information at a glance.
5.2 Düymələr
- MENU düyməsi: Used to access and navigate through the thermostat's settings and programming menus.
- '+' düyməsi: Increases values, navigates forward in menus, or increases the set temperature.
- '-' düyməsi: Decreases values, navigates backward in menus, or decreases the set temperature.
5.3 İş rejimləri
The PT712 offers several operating modes:
- Avtomatik Rejim: Follows the programmed weekly schedule.
- Əl rejimi: Maintains a constant user-defined temperature.
- Söndürmə rejimi: Turns off the heating. Frost protection may still be active depending on settings.
- Tətil rejimi: Sets a specific temperature for a defined period, ideal for when you are away.
Switch between modes using the MENU button and following the on-screen prompts. Detailed instructions for each mode are available in the comprehensive user manual.
6. Proqramlaşdırma
The PT712 allows for advanced programming to optimize your heating schedule. You can set 2 weekly programs, each with up to 6 temperature changes per day.
6.1 Vaxt və Tarixin qurulması
Before programming, ensure the correct time and date are set on the thermostat. Access this setting via the MENU button and navigate to the time/date options. Use the '+' and '-' buttons to adjust values.
6.2 Creating a Weekly Program
- Əsas menyuya daxil olmaq üçün MENU düyməsini basın.
- Navigate to the "Program" or "Schedule" option.
- Select one of the two available weekly programs (e.g., Program 1 or Program 2).
- For each day of the week, you can define up to 6 time intervals and their corresponding desired temperatures.
- Use the '+' and '-' buttons to adjust the start time and temperature for each interval.
- Növbəti parametrə keçməzdən əvvəl hər bir parametri təsdiqləyin.
- Repeat for all desired days and intervals.
Refer to the detailed programming section in the full user manual for specific menu navigation and advanced programming options, such as copying programs between days or weeks.
6.3 Child Lock / Key Lock
To prevent accidental or unauthorized changes, activate the child lock feature. This typically involves a combination of button presses or a menu option. Consult the full manual for activation and deactivation procedures.
7. Baxım
The Elektrobock PT712 thermostat requires minimal maintenance to ensure long-term reliable operation.
7.1 Təmizləmə
- Termostatın səthini yumşaq, quru və ya bir az quru bir parça ilə silinamp parça.
- Aşındırıcı təmizləyicilərdən, həlledicilərdən və ya kimyəvi spreylərdən istifadə etməyin, çünki bunlar plastik və elektron komponentlərə zərər verə bilər.
- Cihaza mayenin daxil olmadığından əmin olun.
7.2 Batareyaya texniki qulluq
The integrated NiMH battery provides power reserve. For optimal performance, ensure the thermostat is connected to power for at least 24 hours after initial installation or extended power outages to fully charge the internal battery.
7.3 Xidmət
The PT712 thermostat contains no user-serviceable parts. Do not attempt to open or repair the device yourself. Contact qualified service personnel for any repairs.
8. Giderme
This section addresses common issues you might encounter with your Elektrobock PT712 thermostat. For more complex problems, consult the full user manual or contact customer support.
| Problem | Mümkün Səbəb | Həll |
|---|---|---|
| Ekran boşdur. | No power supply; internal battery discharged. | Check main power breaker. Ensure thermostat is properly wired. Allow 24 hours for internal battery to charge after power connection. |
| Heating not turning on. | Thermostat in Off mode; set temperature too low; program not active; wiring issue. | Check operating mode (ensure it's Auto or Manual). Increase set temperature above current room temperature. Verify program schedule. Consult an electrician to check wiring. |
| Temperature inaccurate. | Sensor obstructed; thermostat located near heat source/draft. | Ensure the thermostat's sensor is not covered. Relocate the thermostat if it's in an unsuitable position. Calibrate if an external sensor is used and calibration option is available (refer to full manual). |
| Elektrik kəsildikdən sonra parametrlər itirilirtage. | Internal battery not fully charged or faulty. | Ensure the thermostat has been connected to power for at least 24 hours to charge the internal battery. If the issue persists, the battery may need replacement by a qualified technician. |
| Buttons unresponsive (Child Lock). | Child lock feature is active. | Deactivate the child lock as per instructions in the full user manual. |
9. Təhlükəsizlik Məlumatı
- Bu cihaz yalnız daxili istifadə üçün nəzərdə tutulub.
- Do not expose the thermostat to water, high humidity, or extreme temperatures.
- Cihazın ətrafında düzgün ventilyasiya olmasını təmin edin.
- Installation and electrical connections must be performed by a qualified electrician in accordance with all local and national electrical codes.
- Təmizləmədən və ya hər hansı təmirdən əvvəl elektrik enerjisini ayırın.
- Uşaqların əli çatmayan yerdə saxlayın.
10. Zəmanət və Dəstək
Specific warranty information for the Elektrobock PT712 thermostat is not provided in the available product data. Please refer to the documentation included with your purchase or contact Elektrobock customer support for details regarding warranty terms and conditions.
For technical support or inquiries, please visit the official Elektrobock websaytına daxil olun və ya müştəri xidməti şöbəsi ilə əlaqə saxlayın. Əlaqə məlumatı adətən məhsulun qablaşdırmasında və ya istehsalçının özündə tapıla bilər websayt.


