Giriş
This manual provides detailed instructions for the setup, operation, maintenance, and troubleshooting of your Instapark PWT-07 Digital Programmable Water Timer. Please read this manual thoroughly before using the device to ensure proper function and longevity.
Təhlükəsizlik Məlumatı
- Use only 1.5V AA alkaline batteries. Do not mix old and new batteries, or different battery types.
- Ensure the battery compartment is securely closed to maintain the IP66 waterproof rating.
- Do not expose the timer to extreme temperatures or direct sunlight for prolonged periods, which may affect battery life and device performance.
- Disconnect the timer from the faucet and drain it before freezing temperatures to prevent damage.
- This device is designed for outdoor use with standard ¾” (GHS) threaded faucets.
Paketin məzmunu
Bütün əşyaların paketdə olduğunu yoxlayın:
- Instapark PWT-07 Water Timer
- İstifadəçi Təlimatı (bu sənəd)
- Zəmanət kartı
Note: 2 AA alkaline batteries are required and not included.
Məhsul Xüsusiyyətləri
- Single-station digital programmable faucet water timer.
- Impulse solenoid valve for reliable operation.
- Compatible with standard ¾” (GHS) threaded outdoor hose faucets.
- User-friendly interface with a single oversized rotary dial and 4 pushbuttons.
- Large, easy-to-read LCD display (2.1” x 1”).
- Suya davamlı reytinq: IP66.
- Built-in rain delay function (24, 48, or 72 hours).
- Manual watering option without interrupting programmed schedules.
- Detachable battery compartment for easy battery replacement.
- Low power consumption, up to 4,000 on/off cycles per battery set.
Quraşdırma
1. Batareyanın quraşdırılması
The Instapark PWT-07 requires two (2) 1.5V AA alkaline batteries (not included).
- Taymerin arxasındakı batareya bölməsini tapın.
- Slide the battery compartment cover downwards to open.
- Düzgün polariteyi (+/-) təmin edərək iki yeni AA qələvi batareyanı daxil edin.
- Batareya bölməsinin qapağını təhlükəsiz şəkildə kliklənənə qədər yerinə sürüşdürün.
- The LCD display should illuminate, indicating successful battery installation. If the display shows a low battery indicator, remove the batteries, wait for the screen to go completely dark, then reinsert them.
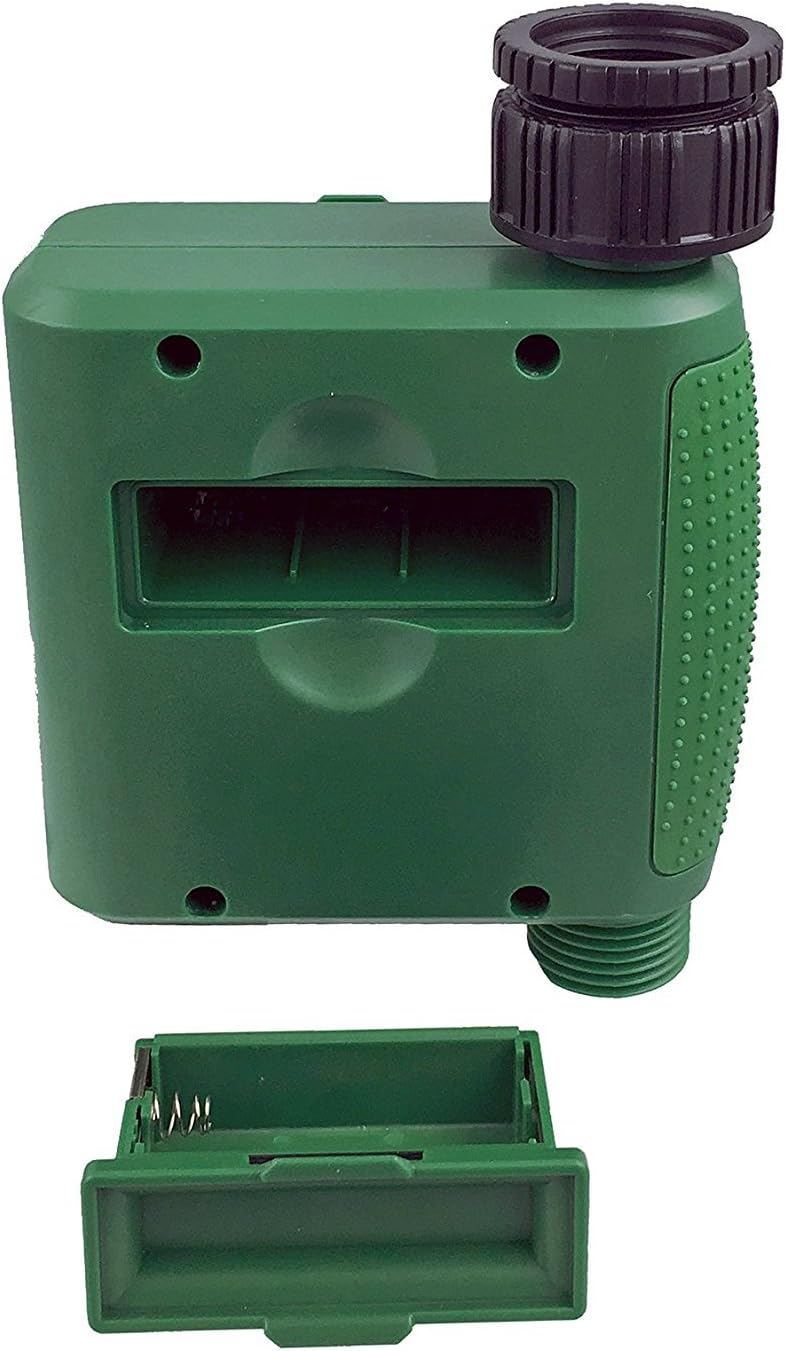
Şəkil 1: Qapağı çıxarılan batareya bölməsi.
2. Taymerin quraşdırılması
Attach the timer to your outdoor faucet:
- Ensure the faucet is clean and free of debris.
- Screw the timer's inlet (top connector) onto a standard ¾” (GHS) outdoor hose faucet. Hand-tighten only to prevent damage. Do not overtighten.
- Connect your garden hose or irrigation system to the timer's outlet (bottom connector). Hand-tighten securely.
- Turn on the faucet fully. The timer is designed to operate under pressure.

Figure 2: Instapark PWT-07 mounted on a faucet.
Əməliyyat Təlimatları
The timer features a large rotary dial and four buttons: SET, +, -, və DƏLƏK.

Figure 3: Control panel and LCD display.
1. Cari vaxtın qurulması
- Fırlanan düyməni çevirin SAAT QAYDIRIN.
- istifadə edin + və - buttons to adjust the current hour. Press SET təsdiq etmək.
- istifadə edin + və - buttons to adjust the current minute. Press SET təsdiq etmək.
2. Programming Watering Schedule
The timer allows you to set a start time, duration, and frequency for watering.
Başlama vaxtını təyin edin:
- Fırlanan düyməni çevirin BAŞLAMA ZAMANI.
- istifadə edin + və - buttons to set the desired watering start hour. Press SET təsdiq etmək.
- istifadə edin + və - buttons to set the desired watering start minute. Press SET təsdiq etmək.
Nə qədər müddətə (müddət) təyin edin:
- Fırlanan düyməni çevirin NECƏ MÜDDƏT.
- istifadə edin + və - buttons to set the watering duration (from 5 seconds to 360 minutes). Press SET təsdiq etmək.
Nə qədər tez-tez (Tezlik) təyin edin:
- Fırlanan düyməni çevirin NƏ TEZ-TEZ.
- istifadə edin + və - buttons to select the watering frequency (e.g., every 10 seconds, 30 seconds, 1 minute, 3 minutes, 5 minutes, 1 hour, 2 hours, 4 hours, 12 hours, 1 day, 2 days, 3 days, 4 days, 5 days, 6 days, 7 days). Press SET təsdiq etmək.
After setting all parameters, turn the rotary dial to KAÇ to activate the programmed schedule.
3. Əl ilə suvarma
To water manually without affecting your programmed schedule:
- Düyməni təyin etdiyinizdən əmin olun KAÇ or OFF.
- düyməsini basın DƏLƏK Ekranda standart əl ilə suvarma müddəti göstəriləcək.
- istifadə edin + və - buttons to adjust the desired manual watering duration.
- basın SET to start manual watering. The timer will run for the selected duration and then automatically shut off.
- To stop manual watering prematurely, press the DƏLƏK yenidən düyməsini basın.
4. Yağış Gecikdirmə Funksiyası
The rain delay function allows you to pause your watering schedule for a set period without losing your program settings.
- Düyməni təyin etdiyinizdən əmin olun KAÇ.
- basın və saxlayın - button for 3 seconds. The display will show "DELAY" and a default delay duration.
- istifadə edin + və - buttons to select a delay duration of 24, 48, or 72 hours.
- basın SET to activate the rain delay. The timer will resume its programmed schedule after the delay period ends.
- To cancel the rain delay, press and hold the - düyməsini yenidən 3 saniyə basın.
Baxım
- Batareyanın dəyişdirilməsi: Replace batteries when the low battery indicator appears on the LCD. Always use new AA alkaline batteries.
- Təmizləmə: Taymeri reklamla silinamp parça. Aşındırıcı təmizləyicilərdən və ya həlledicilərdən istifadə etməyin.
- Qışlama: Before the first frost, disconnect the timer from the faucet. Remove the batteries and store the timer indoors in a dry, frost-free location. Failure to do so may result in damage from freezing water.
- Filtr Ekranı: Periodically check the filter screen inside the inlet connector for debris. Clean if necessary to ensure proper water flow.
Problemlərin aradan qaldırılması
| Problem | Mümkün Səbəb | Həll |
|---|---|---|
| Timer does not turn on / LCD is blank. | Ölü və ya səhv quraşdırılmış batareyalar. | Replace with new AA alkaline batteries, ensuring correct polarity. If still blank, remove batteries, wait for screen to fully clear, then reinsert. |
| Water does not turn on at scheduled time. |
|
|
| Water does not turn off. |
|
|
| Bağlantılardan su sızması. |
|
|
| Low battery indicator flashes even with new batteries. | Firmware not booting correctly after battery change. | Remove batteries, wait for the LCD screen to go completely dark (may take a few minutes), then reinsert new batteries. |
Spesifikasiyalar
| Model | PWT-07 |
| Güc mənbəyi | 2 x 1.5V AA Alkaline Batteries (not included) |
| Vana növü | İmpuls Solenoid Klapanı |
| İşçi suyu təzyiqi | 14.5 ilə 116 psi arasında |
| Gözləmə cərəyanı | <100 µA |
| Watering Frequency Settings | 10s, 30s, 1m, 3m, 5m, 1h, 2h, 4h, 12h, 1d, 2d, 3d, 4d, 5d, 6d, 7d (16 settings) |
| Watering Duration Settings | 5s, 10s, 15s, 20s, 25s, 30s, 35s, 40s, 45s, 50s, 55s, 1-360m |
| Saat Göstər Formatı | 24 saat |
| Suya davamlı reytinq | IP66 |
| Material | ABS Plastik |
| Məhsul Ölçüləri | 4.25"D x 6"W x 2.6"H |
| Maddə Çəkisi | 14.2 unsiya |
Zəmanət və Dəstək
The Instapark PWT-07 Digital Programmable Water Timer is backed by a standard 1-year manufacturer's warranty from the date of purchase. This warranty covers defects in materials and workmanship under normal use.
For warranty claims, technical support, or any questions regarding your product, please contact Instapark customer service. Please have your purchase receipt and product model number (PWT-07) available when contacting support.
Contact information for Instapark customer service can typically be found on the manufacturer's websayt və ya satınalma sənədləriniz.


