1. Giriş
This manual provides essential instructions for the safe and effective use of your DT321B Digital Multimeter. This portable device is designed for measuring AC/DC voltage, DC current, resistance, and includes features for diode testing, continuity, battery testing, and transistor (hFE) measurements. Please read this manual thoroughly before operation and retain it for future reference.
2. Təhlükəsizlik Məlumatı
Always observe basic safety precautions when using this multimeter to reduce the risk of fire, electric shock, or personal injury.
- cild tətbiq etməyintage or current that exceeds the maximum specified limits for the multimeter.
- Ensure the test leads are in good condition and properly connected before making any measurements.
- Never use the multimeter if it appears damaged or if the test leads are damaged.
- Vol ilə işləyərkən diqqətli oluntag30V AC RMS, 42V pik və ya 60V DC-dən yuxarı. Bu cildtagşok təhlükəsi yaradır.
- Always disconnect power to the circuit under test before measuring resistance or continuity.
- Multimetri partlayıcı atmosferdə işlətməyin.
- Dəqiq göstəriciləri təmin etmək üçün batareyalar aşağı göstəricisi göründükdə onları dəyişdirin.
3. Məhsul bitdiview
The DT321B Digital Multimeter features a clear LCD display and a rotary switch for selecting various measurement functions. Input jacks are provided for connecting test leads.

Şəkil 3.1: Ön view of the DT321B Digital Multimeter with key components labeled. The display shows numerical readings, the hold button freezes the current reading, and the rotary switch selects measurement functions. The '10A' jack is for high current measurements, 'COM' is the common ground, and 'VΩmA' is for voltage, müqavimət və aşağı cərəyan ölçmələri.
The multimeter includes a blue backlight for improved visibility in low-light conditions and a data hold function to freeze the displayed reading.
4. Quraşdırma
4.1 Batareyanın quraşdırılması
The DT321B Digital Multimeter requires two 1.5V batteries (Type 7, typically AAA) for operation. To install or replace batteries:
- Multimetrin söndürüldüyünə əmin olun.
- Cihazın arxasındakı batareya bölməsinin qapağını tapın.
- Saxlama vintini(ləri) açın və qapağı çıxarın.
- Insert the two 1.5V batteries, observing the correct polarity (+ and -) as indicated inside the compartment.
- Batareya bölməsinin qapağını dəyişdirin və vint(lər) ilə bərkidin.
5. Əməliyyat Təlimatları
Before making any measurements, ensure the test leads are securely plugged into the correct input jacks.

Figure 5.1: The DT321B Multimeter with test probes connected. The black probe is connected to the 'COM' (common) jack, and the red probe is connected to the 'VΩmA' jack for most voltage, müqavimət və aşağı cərəyan ölçmələri.
5.1 DC həcminin ölçülməsitage (V–)
- Insert the red test lead into the 'VΩmA' jack and the black test lead into the 'COM' jack.
- Dönər açarı istədiyiniz DC Vol-a təyin edintage (V–) range (e.g., 200m, 2, 20, 200, 1000V). If the voltage is unknown, start with the highest range and work downwards.
- Test zondlarını ölçüləcək komponent və ya dövrə boyunca birləşdirin.
- Cild oxuyuntagLCD ekranda e dəyəri.
5.2 AC-nin ölçülməsi Voltage (V∼)
- Insert the red test lead into the 'VΩmA' jack and the black test lead into the 'COM' jack.
- Dönər açarı istədiyiniz AC Vol-a təyin edintage (V∼) range (e.g., 200, 750V).
- Test zondlarını ölçüləcək komponent və ya dövrə boyunca birləşdirin.
- Cild oxuyuntagLCD ekranda e dəyəri.
5.3 Measuring DC Current (A–)
DİQQƏT: To avoid damage to the multimeter or the circuit, never connect the test leads in parallel across a voltage source when measuring current. Always connect in series.
- For currents up to 200mA, insert the red test lead into the 'VΩmA' jack. For currents up to 10A, insert the red test lead into the '10A MAX' jack. The black test lead always goes into the 'COM' jack.
- Set the rotary switch to the desired DC Current (A–) range (e.g., 200u, 2m, 20m, 200m, 10A).
- Cərəyanın ölçüləcəyi dövrəni açın və multimetri dövrəyə ardıcıl olaraq qoşun.
- LCD displeydə cari dəyəri oxuyun.
5.4 Müqavimətin Ölçülməsi (Ω)
DİQQƏT: Ensure the circuit under test is completely de-energized before measuring resistance.
- Insert the red test lead into the 'VΩmA' jack and the black test lead into the 'COM' jack.
- Set the rotary switch to the desired Resistance (Ω) range (e.g., 200, 2k, 20k, 200k, 2M).
- Test problarını ölçüləcək komponent üzərində birləşdirin.
- LCD displeydəki müqavimət dəyərini oxuyun.
5.5 Diod Testi
- Insert the red test lead into the 'VΩmA' jack and the black test lead into the 'COM' jack.
- Set the rotary switch to the diode symbol (→|).
- Qırmızı zond anoda, qara zond isə diodun katoduna birləşdirilir. Ekran irəli səsi göstərəcəktage düşmək.
- Reverse the probes. The display should show 'OL' (open loop) for a good diode.
5.6 Davamlılıq Testi
- Insert the red test lead into the 'VΩmA' jack and the black test lead into the 'COM' jack.
- Set the rotary switch to the continuity symbol (♫).
- Connect the test probes across the circuit or component. If continuity exists (resistance below a certain threshold), the buzzer will sound.
5.7 Battery Testing (1.5V / 9V)
- Insert the red test lead into the 'VΩmA' jack and the black test lead into the 'COM' jack.
- Set the rotary switch to the '1.5V BATT' or '9V BATT' position.
- Qırmızı zondu batareyanın müsbət terminalına, qara zondu isə mənfi terminalına qoşun.
- Batareyanın həcmini oxuyuntage ekranda.
5.8 Transistor (hFE) Test
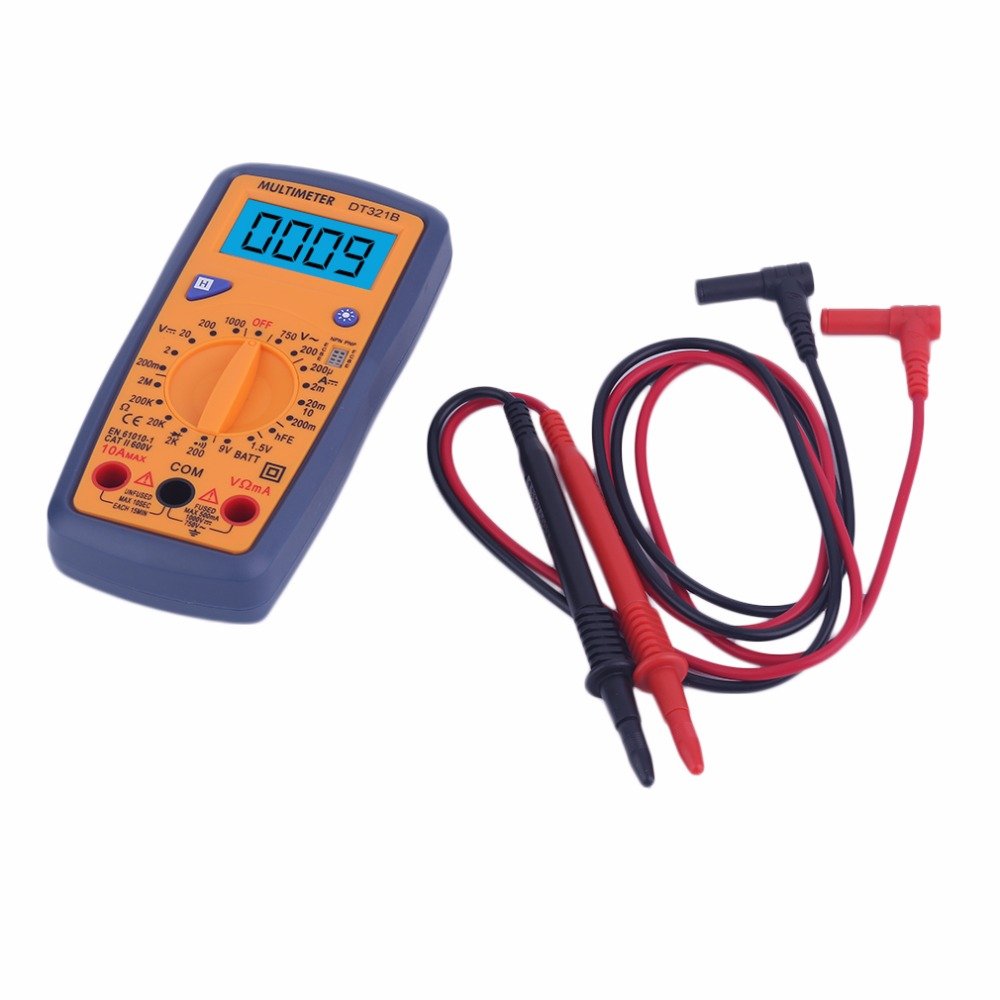
Figure 5.2: The DT321B Multimeter in use, with an inset showing a transistor being tested. The multimeter can measure the hFE (current gain) of NPN and PNP transistors.
- Set the rotary switch to the 'hFE' position.
- Identify the NPN or PNP type of the transistor.
- Insert the transistor leads (Emitter, Base, Collector) into the corresponding sockets in the 'hFE' test socket on the multimeter.
- Read the hFE value on the LCD display.
5.9 Məlumatların saxlanması funksiyası
Press the 'Hold' button to freeze the current reading on the display. Press it again to release the hold function and resume live readings.
5.10 Arxa İşıqlandırma Funksiyası
The multimeter features a blue backlight. Press the backlight button (often integrated with the 'Hold' button or a separate button with a light symbol) to turn the backlight on or off for improved visibility.
6. Baxım
6.1 Təmizləmə
Kassanı reklamla silinamp cloth and a mild detergent. Do not use abrasives or solvents. Ensure the multimeter is completely dry before use.
6.2 Batareyanın dəyişdirilməsi
When the low battery symbol appears on the display, replace the batteries as described in Section 4.1. Remove batteries if the multimeter is not used for extended periods to prevent leakage.
7. Giderme
- Ekran yoxdur və ya zəif ekran: Batareyanın quraşdırılmasını və doldurulmasını yoxlayın. Lazım gələrsə, batareyaları dəyişdirin.
- Yanlış oxunuşlar: Ensure the rotary switch is set to the correct function and range. Check test lead connections. Verify the circuit under test is properly prepared (e.g., de-energized for resistance).
- 'OL' (Həddindən artıq yükləmə) göstərilir: Ölçülmüş dəyər seçilmiş diapazonu aşır. Daha yüksək diapazona keçin və ya açıq dövrə olub olmadığını yoxlayın.
- No continuity buzzer: Ensure the multimeter is in continuity mode and the circuit is closed.
8. Spesifikasiyalar
| Ölçmə | Aralığı | Dəqiqlik |
|---|---|---|
| DC Cildtage | 200mV, 2V, 20V, 200V, 1000V | ±0.5% |
| AC Cildtage | 200V, 750V | ±1.0% |
| DC cərəyanı | 200uA, 2mA, 20mA, 200mA, 10A | ±1.8% |
| Müqavimət | 200Ω, 2kΩ, 20kΩ, 200kΩ, 2MΩ | ±1.0% |
Ümumi Spesifikasiyalar:
- LCD Ekran Ölçüsü: 45x23 mm
- Məhsulun ölçüsü: 160x76x32mm
- Enerji təchizatı: 2 x 1.5V batteries (Type 7 / AAA)
- Aşağı Voltage Symbol Display: Bəli
- Həddindən artıq yükdən qorunma: Bəli
- Diode Detection: Bəli
- On-off Detection & Buzzer: Bəli
- Batareya Tutumunun Algılanması: 1.5V / 9V
- Transistor Detection (hFE): Bəli
- Məlumatların saxlanması: Bəli
- Arxa İşıq Ekranı: Bəli
9. Zəmanət və Dəstək
Specific warranty and support information for the DT321B Digital Multimeter is not available in the provided product details. Please refer to the retailer or manufacturer's website for any applicable warranty terms or customer support contacts.


