MOUNTUP MU0034 Tək Monitor Stolüstü Quraşdırma Təlimat kitabçası
Brend: MOUNTUP | Model: MU0034
1. Giriş
This manual provides detailed instructions for the installation, operation, and maintenance of your MOUNTUP MU0034 Single Monitor Desk Mount. Please read this manual thoroughly before installation to ensure correct setup and safe operation. This monitor mount is designed to enhance your workspace ergonomics by providing adjustable positioning for a single monitor.
2. Təhlükəsizlik Məlumatı
- Quraşdırmadan əvvəl bütün komponentlərin mövcud olduğundan və zədələnmədiyindən əmin olun. Hər hansı bir hissə yoxdursa və ya nasazdırsa, istifadə etməyin.
- This product is intended for monitors weighing up to 17.6 lbs (8 kg) and screen sizes from 17 to 32 inches. Do not exceed the maximum weight capacity.
- Compatible VESA patterns are 75x75mm and 100x100mm. Verify your monitor's VESA pattern before proceeding.
- Masa səthinin montaj və monitorun birləşmiş çəkisini dəstəkləmək üçün kifayət qədər sabit və güclü olduğundan əmin olun.
- Bütün vintləri möhkəm sıxın, lakin yivlərin soyulmasının və ya komponentlərin zədələnməməsinin qarşısını almaq üçün həddindən artıq sıxmayın.
- Quraşdırma zamanı uşaqları və ev heyvanlarını uzaq tutun.
- Quraşdırma prosesi ilə bağlı hər hansı bir şübhəniz varsa, ixtisaslı bir mütəxəssislə məsləhətləşin.
3. Paketin məzmunu
Zəhmət olmasa, bütün hissələrin paketinizə daxil olduğundan əmin olun:
- Monitor Qolu Yığımı
- Masa Clamp Baza
- Grommet Baza Komponentləri
- VESA Lövhəsi
- Avadanlıq dəsti (vintlər, şaybalar, Allen açarlar)
- Təlimat kitabçası
4. Spesifikasiyalar
| Xüsusiyyət | Spesifikasiya |
|---|---|
| Model nömrəsi | MU0034 |
| Material | Polished Aluminum |
| Ekran ölçüsü uyğunluğu | 17" to 32" (flat or curved) |
| Çəki tutumu | 17.6 funta (8 kq) qədər |
| VESA Uyğunluğu | 75x75mm, 100x100mm |
| Hündürlük tənzimlənməsi | Up to 11" (16.3" total height adjustment range) |
| Tilt diapazonu | +45° ilə -45° arasında |
| Döner sıra | 360° (arm), 180° (monitor plate) |
| Fırlanma | 360° (landscape to portrait) |
| Max Desk Thickness (C-clamp) | 3.35" |
| Grommet deşik diametri | 0.39" - 3.1" |
5. Quraşdırma və Quraşdırma
The MOUNTUP MU0034 offers two installation options: C-clamp mounting and Grommet mounting. Choose the method suitable for your desk.
5.1. C-Clamp Montaj
This method is for desks without existing grommet holes, or if you prefer clamping to the edge of your desk. Ensure your desk thickness is no more than 3.35 inches.
- C-cl əlavə edinamp: Assemble the C-clamp components to the base of the monitor arm. Position the base on the edge of your desk and tighten the clamp screw until it is secure.
- VESA lövhəsini monitora əlavə edin: Secure the VESA plate to the back of your monitor using the appropriate screws from the hardware kit. Ensure the screws are tightened securely.
- Slide Monitor onto Arm: Carefully slide the monitor (with the attached VESA plate) onto the monitor arm's VESA head. Ensure it clicks into place or is secured with the provided locking mechanism.
- Gərginliyi tənzimləyin: Refer to Section 6.1 for adjusting the gas spring tension to match your monitor's weight.

Figure 1: Illustration of C-clamp and Grommet mounting options. The C-clamp is shown securing the mount to the desk edge, while the grommet mount uses a desk hole.
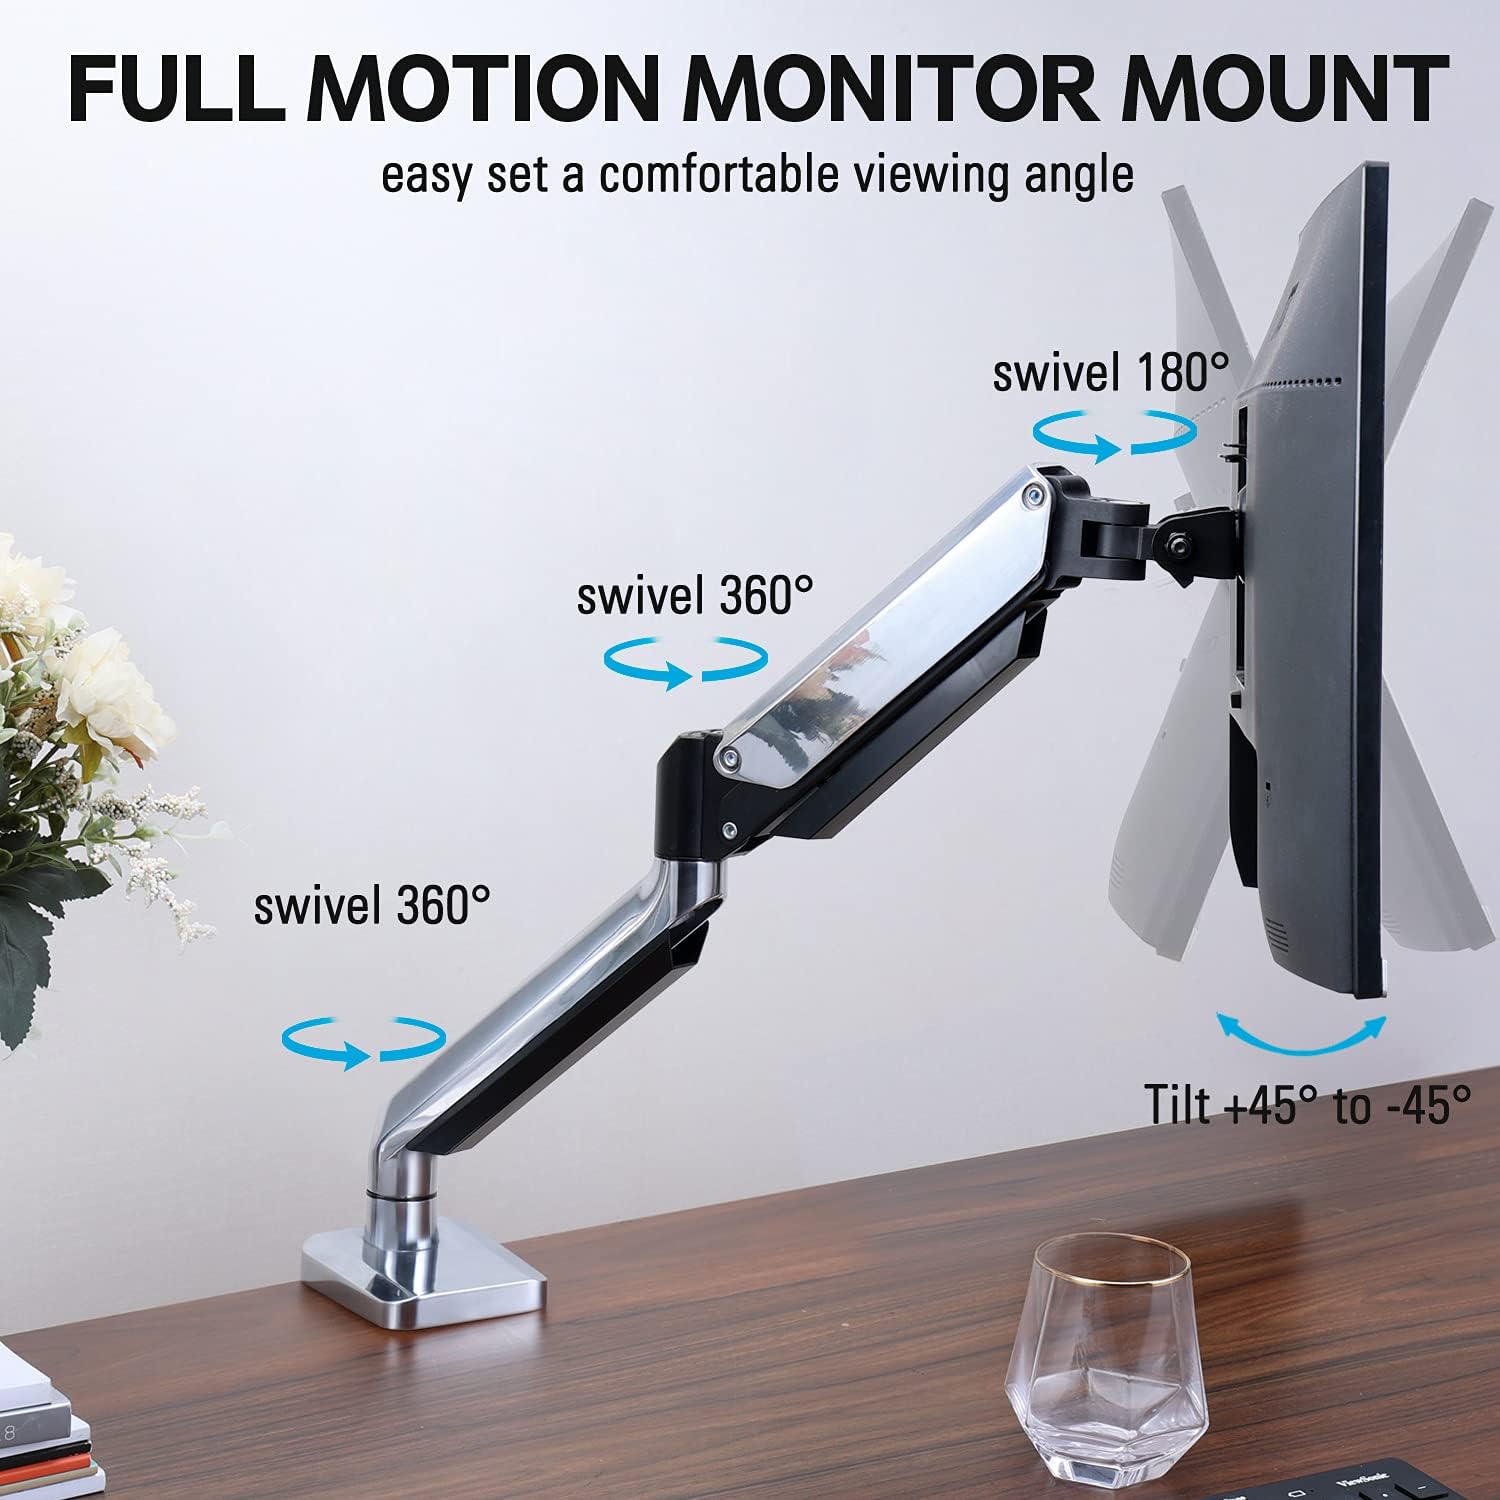
Figure 2: The removable VESA plate being attached to the back of a monitor, then sliding onto the monitor arm for easier installation.
5.2. Qrupun montajı
This method utilizes an existing hole in your desk. Ensure your desk thickness is no more than 3.35 inches and the grommet hole diameter is between 0.39 and 3.1 inches.
- Assemble Grommet Base: Insert the grommet base components through the desk hole and secure them from underneath the desk using the provided plate and nut.
- VESA lövhəsini monitora əlavə edin: Secure the VESA plate to the back of your monitor using the appropriate screws from the hardware kit. Ensure the screws are tightened securely.
- Slide Monitor onto Arm: Carefully slide the monitor (with the attached VESA plate) onto the monitor arm's VESA head. Ensure it clicks into place or is secured with the provided locking mechanism.
- Gərginliyi tənzimləyin: Refer to Section 6.1 for adjusting the gas spring tension to match your monitor's weight.
6. Əməliyyat və Tənzimləmələr
The MOUNTUP MU0034 monitor arm offers various adjustments for optimal viewrahatlıq.
6.1. Gas Spring Tension Adjustment
The gas spring tension needs to be adjusted to match the weight of your monitor. This ensures the monitor stays in position once adjusted.
- If the monitor drifts down, turn the adjustment screw (usually located on the arm joint) clockwise ("+") to increase tension.
- If the monitor floats up, turn the adjustment screw counter-clockwise ("-") to decrease tension.
- Adjust gradually until the monitor remains stable at any height.
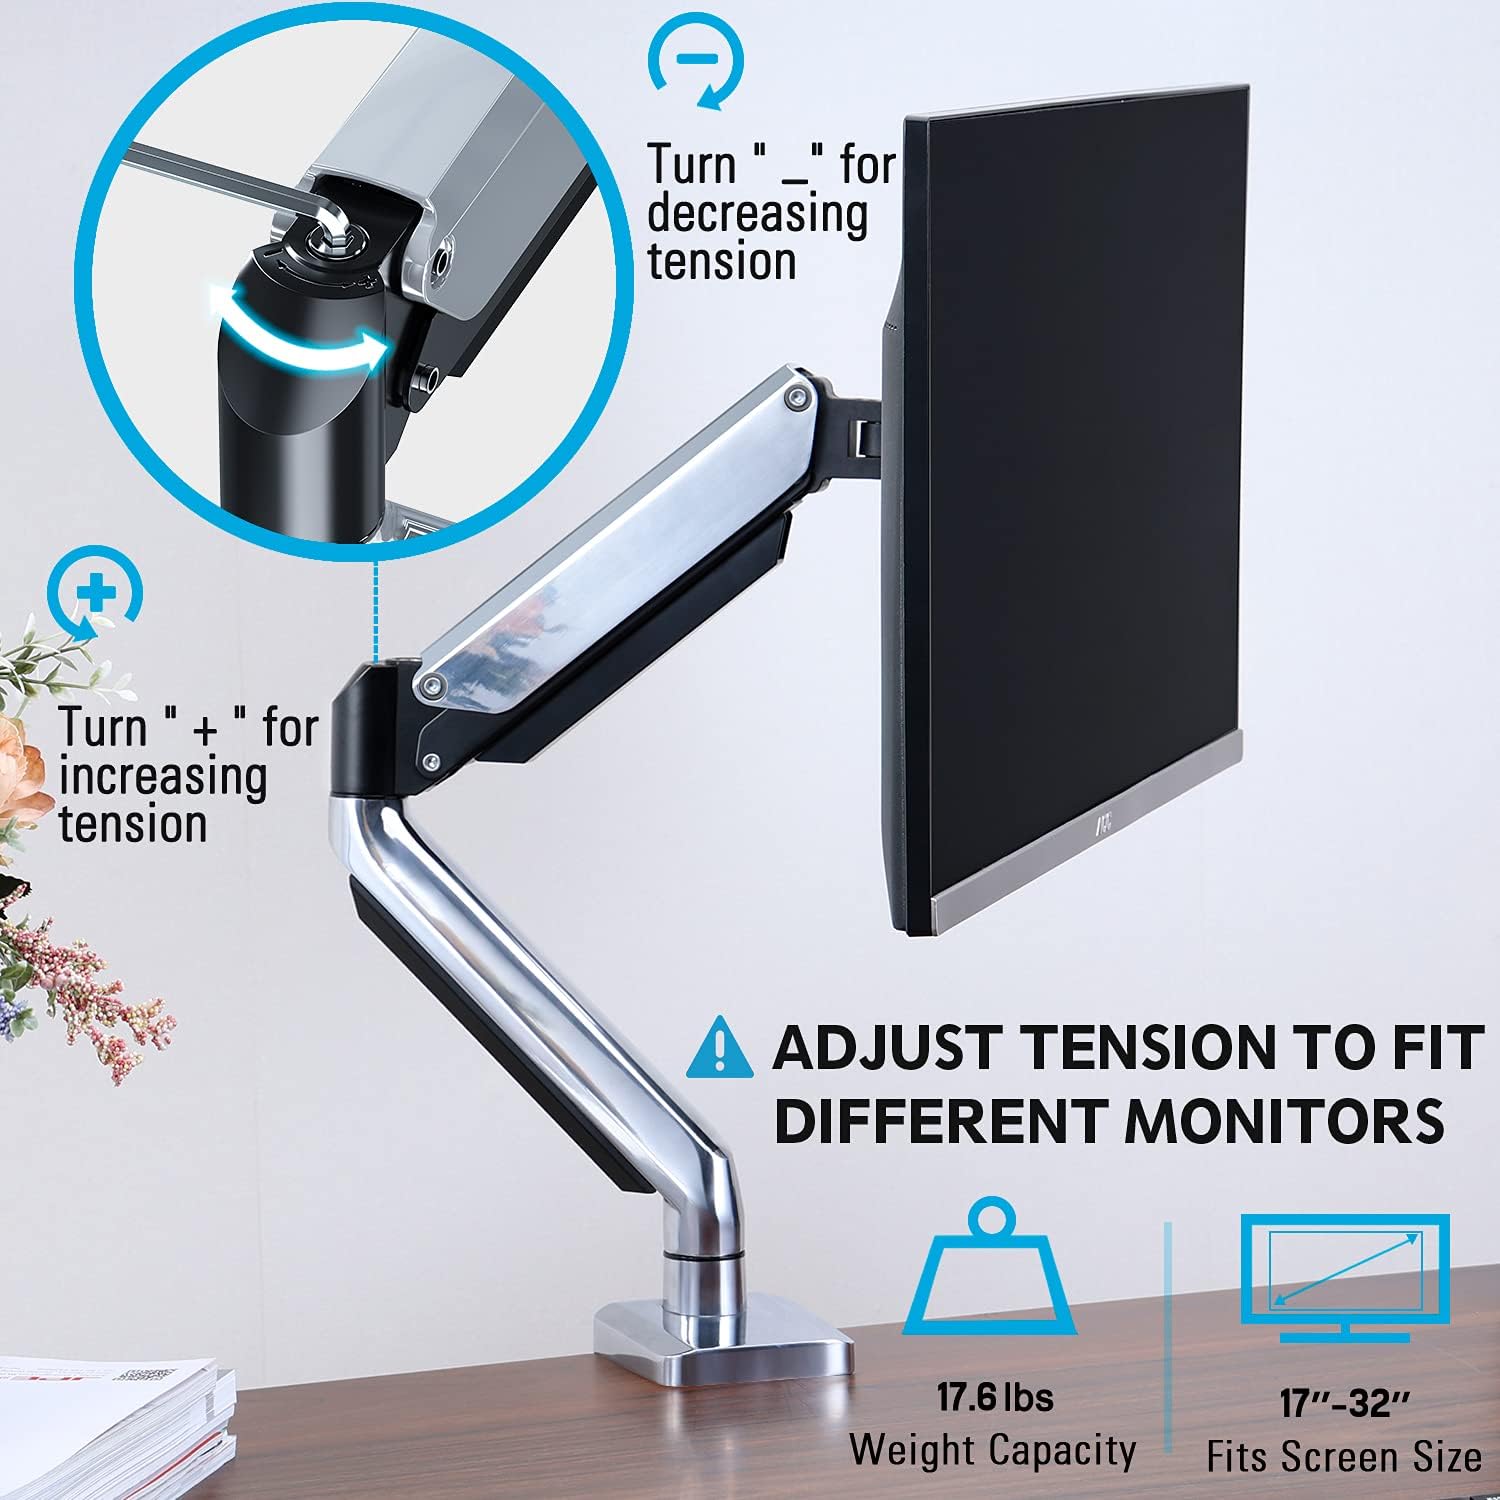
Figure 3: Instructions for adjusting the gas spring tension using an Allen key. Turning clockwise increases tension, counter-clockwise decreases it.
6.2. Hündürlüyün tənzimlənməsi
Once the gas spring tension is correctly set, you can easily raise or lower your monitor to your desired ergonomic height. The arm allows for up to 11 inches of vertical adjustment.

Figure 4: Diagram illustrating the maximum height adjustment of 11 inches and maximum extension of 17.5 inches.
6.3. Tilt, Swivel, and Rotation
The monitor arm provides full motion capabilities:
- Əymək: Adjust the monitor screen +45° to -45° to reduce glare or find a comfortable viewbucaq.
- Fırlanan: The arm can swivel 360° at the base and 360° at the middle joint. The monitor plate itself can swivel 180°. This allows for easy screen sharing or repositioning.
- Fırlanma: Landşaft və portret istiqamətləri arasında keçid etmək üçün monitoru 360° fırladın.

Figure 5: Visual representation of the monitor arm's full motion capabilities, including 360° swivel, 180° swivel at the monitor plate, and +45° to -45° tilt.

Figure 6: An image demonstrating the monitor's ability to rotate 360 degrees, allowing for both landscape and portrait viewrejimləri.
7. Kabel idarəetməsi
The MOUNTUP MU0034 features integrated cable management to keep your workspace tidy.
- Route your monitor cables (power, video, etc.) along the underside of the arm.
- Use the provided cable clips or covers to secure the cables within the arm channels.
- Kabellərin gərginlik olmadan tam hərəkət diapazonuna imkan verəcək qədər boş olduğundan əmin olun.

Figure 7: Illustration of how cables are routed and organized through the integrated channels on the monitor arm, keeping the desk clear.
8. Baxım
- Bütün vintləri və birləşmələri müntəzəm olaraq yoxlayın ki, möhkəm qalsınlar.
- Montajı yumşaq, d ilə təmizləyinamp parça. Aşındırıcı təmizləyicilərdən və ya həlledicilərdən çəkinin.
- Qaz yay mexanizmini yağlamayın.
9. Giderme
| Problem | Mümkün Səbəb | Həll |
|---|---|---|
| Monitor sags or won't stay up | Qaz yayının gərginliyi monitorun çəkisi üçün çox aşağıdır. | Increase gas spring tension by turning the adjustment screw clockwise ("+"). |
| Monitor floats up or is hard to push down | Qaz yayının gərginliyi monitorun çəkisi üçün çox yüksəkdir. | Decrease gas spring tension by turning the adjustment screw counter-clockwise ("-"). |
| Monitor is wobbly | Mount not securely fastened to desk or VESA plate not tight. | Bütün cl-ləri yoxlayın və sıxınamp/grommet screws and VESA plate screws. |
| Difficulty rotating/tilting monitor | Joints are too tight. | Loosen the corresponding joint screws slightly (do not remove). |
10. Zəmanət və Dəstək
The MOUNTUP MU0034 Single Monitor Desk Mount is backed by a 3-year support period. For technical assistance, missing parts, or warranty claims, please contact MOUNTUP customer support through their official channels or the retailer where the product was purchased.
Zəmanət məqsədləri üçün satınalma sübutunuzu özünüzdə saxlayın.


