1. Giriş
Welcome to the user manual for your Ulefone Armor X9 Rugged Phone. This guide provides essential information on setting up, operating, maintaining, and troubleshooting your device. The Ulefone Armor X9 is designed for durability and performance, featuring robust protection and advanced functionalities.
Key features of your Ulefone Armor X9 include:
- IP68/IP69K Grade 360 All Round Protection: Sərt mühitlərə tab gətirmək üçün qurulmuşdur.
- Android 11 Əməliyyat Sistemi: Enjoy the latest Android experience.
- 4 GB RAM + 128 GB ROM: Ample memory and storage for your applications and data.
- 16MP Triple Rear Camera: Capture high-quality photos and videos.
- Massive 5580mAh Battery Capacity: Extended usage time.
- Triple Navigation System: Təkmilləşdirilmiş yerləşdirmə dəqiqliyi.
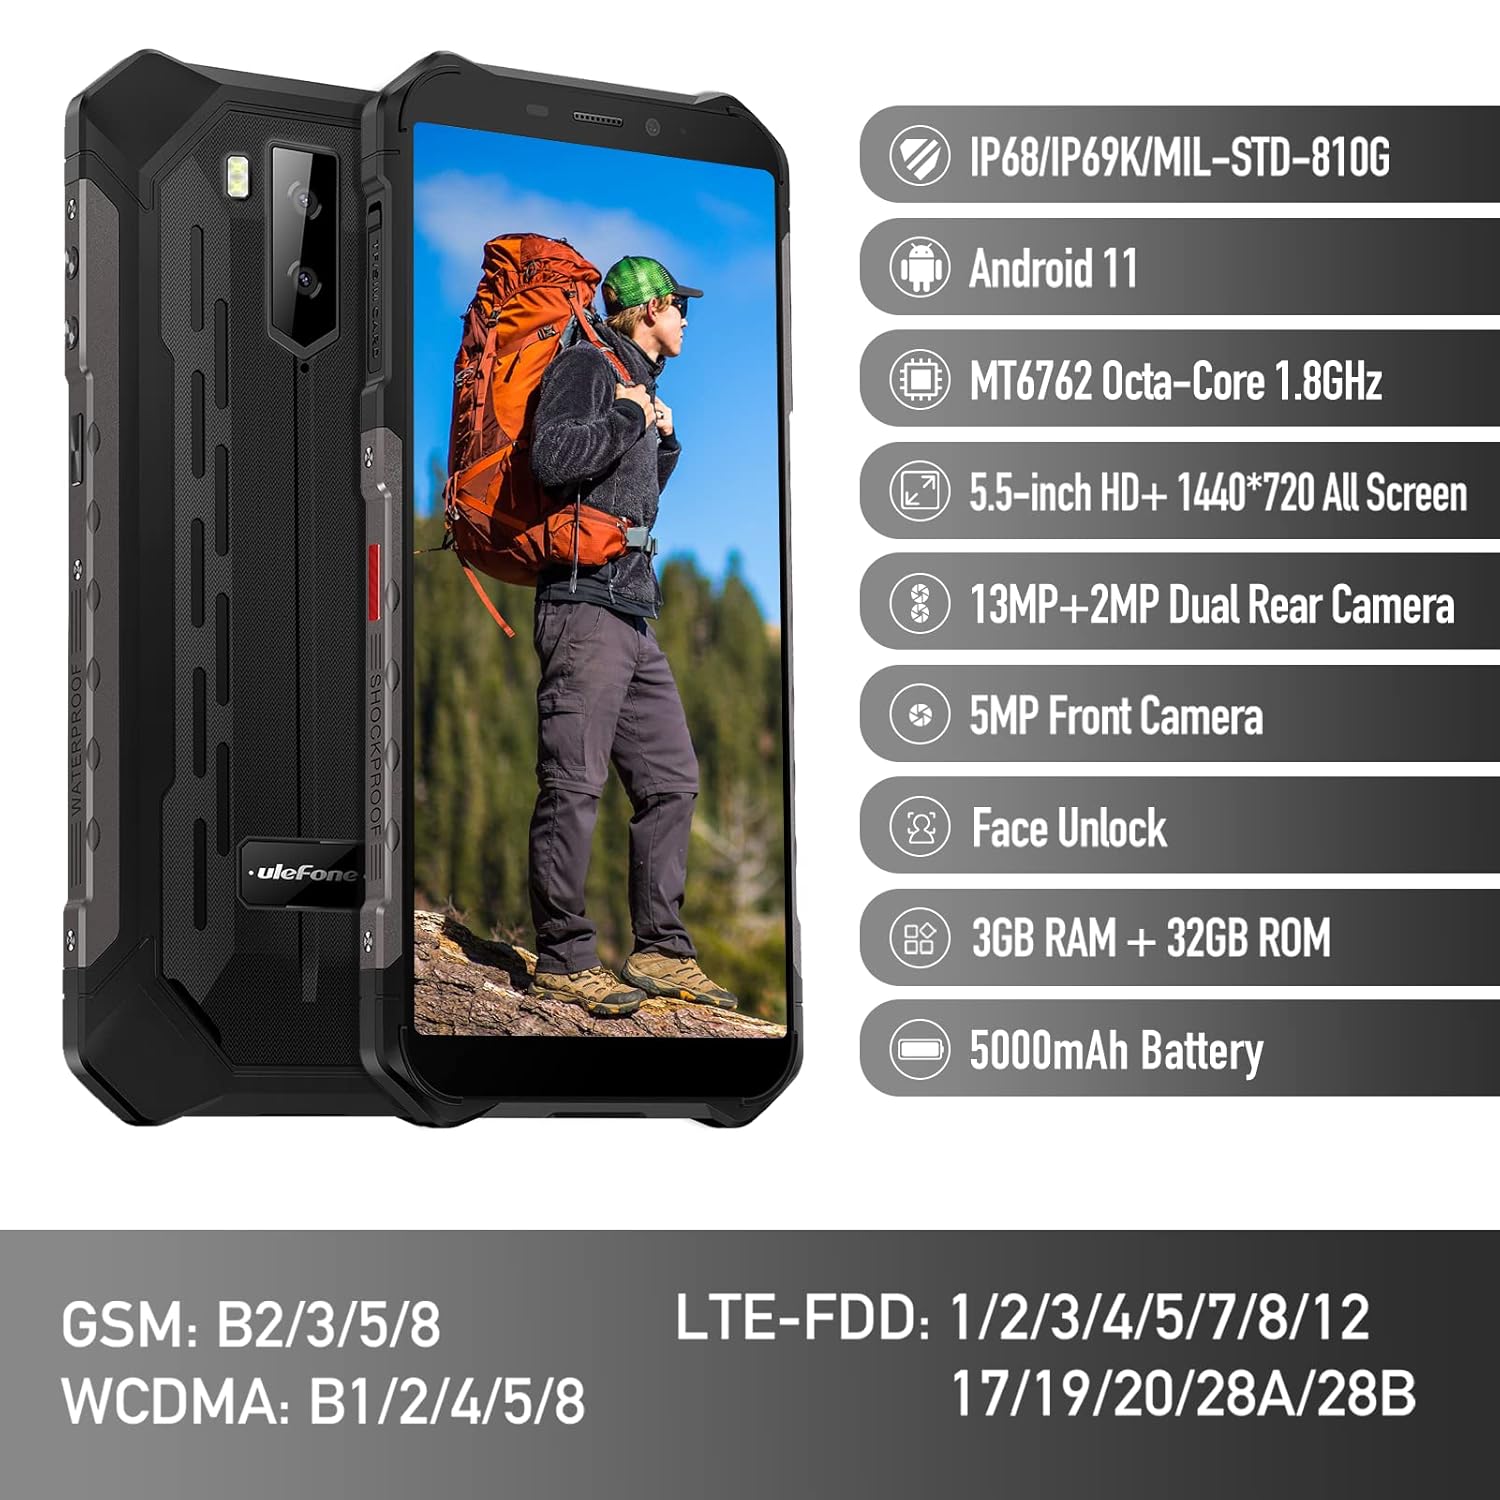
Figure 1: Ulefone Armor X9 Rugged Phone overview, highlighting its robust design and core specifications like IP68/IP69K rating, Android 11, Octa-Core processor, 5.5-inch HD+ screen, 13MP+2MP dual rear camera, 5MP front camera, Face Unlock, 3GB RAM + 32GB ROM, and 5000mAh battery.
2. Quraşdırma
2.1. SİM kart və TF kartın quraşdırılması
The Ulefone Armor X9 supports dual SIM cards and a TF (microSD) card for expandable storage. Follow these steps to install them:
- Telefonun yan tərəfindəki SİM kart tepsisini tapın.
- Təqdim olunan SİM ejektor alətindən istifadə edərək qabı açın.
- Nano-SIM kartlarınızı diqqətlə təyin olunmuş yuvalara (SIM1 və SIM2) yerləşdirin.
- If using a TF card, place it into the dedicated TF card slot. Note that some configurations may share a slot between SIM2 and the TF card.
- Gently push the tray back into the phone until it is flush with the device body. Ensure the tray is properly sealed to maintain water and dust resistance.

Figure 2: Illustration of the dual SIM and TF card tray, showing how to insert SIM1, SIM2, and a TF card into the Ulefone Armor X9.
2.2. İlkin Doldurma
Before first use, it is recommended to fully charge your Ulefone Armor X9. Use the provided USB cable and power adapter.
- USB kabelini telefonunuzun şarj portuna qoşun.
- USB kabelin digər ucunu güc adapterinə qoşun.
- Elektrik adapterini rozetkaya qoşun.
- Ekranda şarj göstəricisi görünəcək. Batareya işarəsi dolu görünənə qədər telefonun şarj olunmasına icazə verin.
2.3. Açma / Söndürmə
- Yandırmaq üçün: Press and hold the Power button (usually on the right side) until the Ulefone logo appears.
- Söndürmək üçün: Press and hold the Power button until the power options menu appears on the screen. Select "Power off" and confirm.
- Yenidən Başlamaq üçün: Güc seçimləri menyusundan "Yenidən başla" seçin və təsdiqləyin.
3. Əməliyyat Təlimatları
3.1. Əsas Naviqasiya (Android 11)
Your Ulefone Armor X9 runs on Android 11, offering an intuitive user interface. Common gestures and navigation include:
- Yuxarı sürüşdürün: Proqram qutusuna daxil olun.
- Aşağı sürüşdürün: Open the notification panel and quick settings.
- Klikləyin: Element seçin və ya proqram açın.
- Uzun Mətbuat: Kontekst menyularına daxil olun və ya nişanları köçürün.
- Böyütmək üçün Çimdik: Şəkilləri böyütmək və ya kiçiltmək və web səhifələr.

Figure 3: Screenshots of the Android 11 interface on the Ulefone Armor X9, showing settings menus, quick toggles, and the sound recorder application.

Figure 4: The 5.5-inch 18:9 All Screen display of the Ulefone Armor X9, showcasing its immersive viewing experience with an image of a skier.
3.2. Kamera İstifadəsi
Your phone is equipped with a 16MP Triple Rear Camera and a Front Camera. To use the camera:
- Ana ekrandan və ya tətbiq çekmecesindən "Kamera" tətbiqini açın.
- Şəkil çəkmək üçün çekim düyməsini klikləyin.
- Lazım olduqda foto və video rejimləri arasında keçid edin.
- Tap the icon to switch between the front and rear cameras.
- Explore various camera modes and settings for optimal results.
3.3. Bağlantı
The Ulefone Armor X9 supports various connectivity options:
- Wi-Fi: Mövcud şəbəkələrə qoşulmaq üçün Parametrlər > Şəbəkə və internet > Wi-Fi bölməsinə keçin.
- Bluetooth: Go to Settings > Connected devices > Bluetooth to pair with Bluetooth devices.
- GPS: The phone features AGPS for accurate location services. Ensure location services are enabled in Settings > Location.
- USB: Connect your phone to a computer using a USB cable for data transfer or charging.
3.4. Üz Kilidi
For convenient and secure unlocking, your Ulefone Armor X9 supports Face Unlock:
- Go to Settings > Security > Face Unlock.
- Üzünüzü qeyd etmək üçün ekrandakı təlimatlara əməl edin.
- Ensure good lighting and hold the phone at eye level during registration.
- Once registered, you can unlock your phone by simply looking at the front camera.
4. Baxım
4.1. Təmizlik və Qulluq
To maintain the performance and appearance of your rugged phone:
- Ekranı və korpusu yumşaq, tüysüz parça ilə silin.
- İnadkar kir üçün bir az d istifadə edinamp parça. Sərt kimyəvi maddələrdən və ya aşındırıcı materiallardan çəkinin.
- Ensure all port covers are securely closed to maintain water and dust resistance, especially after charging or using headphones.

Figure 5: The Ulefone Armor X9's 360° All Protection Design, showcasing its superior materials and superb durability against impacts and harsh conditions.
4.2. Water and Dust Resistance (IP68/IP69K)
The Ulefone Armor X9 is rated IP68/IP69K, meaning it is resistant to dust and water immersion. However, this resistance is not permanent and may decrease over time with normal wear. To ensure optimal protection:
- Do not intentionally submerge the phone in water for extended periods or beyond specified depths.
- Avoid exposing the phone to high-pressure water or extreme temperatures.
- Ensure all port covers are tightly sealed before exposure to water or dust.
- If the phone gets wet, dry it thoroughly before charging or opening any ports.
4.3. Batareyaya qulluq
To prolong the life of your 5580mAh Lithium Polymer battery:
- Həddindən artıq temperaturdan (isti və ya soyuq) çəkinin, çünki onlar batareyanın işini pisləşdirə bilər.
- Use only the original charger and cable or certified compatible accessories.
- Batareyanın tez-tez tamamilə boşalmasına icazə verməyin. Çox aşağı səviyyələrə çatmamışdan əvvəl doldurun.
5. Giderme
If you encounter issues with your Ulefone Armor X9, try the following troubleshooting steps:
5.1. Telefon Yanmır
- Batareyanın doldurulduğundan əmin olun. Telefonu ən azı 30 dəqiqə şarj cihazına qoşun.
- Yenidən başlamağa məcbur etmək üçün Güc düyməsini 10-15 saniyə basıb saxlayın.
5.2. Doldurma Problemləri
- Verify that the charging cable and adapter are working correctly. Try a different charger if available.
- Doldurma portunun təmiz və zibil olmadığından əmin olun.
- Make sure the charging cable is fully inserted into the port. Some rugged phone ports may require a firm connection due to protective covers.
5.3. SIM/TF Card Not Detected
- Ensure the SIM/TF card is correctly inserted into the tray and the tray is fully seated.
- Telefonu yenidən başladın.
- Check if the SIM card is active with your network provider.
5.4. App Crashes or Freezing
- Problemli tətbiqi bağlayın və yenidən açın.
- Proqramın keşini və məlumatlarını silin (Parametrlər > Proqramlar > [Tətbiq Adı] > Yaddaş və keş).
- Proqramın ən son versiyaya yeniləndiyinə əmin olun.
- Telefonu yenidən başladın.
5.5. Zavod parametrlərinə sıfırlama
Problemlər davam edərsə, zavod parametrlərinə yenidən qurmaq onları həll edə bilər. Xəbərdarlıq: Bu, telefonunuzdakı bütün məlumatları siləcək. Davam etməzdən əvvəl vacib məlumatların ehtiyat nüsxəsini çıxarın.
- Parametrlər > Sistem > Seçimləri sıfırla bölməsinə keçin.
- "Bütün məlumatları silmək (zavod parametrlərinə yenidən qurmaq)" seçimini seçin.
- Qərarınızı təsdiqləyin və istənildikdə PIN/şifrənizi daxil edin.
6. Spesifikasiyalar
Below are the detailed specifications for the Ulefone Armor X9:

Figure 6: Details of the Ulefone Armor X9's Octa-Core Processor, highlighting its power-efficient yet powerful performance, along with 3GB RAM and 32GB ROM, and support for up to 256GB TF card extendable storage.
| Xüsusiyyət | Spesifikasiya |
|---|---|
| Əməliyyat sistemi | Android 11.0 |
| RAM | 3 GB (Note: Feature bullets mention 4GB RAM, please verify actual model) |
| Yaddaş Saxlama Tutumu | 32 GB (Expandable with TF card up to 256GB. Feature bullets mention 128GB ROM, please verify actual model) |
| CPU Modeli | MT6762 səkkiz nüvəli 1.8 GHz (Note: Specifications list 'Snapdragon', but image indicates MT6762. Please verify actual model) |
| Məhsul Ölçüləri | 15.8 x 7.75 x 1.38 sm |
| Maddə Çəkisi | 472 q |
| Batareyalar | 1 Lithium Polymer battery (5580mAh, included) |
| Simsiz Rabitə | Cellular, Bluetooth, USB, Wi-Fi |
| GPS | AGPS |
| Xüsusi Xüsusiyyətlər | Rear Camera, Face Unlock, IP68/IP69K, MIL-STD-810G |
| Ekran | 5.5-inch HD+ 1440*720 All Screen |
| Arxa Kamera | 13MP+2MP Dual Rear Camera (Note: Feature bullets mention 16MP Triple Rear Camera, please verify actual model) |
| Ön kamera | 5MP Ön Kamera |
| Rəng | Qara |
| İstehsalçı | Ulefone |
Note: Specifications are based on available product data and may vary slightly. Please refer to your product packaging for the most accurate information. There are discrepancies between feature bullets, specifications, and image text regarding RAM, ROM, CPU, and camera megapixels. This manual uses the most frequently cited or detailed information, with notes for clarification.
7. Zəmanət və Dəstək
7.1. Zəmanət Məlumatı
Your Ulefone Armor X9 is covered by a manufacturer's warranty. The specific terms and duration of the warranty may vary by region and retailer. Please refer to the warranty card included in your product packaging or contact your point of purchase for detailed information regarding warranty coverage and claims.
7.2. Müştəri dəstəyi
For technical assistance, troubleshooting beyond this manual, or warranty inquiries, please contact Ulefone customer support or your authorized dealer. You can typically find contact information on the official Ulefone websaytda və ya məhsul sənədlərinizdə.
- Visit the official Ulefone website for FAQs, software updates, and support contact details.
- Dəstəklə əlaqə saxlayarkən alış qəbzinizi və məhsulun seriya nömrəsini əlinizdə saxlayın.


