1. Giriş
This manual provides comprehensive instructions for the installation, operation, and maintenance of your ASRock Intel Arc A380 Challenger ITX 6GB OC Graphics Card. Please read this manual thoroughly before using the product to ensure proper functionality and to prevent damage. Keep this manual for future reference.
2. Təhlükəsizlik Məlumatı
Qrafik kartınızı idarə edərkən və quraşdırarkən həmişə aşağıdakı təhlükəsizlik tədbirlərinə əməl edin:
- Quraşdırmadan əvvəl kompüter sisteminizin elektrikdən söndürüldüyünə və divar rozetkasından çıxarıldığına əmin olun.
- Komponentləri idarə etməzdən əvvəl torpaqlanmış metal əşyaya (məsələn, kompüter korpusuna) toxunaraq bədəninizdəki statik elektrik enerjisini boşaldın.
- Avoid touching the gold-plated connector pins on the graphics card.
- Install the graphics card in a well-ventilated area to prevent overheating.
- Qrafik kartı nəmə və ya həddindən artıq temperatura məruz qoymayın.
3. Paketin məzmunu
Məhsul paketinizdə bütün elementlərin olduğunu yoxlayın:
- ASRock Intel Arc A380 Challenger ITX 6GB OC Graphics Card
- Sürətli Quraşdırma Bələdçisi
4. Məhsul bitdiview
The ASRock Intel Arc A380 Challenger ITX 6GB OC Graphics Card is designed for compact systems, offering capable graphics performance in a single-slot ITX form factor. It features Intel's Arc A380 GPU with 6GB of GDDR6 memory and a 2250 MHz clock speed. Key features include a striped axial fan, 0dB silent cooling, and support for modern display technologies.

Figure 4.1: ASRock Intel Arc A380 Challenger ITX 6GB OC Graphics Card
4.1. Ölçülər
This graphics card features a compact design suitable for ITX systems.

Figure 4.2: Graphics Card Dimensions (Approx. 7.48 in x 4.88 in, 2-slot)
4.2. Display Outputs
The card provides multiple display outputs for versatile connectivity.
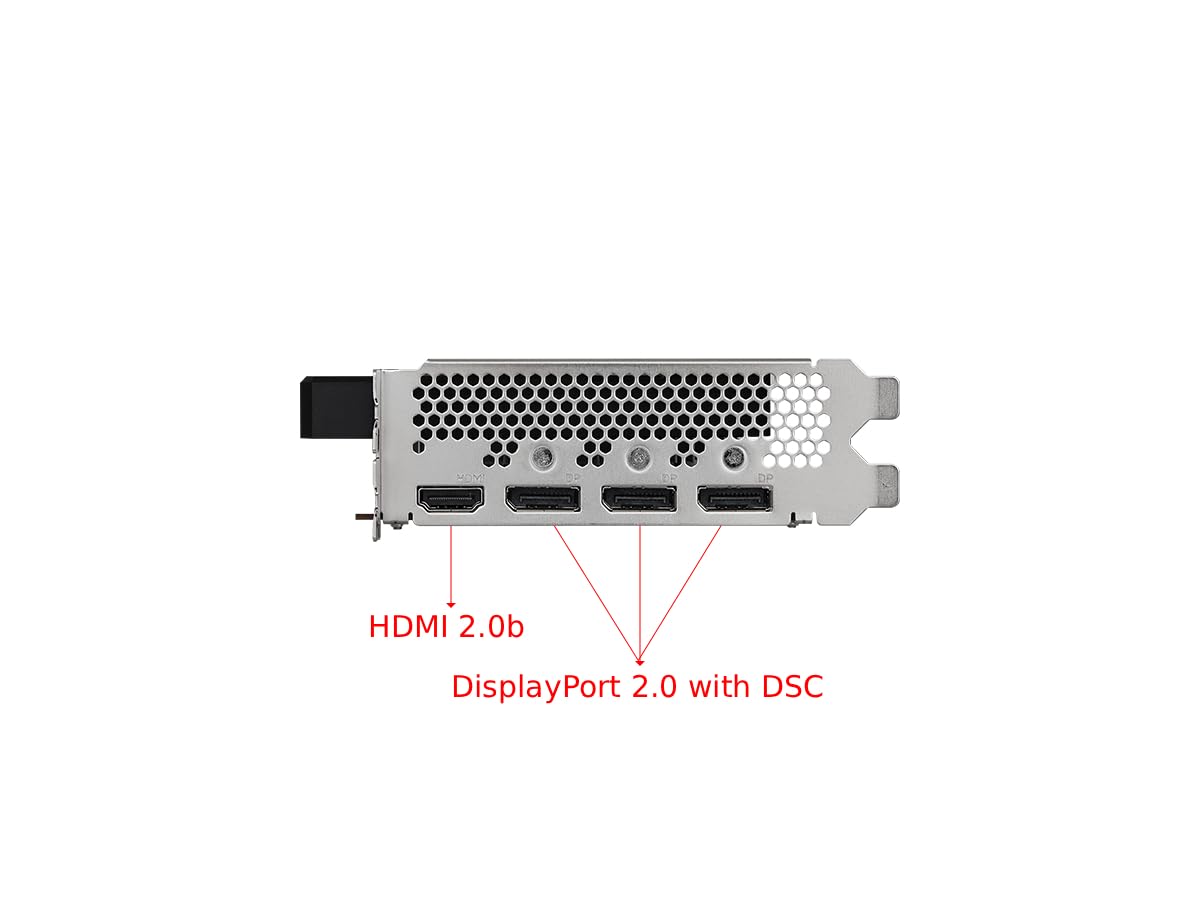
Figure 4.3: Display Outputs (1x HDMI 2.0b, 3x DisplayPort 2.0 with DSC)
4.3. Soyutma sistemi
The ASRock custom Striped Axial Fan design enhances airflow for optimal cooling. The 0dB Silent Cooling technology ensures the fans stop spinning under light workloads for quiet operation.

Figure 4.4: Striped Axial Fan for enhanced airflow

Figure 4.5: 0dB Silent Cooling: Fans stop under light workloads
4.4. Rəsmi Məhsul Videosu
Video 4.1: Bitdiview of Intel ARC Graphics Cards by ASRock USA. This video provides a general introduction to the Intel ARC graphics card series.
5. Quraşdırma
5.1. Fiziki Quraşdırma
- Sisteminizi hazırlayın: Kompüterinizi söndürün və bütün kabelləri ayırın. Kompüter qutusunu açın.
- Locate a PCIe slot: Anakartınızda mövcud olan PCI Express 4.0 x16 yuvasını müəyyən edin.
- Remove slot cover: Kompüter korpusundan müvafiq yuva qapağını çıxarın.
- Qrafik kartı daxil edin: Carefully align the graphics card with the PCIe slot and press it down firmly until it is securely seated. Ensure the retention clip on the PCIe slot locks into place.
- Kartı təhlükəsizləşdirin: Qrafik kartı kompüter korpusuna vintlə bərkidin.
- Gücü birləşdirin: Connect the single 8-pin PCIe power connector from your power supply to the graphics card. Ensure your power supply meets the recommended 500W minimum.
- Close case: Kompüterinizin korpusunu bağlayın və bütün kabelləri yenidən birləşdirin.
5.2. Sürücünün quraşdırılması
After physical installation, you must install the latest drivers for your graphics card:
- Kompüterinizi işə salın.
- Rəsmi ASRock-u ziyarət edin website or Intel's support websayt.
- Navigate to the support section and locate the drivers for the Intel Arc A380 series.
- Download the latest graphics drivers for your operating system.
- Run the installer and follow the on-screen instructions. A system restart may be required.
6. işlək
Once drivers are installed, your ASRock Intel Arc A380 Challenger ITX graphics card is ready for use. Connect your display(s) to the available DisplayPort 2.0 or HDMI 2.0b ports. You can configure display settings, resolution, and refresh rates through your operating system's display settings or the Intel Arc Control software.
7. Baxım
Mütəmadi texniki xidmət qrafik kartınızın uzunömürlülüyünü və optimal işləməsini təmin etməyə kömək edir:
- Toz Təmizləmə: Periodically clean dust from the fan and heatsink using compressed air. Ensure the system is powered off and unplugged before cleaning.
- Sürücü Yeniləmələri: Keep your graphics drivers updated to the latest version. New drivers often include performance improvements, bug fixes, and compatibility enhancements.
- Temperaturun monitorinqi: Use monitoring software to keep an eye on the GPU temperature, especially during heavy workloads. While the 0dB cooling feature is efficient, ensuring good case airflow is crucial.
8. Giderme
Qrafik kartınızla bağlı problemlərlə qarşılaşsanız, aşağıdakı problemlərin aradan qaldırılması addımlarını nəzərdən keçirin:
- Ekran çıxışı yoxdur:
- Qrafik kartın PCIe yuvasına tam yerləşdiyinə əmin olun.
- Verify that the 8-pin power connector is securely attached.
- Check that your monitor cable is correctly connected to the graphics card and the monitor.
- Fərqli bir ekran çıxış portu və ya kabeli sınayın.
- Driver Issues/Instability:
- Perform a clean installation of the latest graphics drivers. Uninstall previous drivers completely before installing new ones.
- Ensure your motherboard BIOS/UEFI is updated to the latest version, as this can improve compatibility.
- Verify that Resizable BAR (ReBAR) is enabled in your system's BIOS/UEFI for optimal performance with Intel Arc GPUs.
- Həddindən artıq istiləşmə:
- Kompüter korpusunuzda kifayət qədər hava dövranını təmin edin.
- Clean any dust buildup from the graphics card's fan and heatsink.
- Check that the fan is spinning correctly under load.
9. Spesifikasiyalar
| Xüsusiyyət | Spesifikasiya |
|---|---|
| Qrafik koprosessor | Intel Arc A380 |
| Video yaddaş | 6 GB GDDR6 |
| Yaddaş sürəti | 15.5 Gbps |
| Mühərrik saatı | 2250 MHz |
| Maksimum Ekran Çözünürlüğü | 7680x4320 Piksel (8K) |
| Video çıxış interfeysi | 3x DisplayPort 2.0, 1x HDMI 2.0b |
| Element Model nömrəsi | 90-GA3KZZ-00UANF |
| Maddə Çəkisi | 1.32 funt sterlinq |
| Məhsul Ölçüləri | 1.1 x 9.7 x 0.04 düym |
| Tövsiyə olunan PSU | 500W |
10. Zəmanət və Dəstək
ASRock provides a manufacturer's warranty for this product. Please refer to the warranty card included in your package or visit the official ASRock website for detailed warranty terms and conditions. For technical support, driver downloads, and FAQs, please visit the ASRock support page at www.asrock.com/support.asp.
Optional protection plans are available for purchase, offering extended coverage beyond the standard manufacturer's warranty. These plans typically cover 3-year or 4-year durations, or monthly subscription options.


