1. Giriş
This manual provides detailed instructions for the installation, operation, and maintenance of your MOUNTUP MU2007 Gas Spring Monitor Wall Mount. Please read this manual thoroughly before installation to ensure correct setup and safe use. Retain this manual for future reference.
2. Təhlükəsizlik Məlumatı
- Çəki tutumu: Do not exceed the maximum weight capacity of 17.6 lbs (8 kg). Exceeding this limit may result in serious injury or product damage.
- Ekran Ölçüsü: This mount is designed for monitors between 17 and 32 inches.
- Divar növü: Bu montaj taxta dirəklərə, beton divarlara və ya kərpic divarlara quraşdırmaq üçün nəzərdə tutulmuşdur. TƏK GİPSOVAR ÜZƏRİNƏ MONTAJ ETMƏYİN. Ensure the mounting surface can safely support the combined weight of the mount and your monitor.
- VESA Uyğunluğu: Ensure your monitor has VESA mounting patterns of 75x75mm or 100x100mm. If your monitor has a different VESA pattern, a VESA adapter (not included) may be required.
- Professional quraşdırma: If you are unsure about the installation process or the suitability of your wall, consult a qualified professional.
- Hərəkət edən hissələr: The gas spring arm contains moving parts. Exercise caution during adjustment to avoid pinching or injury.
3. Paketin məzmunu
Please verify that all components are present and undamaged before beginning installation. Refer to the included hardware bag for specific part identification.
Şəkil: Partladı view of the monitor mount components, including the gas spring arm, wall plate, VESA plate, and various covers and fasteners.
4. Spesifikasiyalar
| Model | MU2007 |
| Brend | MOUNTUP |
| Ekran ölçüsü uyğunluğu | 17 - 32 düym |
| Çəki tutumu | 4.4 - 17.6 funt (2 - 8 kq) |
| VESA Uyğunluğu | 75x75mm, 100x100mm |
| Hərəkət növü | Tilt, Rotate, Swivel, Height Adjust, Full Motion |
| Tilt Bucağı | +90° / -45° |
| Fırlanma | 360° (Landscape/Portrait) |
| Fırlanan | 180° at wall plate, 270° at arm joint |
| Hündürlük tənzimlənməsi | 10.6 düym |
| Max Extension from Wall | 21 düym |
| Min Retraction to Wall | 3 düym |
| Material | Alüminium, Metal |
| Rəng | Qara |
5. Uyğunluğun yoxlanılması
Before installation, confirm your monitor and wall meet the following criteria:
- Monitor Ölçüsü: Your monitor screen size should be between 17 and 32 inches.
- Monitor çəkisi: Your monitor must weigh between 4.4 lbs (2 kg) and 17.6 lbs (8 kg).
- VESA nümunəsi: Check the back of your monitor for a 75x75mm or 100x100mm square hole pattern.
- Divar növü: The mount must be installed on a solid wood stud, concrete wall, or brick wall. Drywall alone is not sufficient.

Şəkil: Visual guide for checking monitor size (17"-32"), load capacity (4.4-17.6 lbs), and VESA pattern (75x75mm/100x100mm).

Şəkil: Illustration of compatible wall types: wood stud, concrete wall, and brick wall. A warning indicates not to use anchors on drywall or wood, implying direct mounting to studs or using appropriate anchors for masonry.
6. Quraşdırma və Quraşdırma
Təhlükəsiz quraşdırma üçün bu addımları diqqətlə izləyin.
6.1 Attaching the VESA Plate to Your Monitor
- Carefully place your monitor face down on a soft, clean surface to prevent scratches.
- VESA lövhəsini monitorunuzun arxasındakı montaj dəlikləri ilə hizalayın.
- Secure the VESA plate using the appropriate screws and washers provided in the hardware kit. Do not overtighten.
Şəkil: The VESA mounting plate being secured to the back of a monitor with screws, indicating the initial step of preparing the monitor for attachment to the arm.
6.2 Divar lövhəsinin quraşdırılması
Əhəmiyyətli: Use a stud finder to locate a wood stud, or ensure you have the correct masonry anchors for concrete/brick walls. A built-in level on the wall plate assists with alignment.
- Determine the desired height and position for your monitor.
- Hold the wall plate against the wall at the chosen location. Use the integrated bubble level to ensure it is perfectly horizontal.
- Mark the drilling points through the holes on the wall plate.
- Drill pilot holes according to the instructions for your specific wall type (wood stud, concrete, or brick).
- Attach the wall plate securely to the wall using the provided lag bolts for wood studs or appropriate anchors and bolts for masonry.

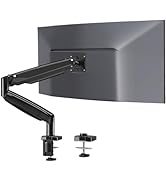
Şəkil: Yaxın plan view of the wall mounting plate, highlighting the integrated bubble level for accurate horizontal alignment during installation.
6.3 Attaching the Monitor Arm to the Wall Plate
- Slide the monitor arm assembly onto the wall plate.
- Secure the arm to the wall plate using the designated fasteners.
6.4 Attaching the Monitor to the Arm
- With assistance, carefully lift the monitor (with the VESA plate attached) and slide it onto the VESA head of the arm.
- Secure the monitor to the arm using the thumb screw or other locking mechanism.
7. İstismar Təlimatları (Düzəlişlər)
The MOUNTUP MU2007 offers a full range of motion for optimal viewrahatlıq.
7.1 Gas Spring Adjustment (Monitor Weight)
The gas spring tension needs to be adjusted to match your monitor's weight for smooth movement and stable positioning. If the monitor rises too easily or drops, adjust the tension.
- Monitor Raises Up (too light): Turn the adjustment screw clockwise ("-" direction) to reduce tension for a lighter monitor.
- Monitor Drops Down (too heavy): Turn the adjustment screw counter-clockwise ("+" direction) to increase tension for a heavier monitor.
Qeyd: When adjusting gas spring tension, hold the arm in a horizontal position. The number of turns depends on the display's weight; it may take up to 17 turns to find the correct tension.
7.2 Tilt Angle Adjustment
Adjust the monitor's vertical angle for optimal viewing.
- Loosen the tilting bolt (turn to "-" direction).
- Adjust the monitor to your desired angle (+90° / -45°).
- Retighten the tilting bolt (turn to "+" direction) to secure the position.
Şəkil: Detailed instructions for adjusting the gas spring tension (clockwise for lighter monitors, counter-clockwise for heavier monitors) and the tilt angle (loosen, adjust, retighten bolt).
7.3 Rotation (Landscape/Portrait)
The monitor can be rotated 360° to switch between landscape and portrait orientations.

Şəkil: A monitor shown rotating 360 degrees, illustrating the ability to switch between landscape and portrait orientations.
7.4 Dönmə və uzadılma
The arm allows for 180° swivel at the wall plate and 270° at the arm joint, providing flexible positioning. It can extend up to 21 inches from the wall and retract to a minimum of 3 inches when not in use, maximizing desktop space.

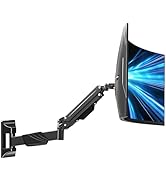
Şəkil: A monitor arm swiveling and folding towards the wall, demonstrating how it can control desktop space by retracting to a minimum of 3 inches and extending up to 21 inches.
7.5 Hündürlüyün tənzimlənməsi
The gas spring mechanism allows for a smooth 10.6-inch vertical height adjustment, enabling ergonomic positioning for both seated and standing work.

Şəkil: Şəffaf view of the monitor arm highlighting the internal gas spring and demonstrating a 10.6-inch height adjustment range for smooth movement.
7.6 Kabel idarəetməsi
Route your cables through the integrated cable management channels on the arm to maintain a clean and organized workspace.

Şəkil: A monitor arm with blue cables neatly routed along its underside, illustrating the integrated cable management feature designed to keep the workspace tidy.
8. Baxım
- Təmizləmə: Montajı yumşaq bir parça ilə silin, damp parça. Aşındırıcı təmizləyicilərdən və ya həlledicilərdən çəkinin.
- Dövri yoxlamalar: Bütün vintlərin və boltların möhkəm və etibarlı olduğundan əmin olmaq üçün vaxtaşırı yoxlayın. Lazım gələrsə, yenidən sıxın.
- Qaz Bulaq: The gas spring is designed for long-term use and generally requires no maintenance. If movement becomes stiff or loose, refer to the gas spring adjustment section.
9. Giderme
- Monitor does not stay in position (drifts up or down): This indicates incorrect gas spring tension. Refer to Section 7.1 "Gas Spring Adjustment" and adjust the tension screw until the monitor holds its position smoothly. Remember to hold the arm horizontally during adjustment.
- Monitoru hərəkət etdirmək çətindir: The gas spring tension may be too high for your monitor's weight, or the pivot points might be too tight. Loosen the gas spring tension slightly (turn clockwise) or check for any overtightened bolts at the arm joints.
- Monitor wobbles: Ensure all mounting bolts (wall plate, arm to wall plate, VESA plate to monitor, and monitor to arm) are securely tightened. Check that the wall mount is firmly attached to a suitable wall structure.
- Monitor cannot tilt: Ensure the tilt angle adjustment bolt (refer to Section 7.2) is sufficiently loosened before attempting to tilt the monitor.
10. Zəmanət və Dəstək
This MOUNTUP product is backed by a 3-year support period. If you encounter any issues during installation or use, or have any questions, please contact MOUNTUP customer service for assistance. Refer to your purchase documentation for contact details.


