Giriş
This manual provides detailed instructions for the installation, operation, and maintenance of your Biorunn Android 13 Car Radio Stereo. Please read this manual thoroughly before installation and use to ensure proper function and safety. This head unit is designed for Toyota Camry models from 2018 to 2020, featuring a 10.1-inch IPS touchscreen, Octa-Core processor, 4GB RAM, and 64GB ROM, with built-in Wireless/Wired CarPlay and Android Auto capabilities.
Applicable Models & Compatibility
This Biorunn Android 13 Car Radio Stereo is specifically designed for the following vehicle models:
- Toyota Camry: 2018, 2019, 2020
Please verify your car's year and center console design carefully. If your original center control is a one-piece unit and not separated below, it cannot be installed. Refer to the image below for visual guidance.
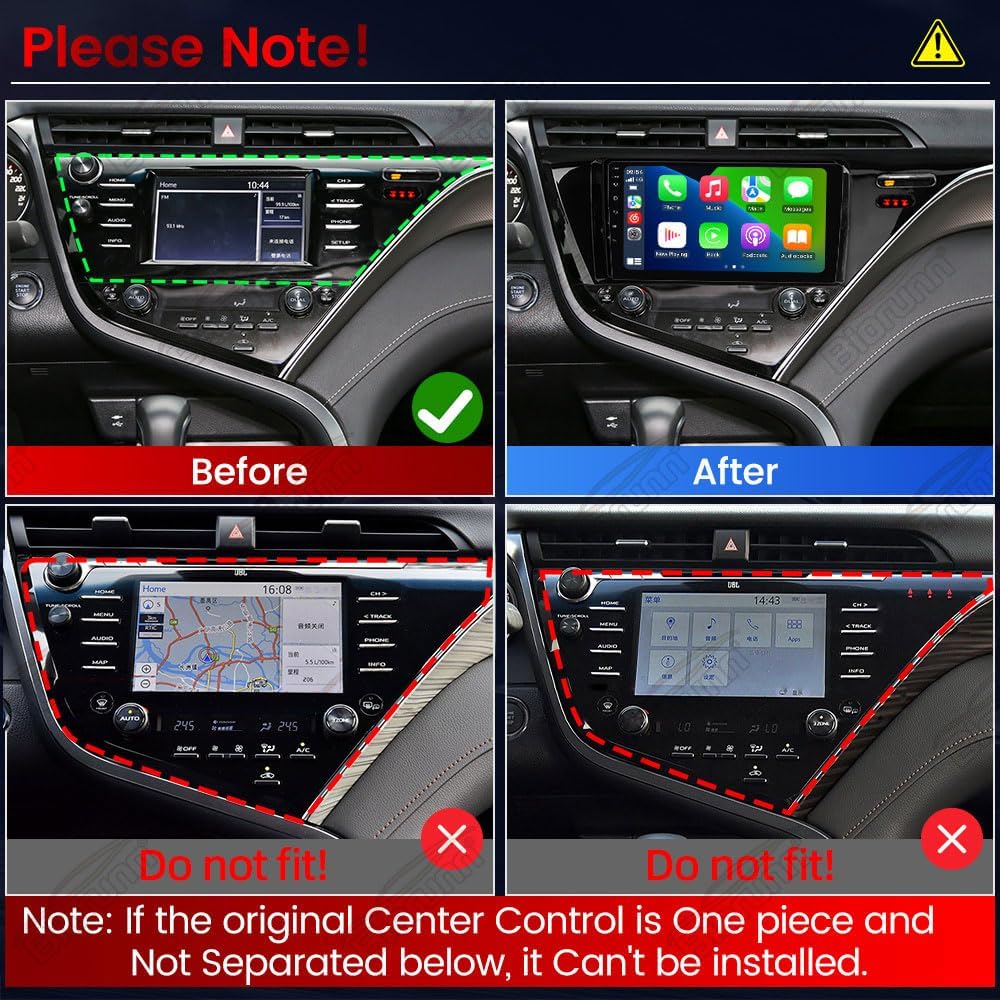
Image: Compatibility check for Toyota Camry center console. The top row shows a compatible console (left) and the Biorunn unit installed (right). The bottom row shows incompatible one-piece consoles.
Qutuda nə var
Paketə aşağıdakı komponentlər daxildir:
- 1 x Biorunn Android 13 Car Radio Stereo Head Unit
- 1 x Elektrik kabeli
- 1 x Canbus decoder
- 2 x USB kabellər
- 1 x RCA cable set
- 1 x GPS antenası
- 1 x 4G Antena
- 1 x Xarici Mikrofon (MIC)
- Mounting Brackets (metal)
- Pry Tool and Zip Ties
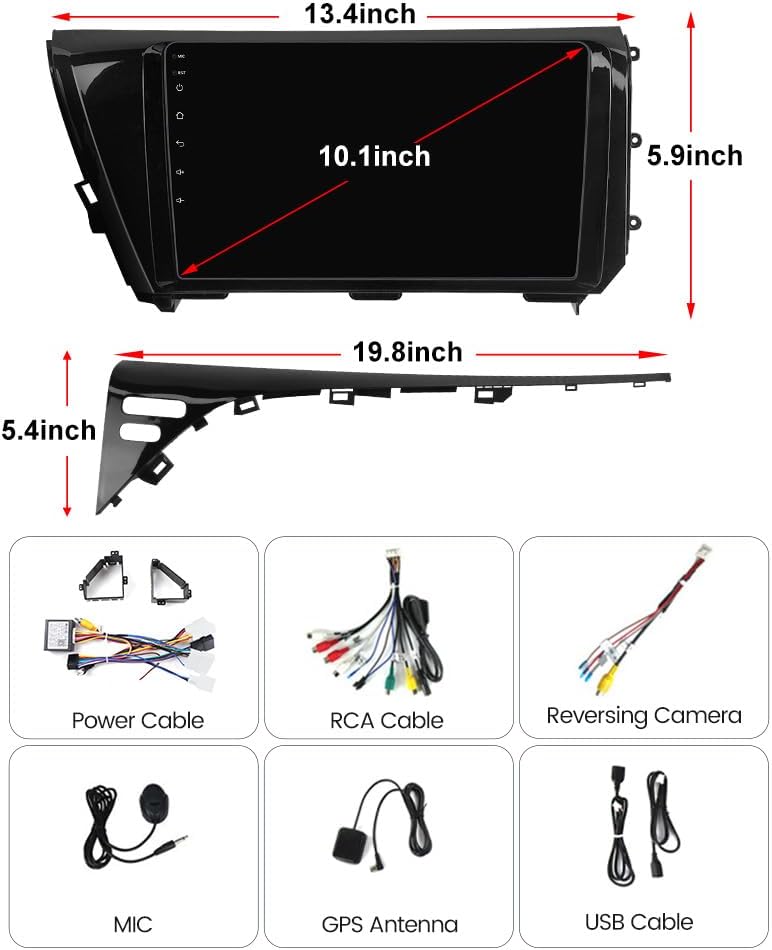
Image: Included components and head unit dimensions.
Xüsusiyyətlər
Your Biorunn Car Radio Stereo comes equipped with advanced features for an enhanced driving experience:
- Android 13 Sistemi: Enjoy the latest Android operating system on a responsive IPS Touch screen.
- Built-in Wireless/Wired CarPlay & Android Auto: Seamlessly integrate your smartphone for navigation, calls, music, and messages.
- Bluetooth & FM/AM RDS Radio: Supports hands-free calling, phone book download, music playback, and FM/AM radio with RDS for station information.
- Octa-Core Processor with 4GB RAM & 64GB ROM: Ensures smooth performance and ample storage for apps.
- Digital Sound Processor (DSP): Multi-format audio and video decoding with brightness adjustment.
- Sükan çarxına nəzarət: Retains original steering wheel remote control functionality for convenience and safety.
- GPS naviqasiyası: GPS Enabled with worldwide map support.
- Bağlantı: Supports 4G, Bluetooth, USB, and Wi-Fi for versatile connectivity options.
- Ekran: 10.1-inch IPS Touch screen with 1280x720 resolution.
- Soyuducu Fan: Integrated cooling fan to maintain optimal operating temperature and prevent overheating.
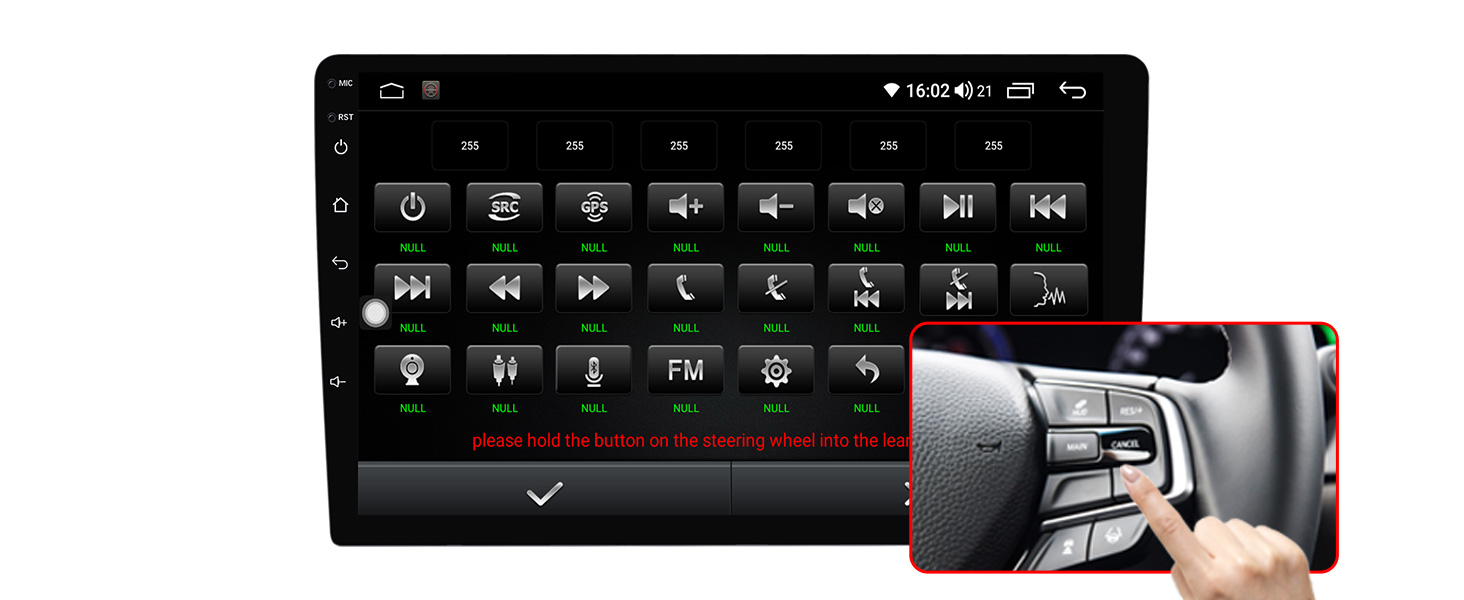
Image: Comparison of head unit temperatures with and without the integrated cooling fan.
Quraşdırma və Quraşdırma
Installation of the Biorunn head unit is designed to be plug-and-play, retaining most original car functionalities. It is recommended to disconnect the car battery before starting the installation process.
1. Removing the Original Head Unit and Trim
Carefully remove the trim pieces surrounding your original head unit. It is crucial to remove them in the correct order to avoid damage, as some pieces overlap. Use the provided pry tool for this process. Take photos of the wiring connections before unplugging anything for future reference, especially if you plan to revert to the OEM unit.

Image: Before and after view of the dashboard with the new head unit installed.
2. Naqil birləşmələri
Connect the provided harnesses to the new Biorunn head unit and then to your car's factory plugs. The harnesses are color-coded and designed to prevent incorrect connections. Ensure all necessary cables, including the GPS antenna, 4G antenna, and external microphone, are properly connected and routed.

Image: Comprehensive wiring diagram for the head unit.
3. Antenna and Microphone Routing
Route the GPS antenna, 4G antenna, and external microphone to optimal locations. The GPS antenna should have a clear view of the sky, the 4G antenna should be placed where it can receive a strong signal, and the microphone should be positioned for clear voice capture, typically near the driver's headliner or A-pillar.
4. Securing the New Head Unit
Attach the new metal mounting brackets to the Biorunn head unit using the provided screws. Carefully slide the new head unit into the dashboard opening, ensuring all connections are secure and wires are not pinched. Reinstall the trim pieces in reverse order of removal.
Quraşdırma video təlimatı
Video: Step-by-step guide on how to install the Toyota adapter and head unit.
Video: Detailed installation process for the 11.6-inch head unit in a Toyota Camry.
Əməliyyat Təlimatları
The Biorunn Android 13 head unit features an intuitive touchscreen interface similar to a tablet. Power on the unit by starting your vehicle. The Android logo will appear, followed by the main home screen.
1. İstifadəçi İnterfeysində Naviqasiya
Swipe left or right on the home screen to access different application pages. The main screen typically displays widgets for music, radio, and frequently used apps. Tap on icons to launch applications.
2. Radio əməliyyatı
Tap the 'Radio' icon to access the FM/AM tuner. You can manually tune frequencies by swiping across the frequency bar or use preset stations. The RDS feature provides station information where available.
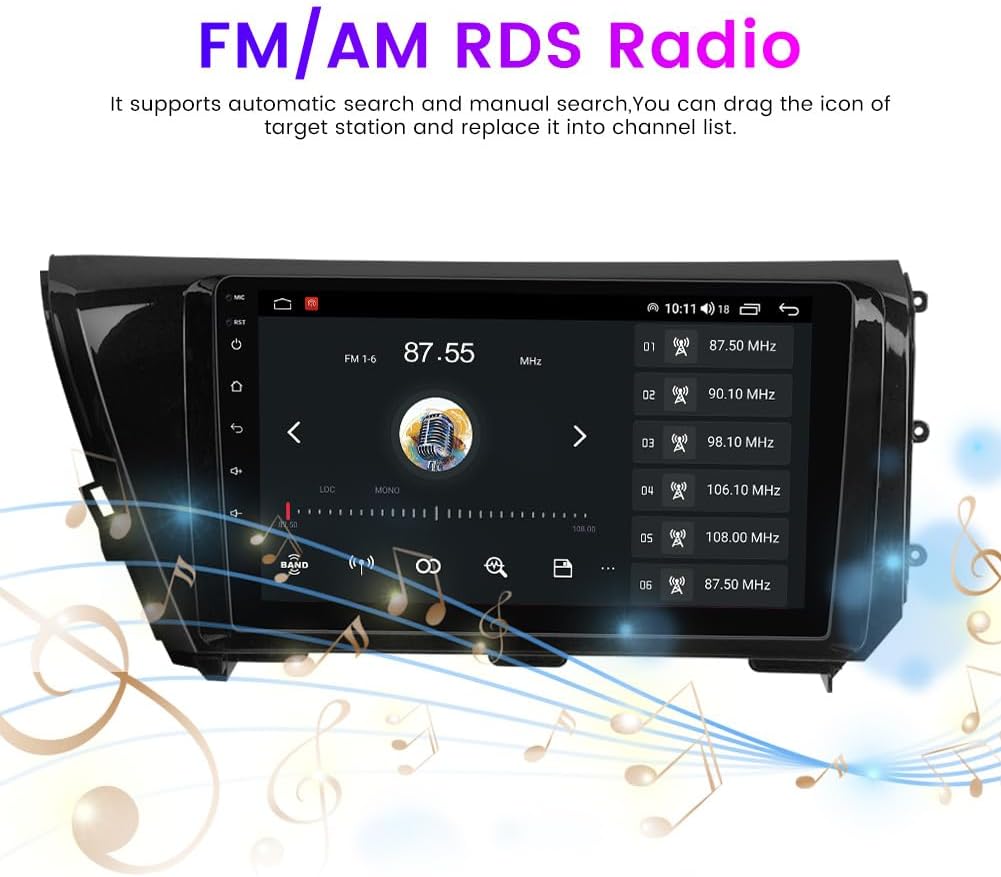
Image: FM/AM RDS Radio interface.
3. Sound Settings and Equalizer
Access the 'Settings' menu, then navigate to 'Sound' to adjust audio preferences. The built-in equalizer (EQ) allows you to customize sound profiles (e.g., Jazz, Pop, Rock, Classical, News) or create a custom user profile. You can also adjust the sound zone and loudness settings.
4. Simsiz CarPlay və Android Auto
The unit supports both Wireless/Wired CarPlay and Android Auto. Connect your smartphone via Bluetooth for wireless connection or use a USB cable for wired connection. Once connected, your phone's interface will be mirrored on the head unit, allowing access to navigation, calls, messages, and music.

Image: Wireless CarPlay and Android Auto interfaces.
5. GPS Naviqasiyası
Use the pre-installed GPS navigation app or download your preferred navigation app from the Play Store. The unit supports worldwide maps and provides real-time directions.
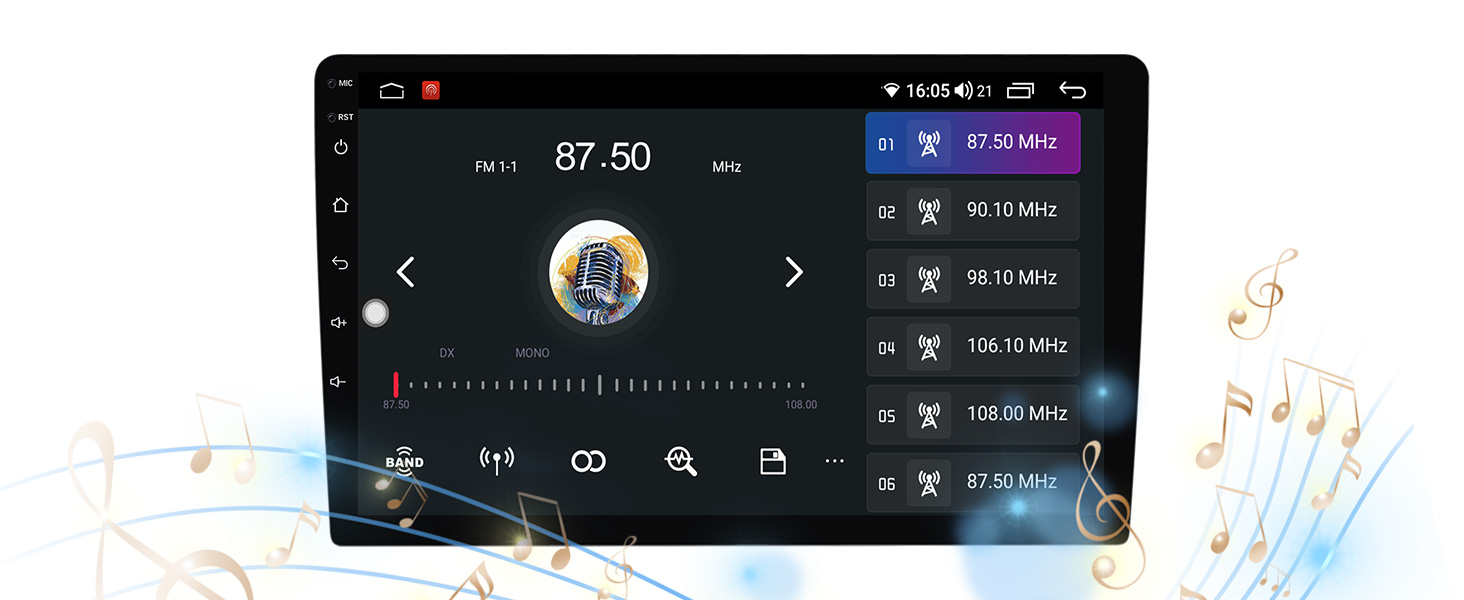
Image: GPS Navigation interface.
6. Sükan idarəetmələri
The head unit is compatible with your vehicle's original steering wheel controls. You may need to enter the 'Steering Wheel' settings in the 'Original' menu to learn or configure the buttons for optimal functionality.

Image: Steering Wheel Control learning interface.
7. Reversing Camera
If a reversing camera is connected (not included), the display will automatically switch to the camera view when the vehicle is put into reverse. The unit supports reversing trajectory and line ruler display for easier parking.

Image: Reversing camera view parklanma qaydaları ilə.
8. Sistem Ayarları
The 'System' settings allow for MCU and system upgrades, time and date adjustments, and developer options. You can also reset the unit to factory settings if needed.
Video: Demonstration of the head unit's user interface, including theme selection, radio, equalizer, and various system settings.
Baxım
To ensure the longevity and optimal performance of your Biorunn Car Radio Stereo, follow these maintenance guidelines:
- Ekranın təmizlənməsi: Use a soft, lint-free cloth to gently wipe the touchscreen. Avoid abrasive cleaners or harsh chemicals that could damage the display.
- Proqram təminatı yeniləmələri: Periodically check for system updates in the 'System' settings to ensure you have the latest features and bug fixes.
- Havalandırma: Ensure the unit's cooling fan and vents are not obstructed to prevent overheating.
- Kabel Bağlantıları: Təhlükəsizliyi və zədələnməməsi üçün bütün kabel birləşmələrini mütəmadi olaraq yoxlayın.
Problemlərin aradan qaldırılması
If you encounter any issues with your Biorunn Car Radio Stereo, refer to the following troubleshooting tips:
- Cihaz işə düşmür: Check the power cable connection and ensure the car battery is properly connected. Verify the fuse for the head unit.
- Səs yoxdur: Check speaker connections, volume levels, and audio settings in the equalizer. Ensure the correct audio output mode is selected.
- Toxunma ekranı cavab vermir: Try restarting the unit. If the issue persists, perform a factory reset (note: this will erase all custom settings and data).
- Bluetooth/CarPlay/Android Auto Connection Issues: Ensure Bluetooth is enabled on both the head unit and your smartphone. Forget the device on both ends and attempt to pair again. For wired connections, try a different USB cable.
- Sükan çarxının idarəediciləri işləmir: Access the 'Steering Wheel' settings in the 'Original' menu and re-learn the controls.
- Arxaview Kamera Göstərilmir: Check the camera's power and video connections. Ensure the 'Reverse' settings are correctly configured (e.g., reversing system selection).
- Poor Wi-Fi/4G Signal: Ensure antennas are properly installed and positioned for optimal reception. Avoid placing antennas near metal obstructions.
For further assistance, please contact Biorunn customer support.
Spesifikasiyalar
| Əməliyyat sistemi | Android 13 |
| RAM | 4 GB |
| ROM | 64 GB |
| Prosessor | Octa Core |
| Ekran Ölçüsü | 10.1 düym |
| Ekran Çözünürlüğü | 1280x720 |
| Bağlantı texnologiyası | Bluetooth, USB, Wi-Fi, 4G |
| Xüsusi Xüsusiyyətlər | Bluetooth, Touchscreen, GPS Enabled |
| Səs Çıxış Modu | Stereo |
| Montaj növü | Tablosuna Dəstək |
| Maddə Çəkisi | 4.99 funt sterlinq |
| Paket Ölçüləri | 20.5 x 7.6 x 5.5 düym |
Zəmanət və Dəstək
Biorunn offers a 1-year warranty and after-sale service for this product. For any technical support or inquiries, please contact RongNan International, the seller. They aim to respond within 24 hours. Kindly advise: 99.99% problems can get a solution, please don't return the product before contact us, thanks!
Əlavə mühafizə planları satın alına bilər:
- 2 İllik Qoruma Planı: $26.99
- 3 İllik Qoruma Planı: $36.99
- Tam qorunma: Bir plan ayda 16.99 dollara bütün uyğun keçmiş və gələcək alışları əhatə edir.


