1. Giriş
This manual provides essential information for the safe and effective operation of your Mastech MS8301A Digital Multimeter. Please read this manual thoroughly before using the device to ensure proper functionality and to prevent potential hazards. Keep this manual for future reference.
2. Təhlükəsizlik Məlumatı
Always adhere to the following safety precautions to avoid electric shock or personal injury, and to prevent damage to the multimeter or the equipment under test.
- Təlimatları oxuyun: Understand all instructions and safety information before use.
- Qiymətləndirilmiş Cildtage: Qiymətləndirilmiş həcmdən artıq tətbiq etməyintage, as marked on the multimeter, between the terminals or between any terminal and ground.
- Test rəhbərləri: Sınaq naqillərini zədələnmiş izolyasiya və ya açıq metal üçün yoxlayın. Zədələnmişsə, dəyişdirin.
- Circuit Disconnection: Disconnect the circuit power and discharge all high-voltage kondansatörlər müqaviməti, davamlılığı, diodları və ya tutumu sınaqdan keçirməzdən əvvəl.
- Funksiya seçimi: Ölçmənin aparılması üçün funksiya açarının düzgün vəziyyətdə olduğundan əmin olun.
- Canlı Dövrələr: Do not measure current on a live circuit with the test leads connected in parallel.
- Əməliyyat mühiti: Do not operate the multimeter in explosive gas, vapor, or damp mühitlər.
- Fərdi Qoruyucu Avadanlıqlar: Always wear appropriate personal protective equipment, such as safety glasses, when working with electrical circuits.
- Təhlükəsizlik reytinqi: This device is rated for CAT III 600V. Do not exceed this rating.
3. Məhsul bitdiview
3.1 Xüsusiyyətlər
The Mastech MS8301A Digital Multimeter offers a range of features for various electrical measurements:
- Ekran: 2000 sayı
- Məlumat saxlama: Rahat qeyd üçün göstərilən oxunu dondurur.
- Battery Tester: For 1.5V and 9V batteries.
- Kompakt dizayn: Product Size: 150mm x 74mm x 48mm (5.9" x 2.9" x 1.7")
- Yüngül: Product Weight: 220g (0.48lb)

Image: Detailed features and specifications of the Mastech MS8301A multimeter, including display count, data hold, battery test function, and physical dimensions.
3.2 Komponentlər
The Mastech MS8301A package typically includes the following components:
- Mastech MS8301A Digital Multimeter Unit
- Test kabelləri (Qırmızı və Qara)
- AAA Batteries (2x1.5V)
- Kalibrləmə Sertifikatı (əgər varsa)
- Tez Başlanğıc Bələdçisi
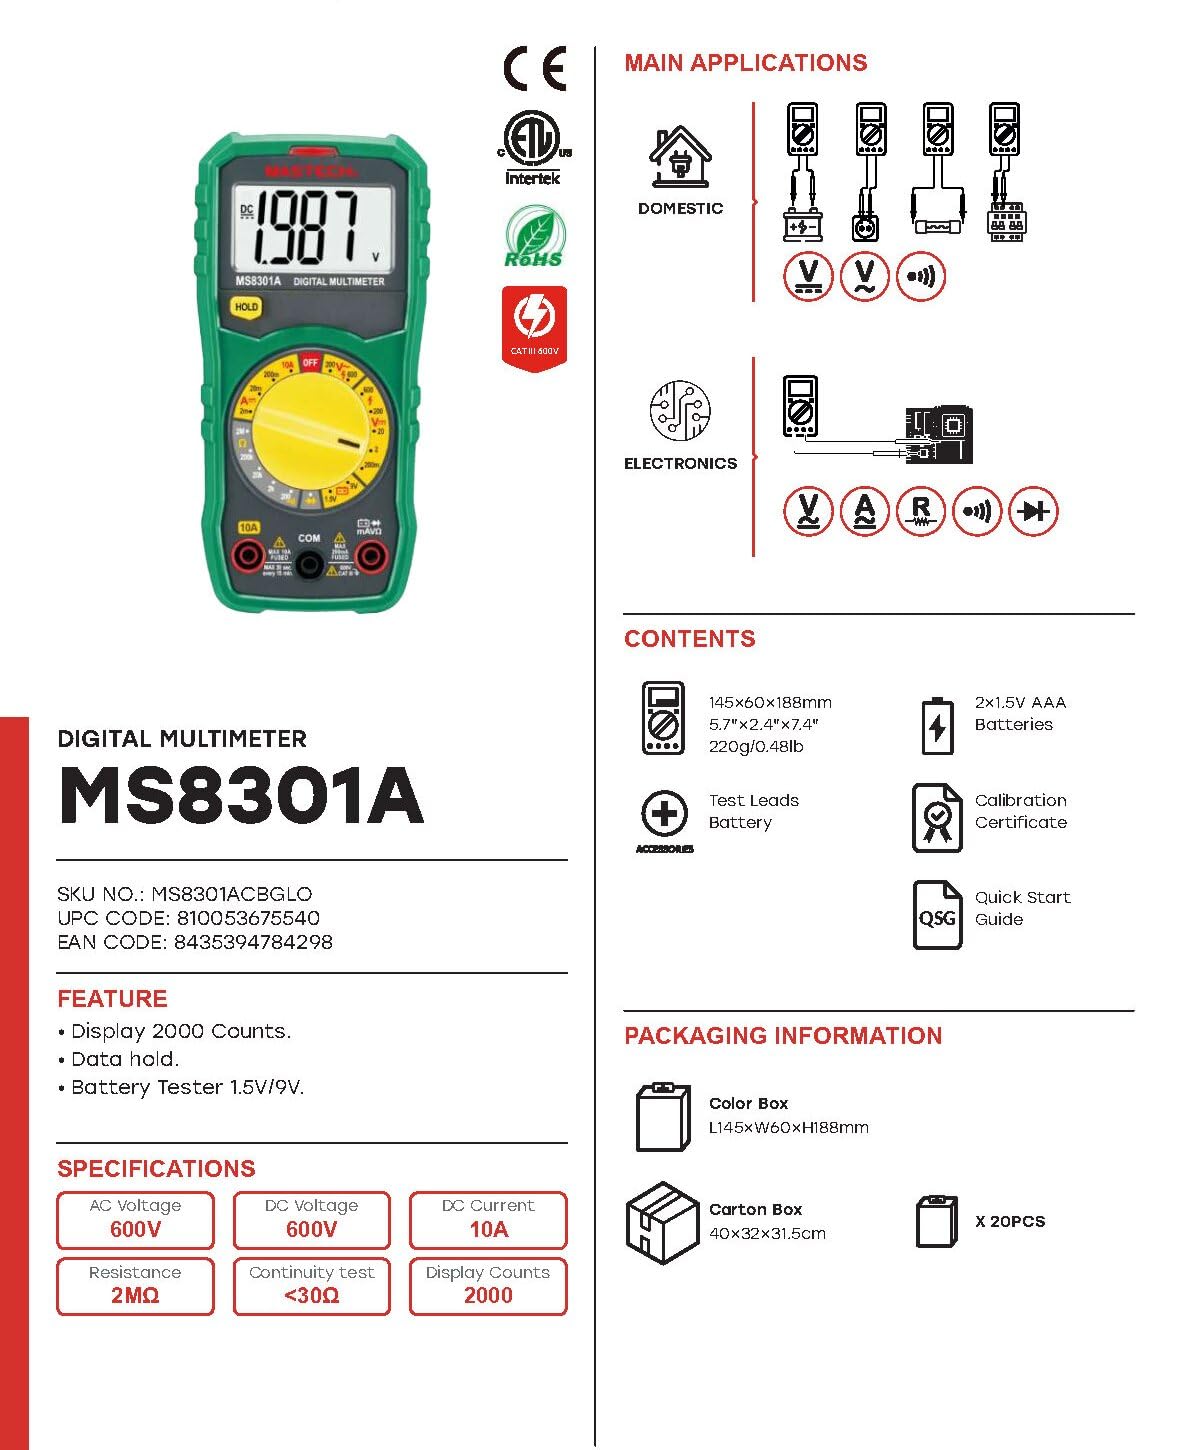
Image: The Mastech MS8301A Digital Multimeter showing its front panel, rotary switch, display, input jacks, and a list of included accessories such as test leads and batteries.
4. Quraşdırma
4.1 Batareyanın quraşdırılması
- Ensure the multimeter is turned off and disconnect any test leads.
- Multimetrin arxasındakı batareya bölməsinin qapağını tapın.
- Saxlama vintini(ləri) açın və qapağı çıxarın.
- Bölmənin içərisində göstərildiyi kimi düzgün qütblüyə (+ və -) riayət edərək iki 1.5V AAA batareyasını yerləşdirin.
- Batareya bölməsinin qapağını dəyişdirin və vint(lər) ilə bərkidin.
4.2 Test aparatlarının birləşdirilməsi
Test naqillərini multimetrdəki müvafiq giriş yuvalarına qoşun:
- daxil edin qara sınaq qurğusuna COM (adi) jak.
- Əksər ölçmələr üçün (Cildtage, Resistance, Diode, Continuity, Temperature, Battery Test), insert the qırmızı sınaq qurğusuna VΩmA jak.
- For high current measurements (up to 10A), insert the qırmızı sınaq qurğusuna 10A jak.
5. Əməliyyat Təlimatları
Before taking any measurement, ensure the test leads are correctly connected and the rotary switch is set to the desired function.
5.1 DC həcminin ölçülməsitage (V=)
- Set the rotary switch to the desired V= range (e.g., 20V for measuring up to 20V DC).
- Qırmızı sınaq naqilini dövrənin müsbət (+) tərəfinə, qara sınaq naqilini isə mənfi (-) tərəfinə qoşun.
- Cild oxuyuntagEkranda e dəyəri.
5.2 AC-nin ölçülməsi Voltage (V~)
- Set the rotary switch to the desired V~ range (e.g., 200V for measuring up to 200V AC).
- Test naqillərini AC həcmi boyunca qoşuntage mənbə.
- Cild oxuyuntagEkranda e dəyəri.
5.3 Measuring DC Current (A=)
- Əhəmiyyətli: Multimetri ardıcıl olaraq qoşmadan əvvəl dövrədəki enerjini ayırın.
- Set the rotary switch to the desired A= range (e.g., 200mA or 10A). Remember to move the red lead to the 10A jack for high current.
- Open the circuit where current is to be measured.
- Connect the multimeter in series with the circuit, ensuring the current flows through the multimeter.
- Apply power to the circuit and read the current value on the display.
5.4 Müqavimətin Ölçülməsi (Ω)
- Əhəmiyyətli: Müqaviməti ölçməzdən əvvəl dövrənin enerjisiz olduğundan və bütün kondansatörlərin boşaldıldığından əmin olun.
- Set the rotary switch to the desired Ω diapazon.
- Test aparatlarını ölçüləcək komponent üzərində birləşdirin.
- Ekrandakı müqavimət dəyərini oxuyun.
5.5 Diod Testi (→|)
- Əhəmiyyətli: Diodun dövrədən ayrıldığından əmin olun.
- Fırlanan açarı " Diod testi mövqe.
- Connect the red test lead to the anode and the black test lead to the cathode of the diode. The display will show the forward voltage düşmək.
- Naqilləri tərsinə çevirin. Yaxşı bir diod üçün ekranda "OL" (Açıq Döngə) göstərilməlidir.
5.6 Davamlılıq Testi ())))
- Əhəmiyyətli: Dövrənin enerjisiz olduğundan əmin olun.
- Fırlanan açarı " Davamlılıq Testi mövqe.
- Connect the test leads across the component or wire to be tested.
- If the resistance is below approximately 30Ω, the buzzer will sound, indicating continuity. The display will also show the resistance value.
5.7 Battery Test (1.5V/9V)
- Fırlanan açarı " 1.5V or 9V battery test position, corresponding to the battery type.
- Qırmızı test kabelini batareyanın müsbət (+) terminalına və qara test kabelini mənfi (-) terminalına qoşun.
- Batareyanın həcmini oxuyuntage ekranda.
5.8 Məlumatların saxlanması
Press the "HOLD" button to freeze the current reading on the display. Press it again to release the hold function and resume live readings.
6. Spesifikasiyalar
| Ölçmə | Aralığı | Qətnamə |
|---|---|---|
| DC Cildtage | 200mV / 2V / 20V / 200V / 600V | 100µV / 1mV / 10mV / 100mV / 1V |
| AC Cildtage | 200V / 600V | 100mV / 1V |
| DC cərəyanı | 2mA / 20mA / 200mA / 10A | 1µA / 10µA / 100µA / 10mA |
| Müqavimət | 200Ω / 2kΩ / 20kΩ / 200kΩ / 2MΩ | 0.1Ω / 1Ω / 10Ω / 100Ω / 1kΩ |
| Davamlılıq Testi | Buzzer sounds at <30Ω | — |
| Diod testi | İrəli cildtage düşmək | — |
| Batareya Testi | 1.5V / 9V | — |
Ümumi Spesifikasiyalar
- Ekran: 2000 sayı
- Enerji təchizatı: 2 x 1.5V AAA batareyaları
- Ölçülər: 150mm x 74mm x 48mm (5.9" x 2.9" x 1.7")
- Çəki: 220 q (0.48 lb)
- Təhlükəsizlik reytinqi: CAT III 600V
- Material: Akrilonitril Butadien Stirol (ABS)
- Rəng: Mavi

Image: A table detailing manual ranging specifications for various Mastech digital multimeters, including the MS8301A, showing display counts, safety ratings, and measurement capabilities.
7. Baxım
7.1 Batareyanın dəyişdirilməsi
When the battery low indicator appears on the display, replace the batteries immediately to ensure accurate readings. Follow the steps outlined in Section 4.1 for battery installation.
7.2 Təmizləmə
Kassanı reklamla silinamp parça və yumşaq yuyucu vasitə. Aşındırıcı maddələr və ya həlledicilərdən istifadə etməyin. İstifadədən əvvəl multimetrin tamamilə quruduğundan əmin olun.
7.3 Saxlama
If the multimeter is not used for an extended period, remove the batteries to prevent leakage and damage to the device. Store in a cool, dry place away from direct sunlight.
8. Giderme
| Problem | Mümkün Səbəb | Həll |
|---|---|---|
| Ekran və ya zəif ekran yoxdur | Dead or low batteries; incorrect battery polarity. | Replace batteries; check battery orientation. |
| "OL" (Həddindən artıq yükləmə) göstərilir | Measurement exceeds selected range; open circuit. | Select a higher range; check for open circuit in the component or leads. |
| Yanlış oxunuşlar | Incorrect function selected; poor test lead connection; damaged test leads. | Verify function switch position; ensure secure lead connection; inspect and replace damaged leads. |
| Davamlılıq siqnalı yoxdur | Open circuit; resistance too high. | Check for breaks in the circuit; ensure resistance is below 30Ω. |
9. Zəmanət və Dəstək
Mastech products are designed for reliability and performance. For specific warranty information, please refer to the warranty card included with your product or contact Mastech customer support. Keep your purchase receipt as proof of purchase.
For technical support or service inquiries, please visit the official Mastech websaytına daxil olun və ya onların səlahiyyətli xidmət mərkəzləri ilə əlaqə saxlayın.