1. Giriş
Thank you for choosing the FLYLINKTECH 5000A Jump Starter. This portable device is designed to provide instant power to jump-start 12V vehicles, charge electronic devices, and offer emergency lighting. Please read this manual thoroughly before use to ensure safe and optimal performance.
2. Əhəmiyyətli Təhlükəsizlik Məlumatı
- Always ensure the jump starter is fully charged before use.
- Donmuş batareyanı işə salmağa çalışmayın.
- cl-ni birləşdirinamps correctly: red to positive (+), black to negative (-). Reverse polarity can cause damage.
- Qırmızı və qara cl-ni birləşdirməyinamps birlikdə.
- Uşaqların əli çatmayan yerdə saxlayın.
- Yaxşı havalandırılan bir ərazidə istifadə edin.
- Cihazı uzun müddət həddindən artıq temperaturda və ya birbaşa günəş işığında saxlamaqdan çəkinin.
- If the device becomes excessively hot during use, disconnect it immediately.
- Xüsusi işə salma prosedurları üçün avtomobilinizin istifadəçi təlimatına baxın.
3. Paketin məzmunu
Bütün əşyaların paketinizdə olduğunu yoxlayın:
- FLYLINKTECH 5000A Jump Starter (Model BD10)
- Ağıllı keçid kabelləri
- USB-C şarj kabeli
- EVA saxlama qutusu
- İstifadəçi təlimatı

Image: Contents of the FLYLINKTECH 5000A Jump Starter package, including the jump starter unit, smart jumper cables, USB-C charging cable, and EVA storage case.
4. Məhsul bitdiview
Familiarize yourself with the components and ports of your jump starter:
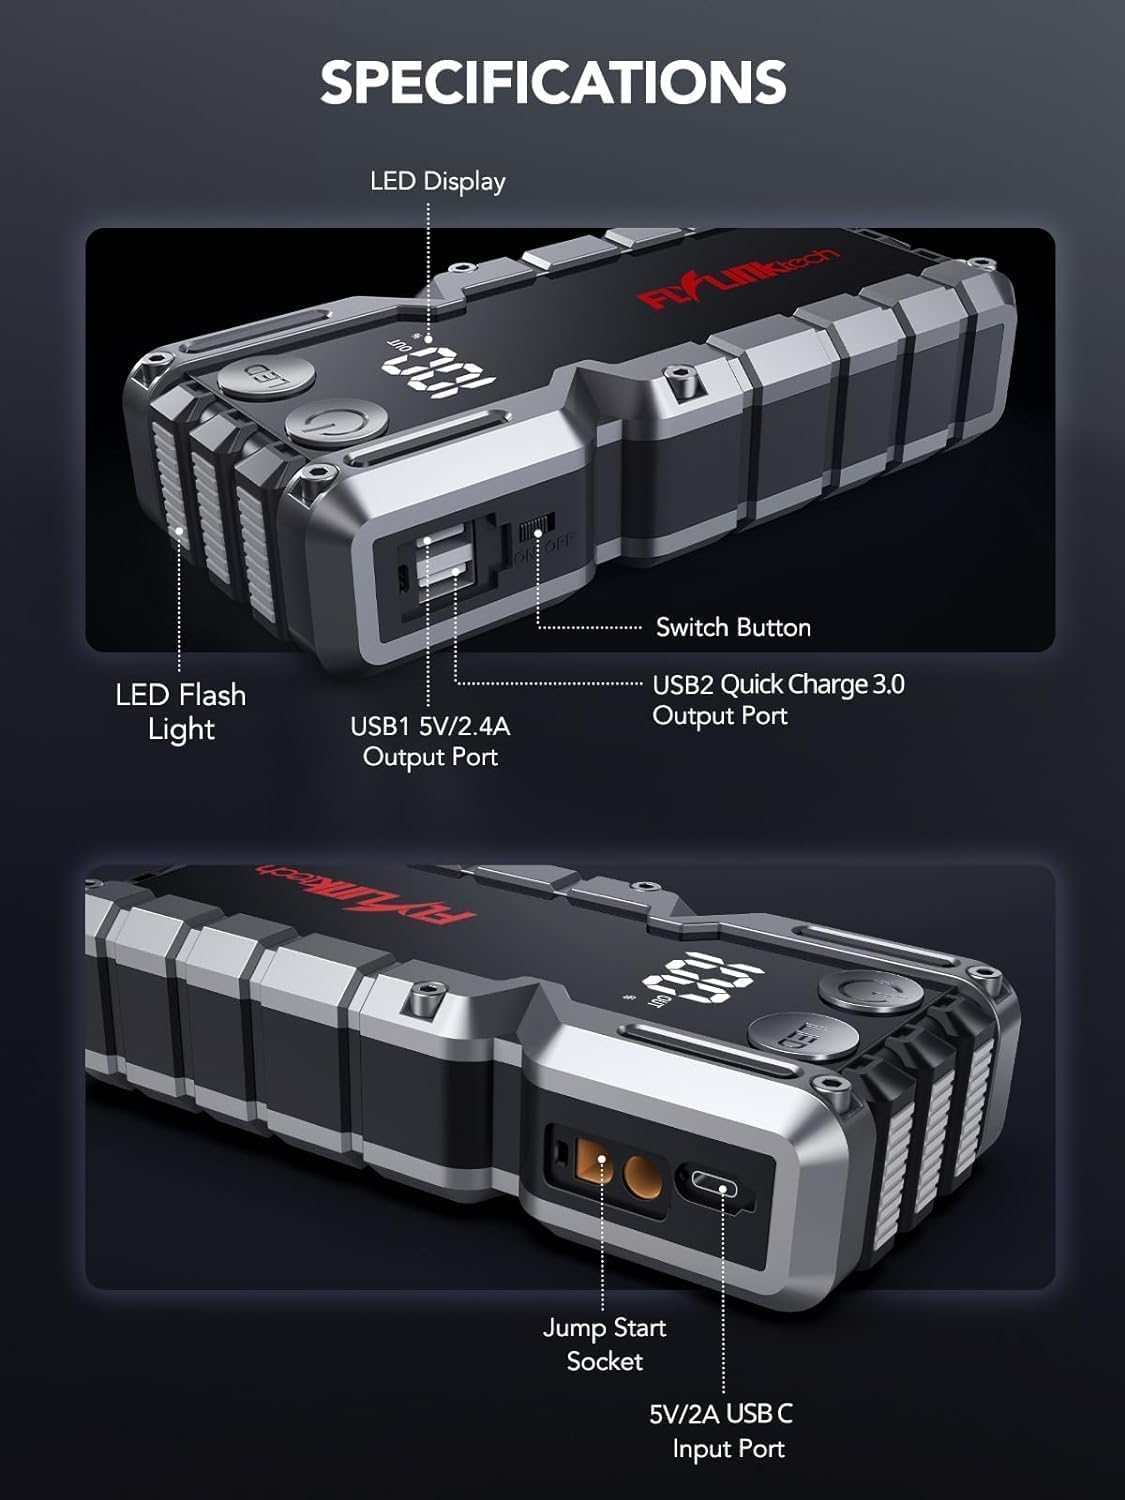
Şəkil: Ətraflı view of the jump starter showing the LED display, LED flashlight, power button, switch button, USB1 5V/2.4A output port, USB2 Quick Charge 3.0 output port, Jump Start Socket, and 5V/2A USB-C input port.
- LED ekran: Batareyanın gücünü göstərirtage.
- LED Fənər: Birdən çox rejimdə işıqlandırma təmin edir.
- Güc düyməsi: Activates the device and controls flashlight modes.
- Düyməni dəyişdirin: Əsas güc nəzarəti.
- USB1 Output (5V/2.4A): Standart USB şarj portu.
- USB2 Output (QC3.0): Quick Charge 3.0 port for faster charging.
- Başlanğıc Başlatma Soketi: Connects to the smart jumper cables.
- USB-C Input (5V/2A): Used to recharge the jump starter.
5. Başlanğıc qurğusunun doldurulması
İlk istifadədən əvvəl starteri tam doldurun. Batareyanın sağlamlığını qorumaq üçün cihazı hər 3-6 aydan bir doldurmaq tövsiyə olunur.
- Connect the provided USB-C charging cable to the USB-C input port on the jump starter.
- Connect the other end of the USB-C cable to a 5V/2A USB wall adapter (not included) or a car charger.
- LED displeydə doldurma prosesi göstəriləcək. Ekranda 100% göstərildikdə cihaz tam doldurulmuş hesab olunur.

Image: The jump starter connected via USB to charge a smartphone and a tablet, demonstrating its power bank functionality.
6. Nəqliyyat vasitənizi təcili işə salın
Follow these steps carefully to safely jump-start your 12V vehicle:
- Prepare the Jump Starter: Ensure the jump starter is at least 50% charged. Turn off your vehicle's ignition and all accessories (headlights, radio, etc.).
- Ağıllı Jumper Kabellərini Qoşun: Insert the blue plug of the smart jumper cables into the Jump Start Socket on the jump starter. Ensure a firm connection. The indicator light on the smart clamp will flash red and green.
- Avtomobilin akkumulyatoruna qoşulun:
- əlavə edin qırmızı (+) clamp avtomobilinizin akkumulyatorunun müsbət terminalına.
- əlavə edin qara (-) clamp avtomobilinizin akkumulyatorunun mənfi terminalına.
Once connected correctly, the indicator light on the smart clamp bərk yaşıllaşacaq.
- Maşını işə salın: Go into your vehicle and start the engine. If the vehicle does not start immediately, wait 30 seconds and try again. If it still doesn't start, press the "BOOST" button on the smart clamp for 3 seconds until the green light turns solid, then try starting the car again within 30 seconds.
- Kabelləri çıxarın: Once the engine starts, immediately remove the smart jumper cables from the vehicle battery, then disconnect them from the jump starter.

Image: Visual guide for jump-starting: 1. Insert jump clamp into booster. 2. Connect clamps to car battery. 3. Start your car. 4. Remove clamps.

Image: The smart clamps connected to the jump starter, illustrating the 10-layer safety protections including short circuit, reverse charge, over charge, reverse polarity, over discharge, over current, reverse connection, and high temperature protection.
7. Power Bank kimi istifadə
The jump starter can also be used to charge your electronic devices.
- Connect your device's USB charging cable to either the USB1 (5V/2.4A) or USB2 (QC3.0) output port on the jump starter.
- Sürətli başlanğıc avtomatik olaraq cihazınızı doldurmağa başlayacaq.
- The LED display will show the remaining battery capacity of the jump starter.

Image: The jump starter functioning as a portable power bank, with two USB output ports (5V/2.4A and Quick Charge 3.0) actively charging a smartphone and a tablet.
8. LED Fənərdən istifadə
The built-in 600-lumen LED flashlight has three modes for various situations:
- Yandırmaq/Söndürmək üçün: Press and hold the LED button for 3 seconds.
- Dövr Rejimlərinə: Once the light is on, short press the LED button to switch between:
- Daimi aktiv: Ümumi işıqlandırma üçün.
- SOS rejimi: Flashes the international SOS signal for emergencies.
- Strobe rejimi: Rapid flashing for warning or signaling.

Image: The jump starter with its LED flashlight active, illustrating the three available modes: standard flashlight, SOS signal, and strobe light for emergencies.
9. Baxım
- Təmizləmə: Wipe the unit with a soft, dry cloth. Do not use harsh chemicals or abrasive materials.
- Yaddaş: Store the jump starter in its EVA case in a cool, dry place away from direct sunlight. Ensure it is charged to at least 50% before storing for extended periods. Recharge every 3-6 months.
- Batareyaya qulluq: The internal lithium-ion battery is designed for long life. Avoid fully discharging the unit frequently.

Water-resistant design.

Rugged ABS shell for drop resistance.

Operates in extreme temperatures (-4°F to 140°F).
10. Giderme
| Problem | Mümkün Səbəb | Həll |
|---|---|---|
| Vehicle won't start after connecting. | Jump starter battery too low; incorrect clamp connection; vehicle battery completely dead. | Atlama başlanğıcının tam doldurulduğundan əmin olun. Cl yoxlayınamp connections (red to +, black to -). Press the "BOOST" button on the smart clamp for 3 seconds and try again. |
| Ağıllı clamp indicator light is red/flashing. | Tərs qütblük; qısaqapanma; həddindən artıq temperatur. | cl-ni ayırınamps and re-connect correctly. Check for any short circuits. Allow unit to cool down if overheated. |
| Başlanğıc şarj olunmur. | Şarj kabeli və ya adapteri nasazdır; boş əlaqə. | Ensure USB-C cable and adapter are working and connected securely. Try a different cable or adapter. |
| LED fənər işləmir. | Not activated correctly; low battery. | Press and hold the LED button for 3 seconds to activate. Ensure the jump starter has sufficient charge. |
11. Spesifikasiyalar
| Xüsusiyyət | Detal |
|---|---|
| Pik cərəyanı | 5000A |
| Batareya Tutumu | 18000mAh (66.6Wh) |
| Başlanğıc Cildtage | 12V |
| Mühərrik Uyğunluğu | 9.0L qaz / 8.0L dizel |
| USB Çıxışı 1 | 5V/2.4A |
| USB Çıxışı 2 | QC3.0 |
| USB-C Girişi | 5V/2A |
| LED fənər | 600-Lumen (Constant, SOS, Strobe) |
| İşləmə temperaturu | -4°F - 140°F (-20°C - 60°C) |
| Ölçülər | 4.2 x 9 x 19 sm |
| Çəki | 540 q (1.19 funt) |
| Təhlükəsizlik Mühafizələri | 10-Layer (Short Circuit, Reverse Polarity, Over-Current, etc.) |
12. Zəmanət və Dəstək
The FLYLINKTECH 5000A Jump Starter comes with an industry-leading 3 il zəmanət satın alındığı tarixdən etibarən. Bu zəmanət istehsal qüsurlarını əhatə edir və etibarlı işləməyi təmin edir.
For technical support, warranty claims, or any questions regarding your product, please contact FLYLINKTECH customer service through the retailer's platform or visit our official websayt.
Zəmanətin yoxlanılması üçün satınalma sübutunuzu saxlayın.


