1. Giriş
Thank you for choosing the Olvy A10 Cordless Stick Vacuum Cleaner with Mop Function. This appliance is designed for efficient cleaning of various floor types, offering both vacuuming and mopping capabilities. Please read this manual thoroughly before use to ensure proper operation, maintenance, and safety.

Image: The Olvy A10 Cordless Stick Vacuum Cleaner in its full assembly, alongside various attachments and the wall mount.
2. Təhlükəsizlik Təlimatları
Yanğın, elektrik cərəyanı vurması və ya yaralanma riskini azaltmaq üçün elektrik cihazından istifadə edərkən həmişə əsas təhlükəsizlik tədbirlərinə əməl edin.
- Cihazı istifadə etməzdən əvvəl bütün təlimatları oxuyun.
- Açıq havada və ya yaş səthlərdə istifadə etməyin.
- Oyuncaq kimi istifadə edilməsinə icazə verməyin. Uşaqlar tərəfindən və ya onların yaxınlığında istifadə edildikdə, diqqətli olmaq lazımdır.
- Yalnız bu təlimatda təsvir olunduğu kimi istifadə edin. Yalnız istehsalçının tövsiyə etdiyi əlavələrdən istifadə edin.
- Zədələnmiş şnur və ya fiş ilə istifadə etməyin. Əgər cihaz lazım olduğu kimi işləmirsə, yerə düşübsə, zədələnibsə, açıq havada qalıbsa və ya suya düşübsə, onu xidmət mərkəzinə qaytarın.
- Şnurla çəkməyin və daşımayın, şnurdan tutacaq kimi istifadə etməyin, şnurun üzərində qapını bağlamayın və ya şnurunu iti kənarlardan və ya künclərdən dartmayın. Cihazı şnurun üzərində işə salmayın. Şnurunu qızdırılan səthlərdən uzaq tutun.
- Şnurdan çəkərək elektrik şəbəkəsindən ayırmayın. Elektrik rozetkasını ayırmaq üçün şnurdan deyil, fişdən tutun.
- Elektrik fişini və ya cihazı yaş əllərlə tutmayın.
- Açıqlara heç bir əşya qoymayın. Hər hansı bir açılışla istifadə etməyin; tozdan, tükdən, saçdan və hava axını azalda biləcək hər şeydən təmizləyin.
- Saçları, boş paltarları, barmaqları və bədənin bütün hissələrini deşiklərdən və hərəkət edən hissələrdən uzaq tutun.
- Elektrik şəbəkəsindən çıxarmazdan əvvəl bütün idarəetmələri söndürün.
- Pilləkənləri təmizləyərkən çox diqqətli olun.
- Yanan və ya yanan mayeləri, məsələn, benzini götürmək üçün istifadə etməyin və ya onların ola biləcəyi yerlərdə istifadə etməyin.
- Siqaret, kibrit və ya isti kül kimi yanan və ya çəkən heç bir şeyi götürməyin.
- Toz qabı və/yaxud filtrləri yerində olmadan istifadə etməyin.
- Qəsdən başlamağın qarşısını alın. Batareya paketinə qoşulmazdan, cihazı götürməzdən və ya daşımazdan əvvəl açarın söndürülmüş vəziyyətdə olduğundan əmin olun.
- Yalnız istehsalçı tərəfindən göstərilən şarj cihazı ilə doldurun. Bir növ batareya paketi üçün uyğun olan şarj cihazı başqa batareya paketi ilə istifadə edildikdə yanğın riski yarada bilər.
- Təhlükəli şərtlərdə batareyadan maye çıxa bilər; təmasdan çəkinin. Təmas təsadüfən baş verərsə, su ilə yuyun. Maye gözlərə toxunarsa, əlavə olaraq tibbi yardım axtarın. Batareyadan çıxan maye qıcıqlanmaya və ya yanmağa səbəb ola bilər.
3. Paketin məzmunu
Bütün komponentlərin paketdə olduğunu yoxlayın:
- Əsas Blok (Əl Tozsoranı)
- Tənzimlənən Uzatma Borusu
- Döşəmə Fırçası Başlığı
- Çıxarılan Batareya
- Water Tank (for mopping)
- Mop pad
- 2-in-1 Fırça Aləti
- Yarıq aləti
- Divar montaj mötərizəsi
- Güc adapteri
- Replacement HEPA Filter (2x)
- İstifadəçi təlimatı

Image: A visual representation of all components included with the Olvy A10 Cordless Stick Vacuum Cleaner.
4. Məhsul bitdiview
The Olvy A10 features a powerful 350W motor providing up to 35,000 Pa suction, an integrated mop function, and a multi-stage HEPA filtration system. It includes an intelligent LED display for monitoring status and an auto-mode for adaptive cleaning.
Əsas Xüsusiyyətlər:
- Güclü emiş: 350W motor with 35,000 Pa for deep cleaning on various surfaces.
- 2-ü 1-də Funksionallıq: Seamlessly switch between vacuuming and mopping.
- Ağıllı LED Ekran: Provides real-time information on battery level, suction mode, and dust concentration.
- Avtomatik Rejim: Automatically adjusts suction power based on detected dirt levels.
- HEPA 13 Filtration: Captures 99.99% of fine particles, suitable for allergy sufferers.
- Uzun İstifadə müddəti: Up to 60 minutes on a single charge with a 2200 mAh removable battery.
- Yüngül və çox yönlü: Easy to maneuver and convert into a handheld vacuum for various cleaning tasks.

Image: Close-up of the intelligent LED display showing battery indicator, low power warning, auto mode, dust concentration, and control panel.

Image: The LED display indicating 'Auto-mode' and the current power level during operation.
5. Quraşdırma və Quraşdırma
5.1 İlkin Doldurma
Before first use, fully charge the battery. The battery takes approximately 4-5 hours to fully charge.
- Remove the battery from the main unit by pressing the release button.
- Connect the power adapter to the charging port on the battery.
- Plug the adapter into a power outlet. The battery indicator on the LED display will show charging status.
- Tam doldurulduqdan sonra adapteri ayırın.

Image: The removable battery unit, highlighting its 2200 mAh capacity, 4-5 hour charging time, and up to 60 minutes run time.
5.2 Tozsoranın yığılması
- Batareyanı əlavə edin: Slide the charged battery into the main unit until it clicks into place.
- Uzatma borusunu əlavə edin: Connect the adjustable extension tube to the main unit. Ensure it clicks securely.
- Döşəmə Fırçasını əlavə edin: Connect the floor brush head to the other end of the extension tube.
- Divar montajını quraşdırın (istəyə görə): Choose a suitable location for the wall mount. Secure it to the wall using the provided screws and anchors. This allows for convenient storage and charging.
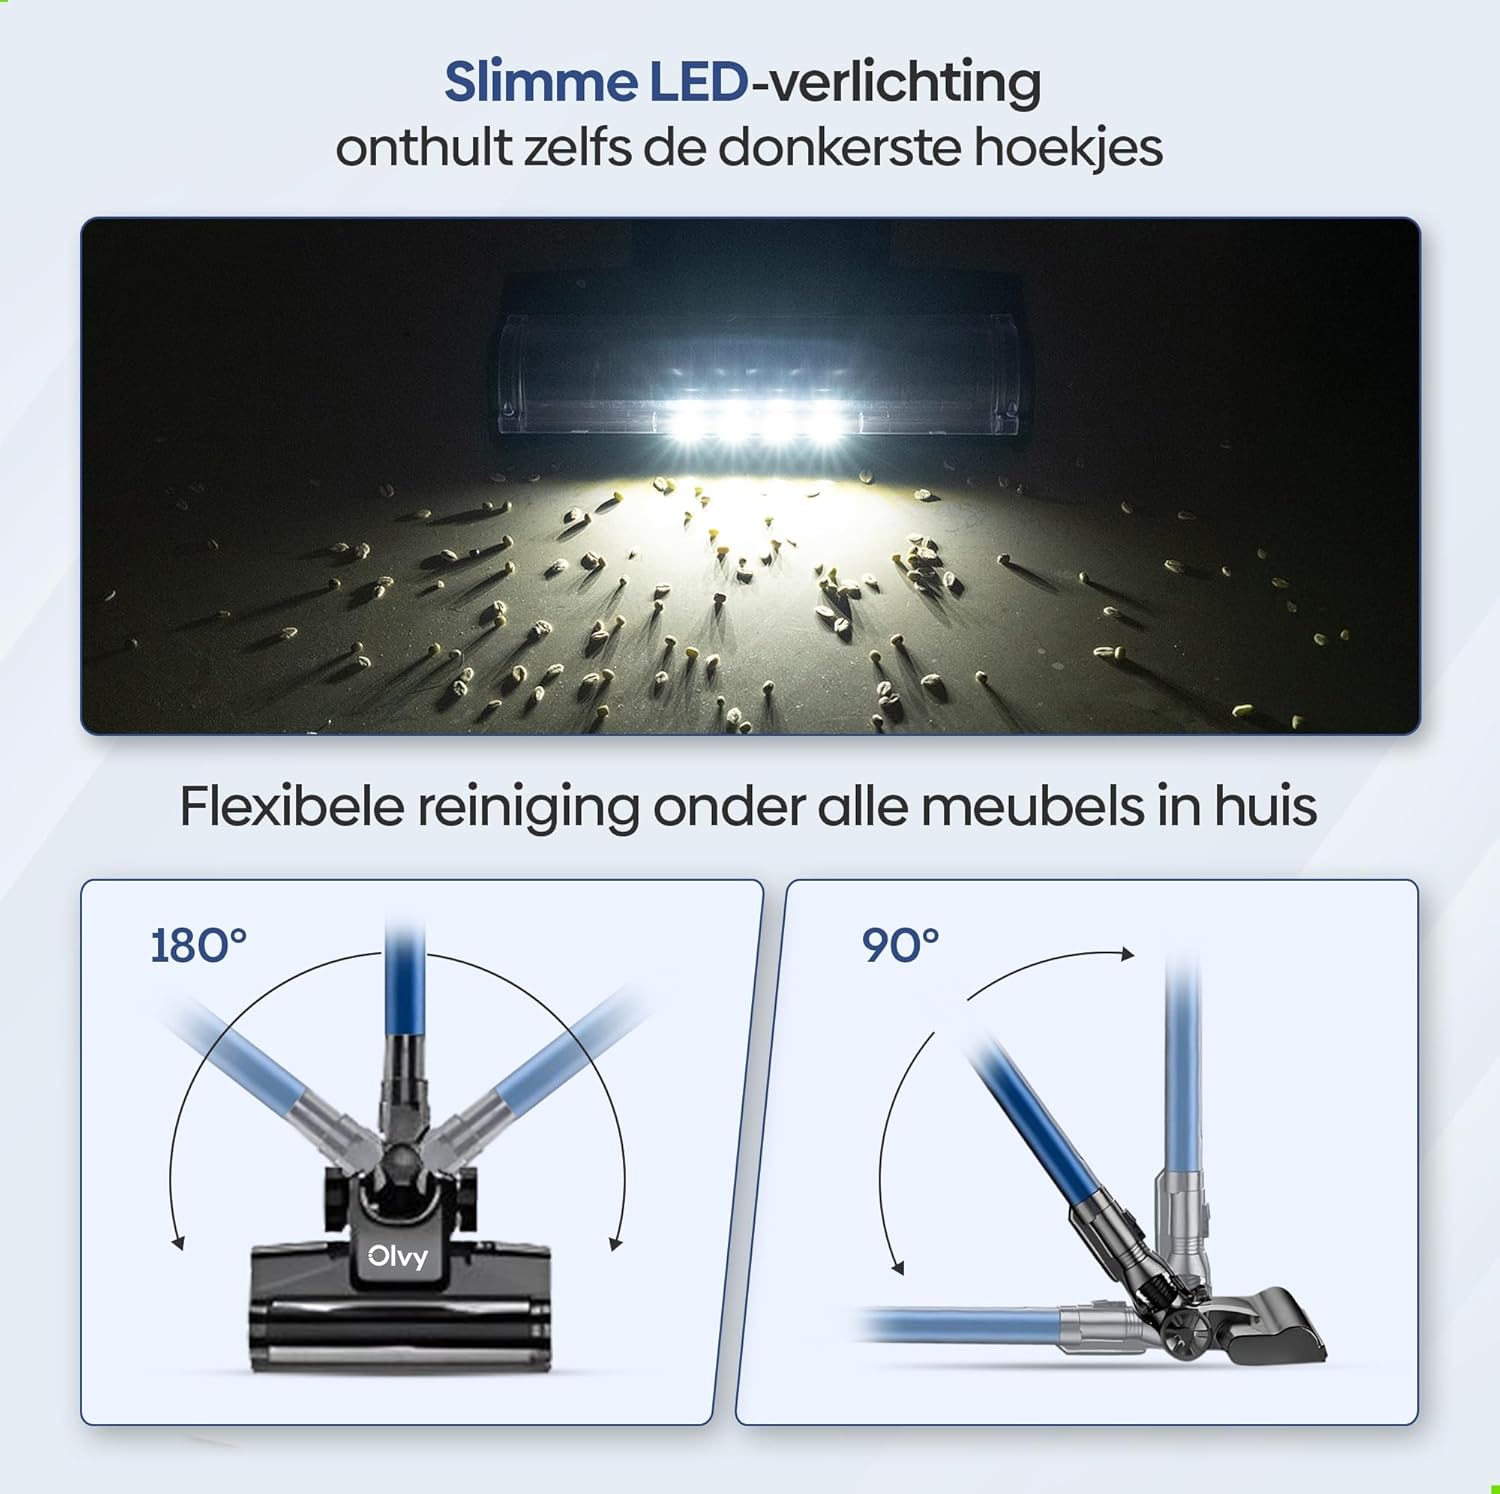
Image: The vacuum cleaner demonstrating both wall-mounted storage and self-standing capability.
6. Əməliyyat Təlimatları
6.1 Əsas əməliyyat
- Yandırma/Söndürmə: Tozsoranı yandırmaq və ya söndürmək üçün əsas qurğunun güc düyməsini sıxın.
- Emiş gücünü tənzimləyin: The vacuum offers 5 suction levels. Use the control panel on the LED display to cycle through the power modes (Low, Normal, High, Turbo).
- Avtomatik Rejim: Activate the intelligent auto mode for automatic suction adjustment based on dirt detection. The LED display will show 'Auto' when this mode is active.
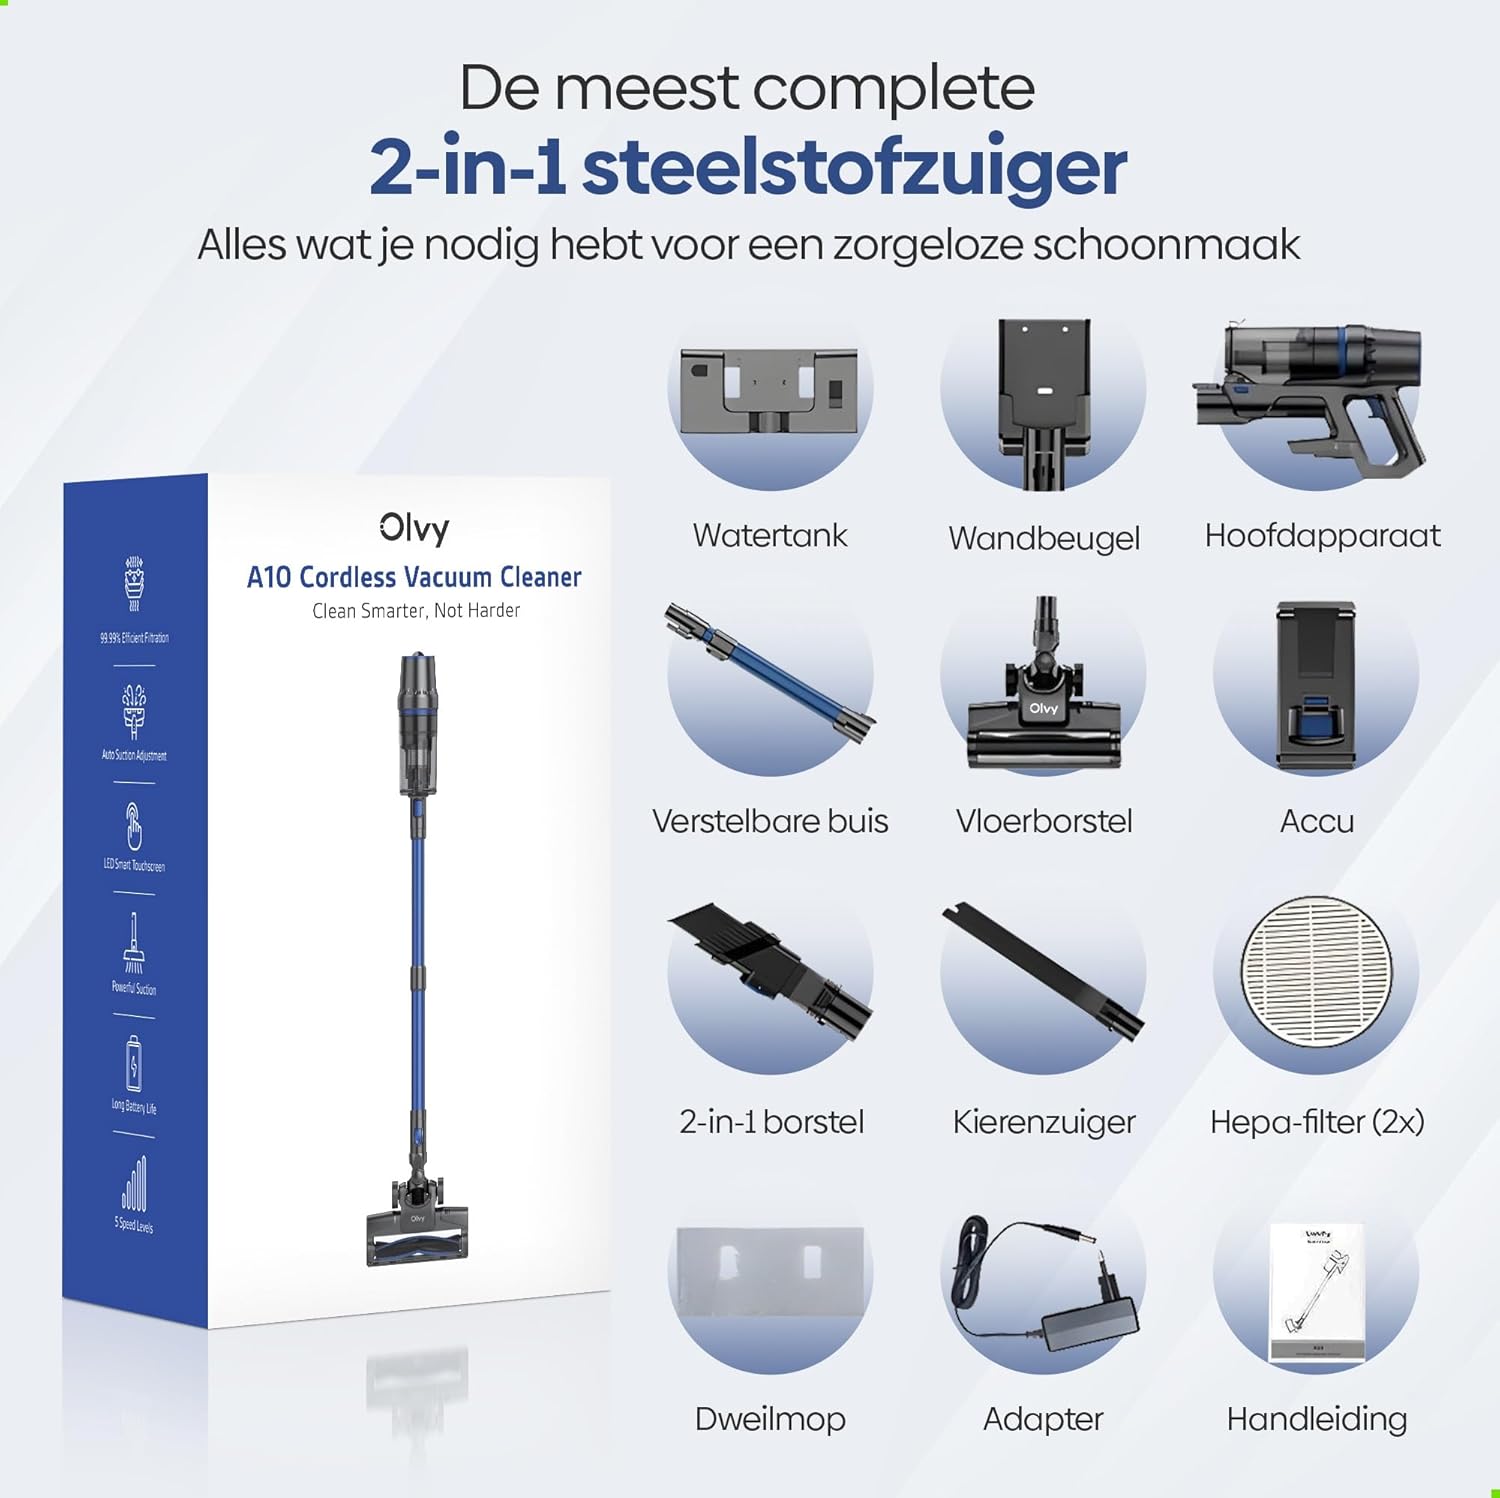
Image: The vacuum cleaner demonstrating its 4 suction levels (Low, Normal, High, Turbo) and intelligent auto mode, which adapts to dirt levels.
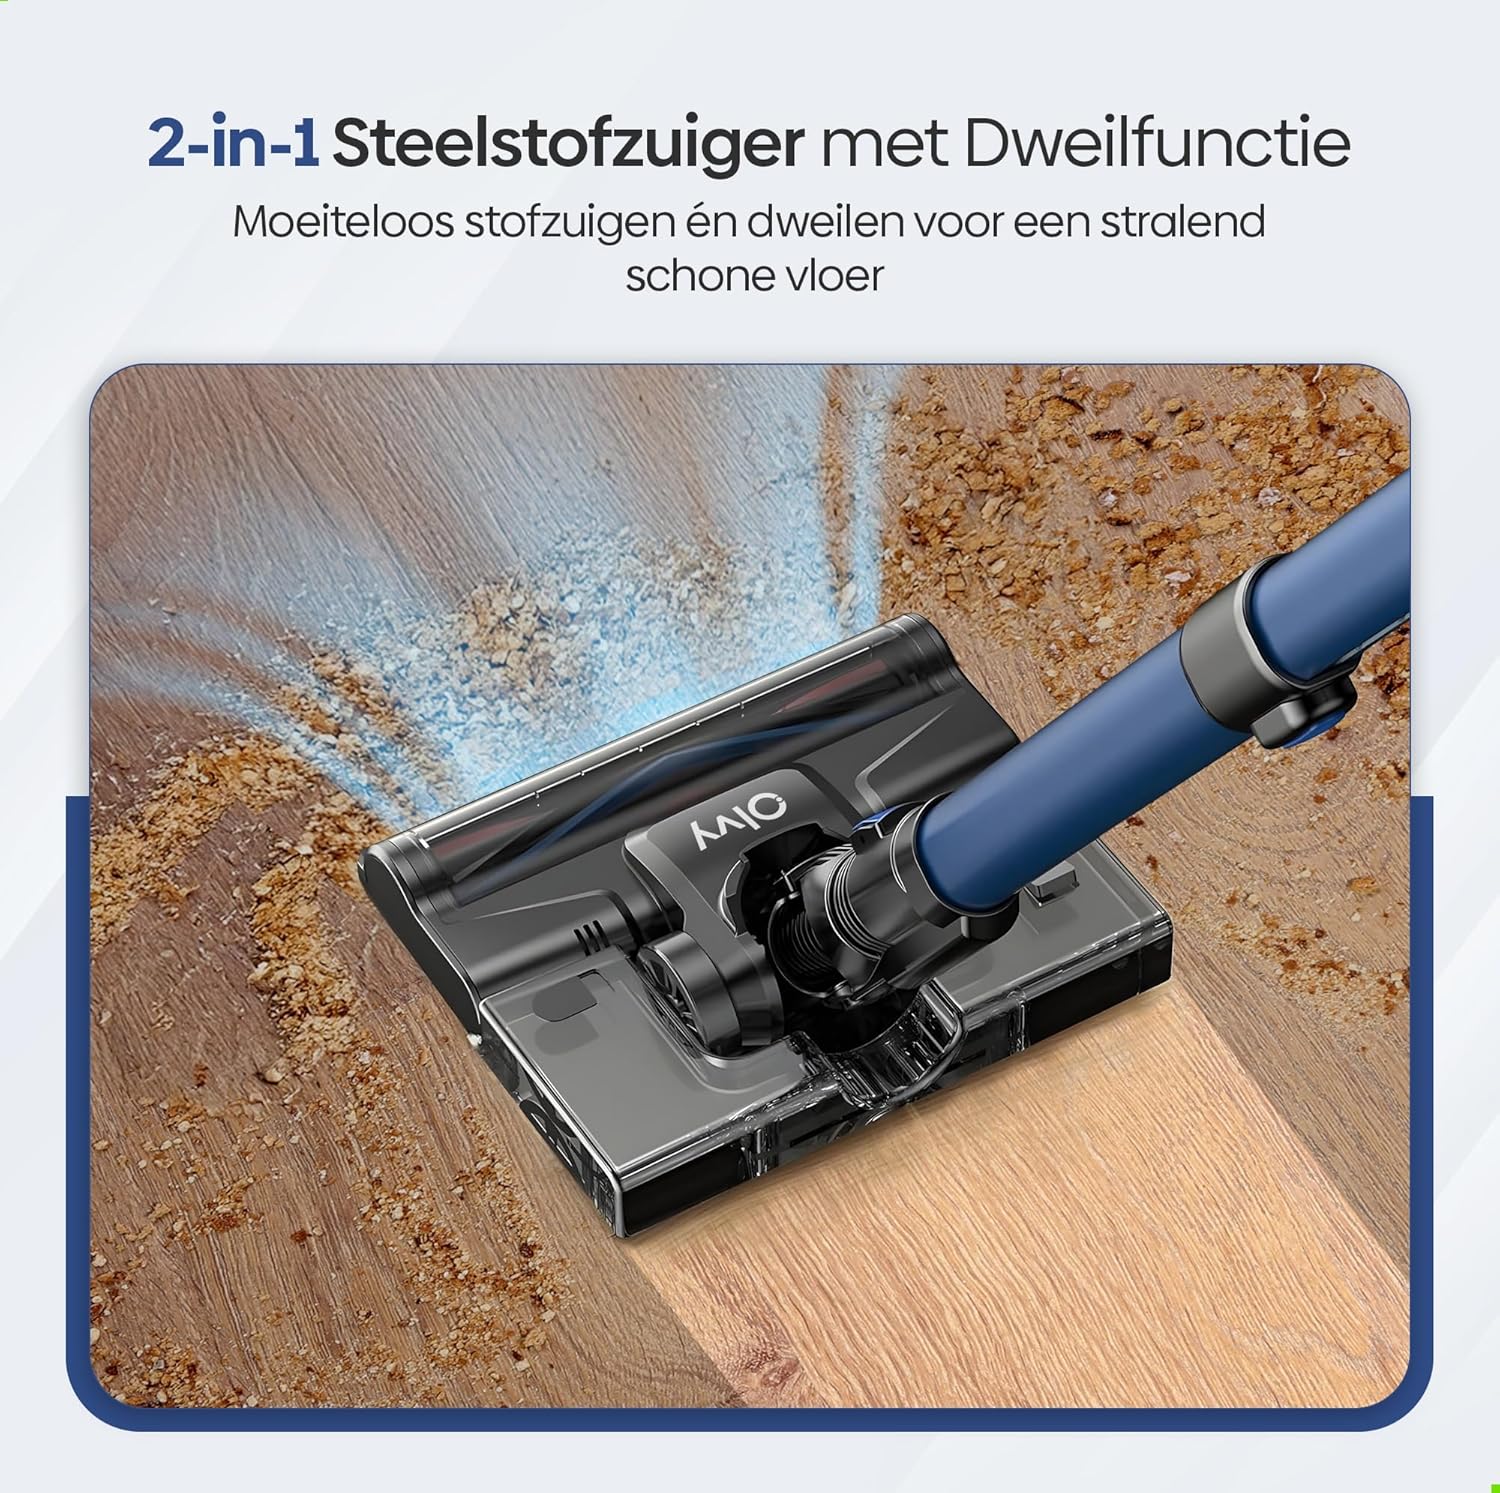
Image: A user operating the Olvy A10, showcasing its powerful 350W motor and 35,000 Pa suction for effective cleaning of various debris like hair, dust, crumbs, and sand.
6.2 Using the Mop Function
The integrated mop function allows for simultaneous vacuuming and wet cleaning of hard floors.
- Su çənini doldurun: Detach the water tank from the floor brush head. Fill it with clean water. Do not use corrosive liquids or detergents that may damage the tank or floor.
- Mop Yastığını Qoşun: Securely attach the mop pad to the bottom of the water tank.
- Su Çənini Yenidən Qoşun: Reinstall the filled water tank onto the floor brush head.
- Begin Mopping: Operate the vacuum cleaner as usual. The mop pad will dampen the floor as you vacuum, providing a streak-free clean.

Şəkil: ətraflı view of the 2-in-1 stick vacuum with mop function, showing water being dispensed for simultaneous vacuuming and mopping on a hard floor.

Image: The mop function of the Olvy A10 actively cleaning a hard floor, demonstrating its effectiveness in removing dirt and leaving a clean surface.
6.3 Qoşmalardan istifadə
- 2-in-1 Fırça Aləti: Döşəmələri, pərdələri və incə səthləri təmizləmək üçün idealdır.
- Yarıq Alət: Dar boşluqlara, künclərə və kənarlara çatmaq üçün mükəmməldir.
- To use, detach the extension tube and connect the desired attachment directly to the main unit.

Image: The Olvy A10 being used in different configurations, including as a stick vacuum for floors, a handheld for high areas, and for cleaning under furniture.

Image: The vacuum's LED lighting revealing hidden dust particles on the floor, and diagrams illustrating its 180° and 90° flexible head rotation for cleaning under furniture.
7. Baxım
Regular maintenance ensures optimal performance and extends the lifespan of your Olvy A10 vacuum cleaner.
7.1 Zibil qutusunun boşaldılması
Empty the dustbin regularly, especially when the 'Dust Concn' indicator on the LED display shows high concentration.
- Vakuumun söndürüldüyünə əmin olun.
- Onu əsas qurğudan ayırmaq üçün zibil qutusunun buraxma düyməsini basın.
- Hold the dustbin over a trash can and press the bottom release latch to open the lid and empty the contents.
- Close the lid and reattach the dustbin to the main unit.

Image: The dustbin being emptied with a single click, demonstrating its large 0.8L capacity.

Image: A user washing the dustbin under running water, illustrating the washable components for easy cleaning.
7.2 Filtrlərin təmizlənməsi
The Olvy A10 uses a multi-stage filtration system, including an HEPA filter, which should be cleaned regularly.
- Zibil qutusunu çıxarın.
- Twist and pull out the filter assembly (HEPA filter, dust filter, stainless steel filter).
- Tap off loose dirt from each filter component.
- Rinse the filters under cold running water. Do not use hot water or detergents.
- Allow all filter components to air dry completely for at least 24 hours before reassembling. Do not use the vacuum with wet filters.
- Filtrləri yenidən yığın və yenidən zibil qutusuna qoyun, sonra zibil qutusunu əsas qurğuya yenidən qoşun.

Image: A cutaway diagram illustrating the multi-stage HEPA filtration system, including the dustbin filter, stainless steel filter, dust filter, HEPA air filter, and air outlet filter.
7.3 Fırça rulonunun təmizlənməsi
Fırça rulonunda dolaşıq saç və ya zibil üçün vaxtaşırı yoxlayın.
- Tozsoranı söndürün.
- Press the release tab on the side of the floor brush head to remove the brush roll cover.
- Fırça rulonunu yuxarı qaldırın.
- Dolaşıq tükləri və ya lifləri kəsib təmizləmək üçün qayçı və ya təmizləyici vasitədən istifadə edin.
- Fırça rulonunu yenidən daxil edin və örtüyü bərkidin.
7.4 Cleaning the Mop Pad
After each use of the mop function, remove and clean the mop pad.
- Detach the mop pad from the water tank.
- Rinse the mop pad under running water or machine wash it with mild detergent.
- Allow the mop pad to air dry completely before storing or reusing.
8. Giderme
If you encounter any issues with your Olvy A10, refer to the following common problems and solutions:
| Problem | Mümkün Səbəb | Həll |
|---|---|---|
| Vakuum açılmır | Batareya doldurulmayıb və ya düzgün quraşdırılmayıb. | Charge the battery fully. Ensure the battery is securely clicked into the main unit. |
| Aşağı emiş gücü | Dustbin is full. Filters are clogged. Brush roll is tangled. Obstruction in the nozzle or tube. | Empty the dustbin. Clean all filters thoroughly and ensure they are dry. Remove any hair or debris from the brush roll. Check for and remove any blockages. |
| Fırça rulonu fırlanmır | Brush roll is tangled or jammed. | Turn off the vacuum. Remove the brush roll and clear any obstructions. |
| Mop function not working | Water tank is empty or not properly installed. Mop pad is dry. | Fill the water tank. Ensure the water tank is securely attached to the floor brush. Dampen the mop pad slightly before use if needed. |
| Qısa iş vaxtı | Battery not fully charged. Using high suction mode continuously. Battery degradation. | Ensure battery is fully charged. Use lower suction modes for longer run time. If battery life significantly decreases, consider replacing the battery. |
9. Spesifikasiyalar
| Xüsusiyyət | Spesifikasiya |
|---|---|
| Brend | Olvy |
| Model nömrəsi | A10 |
| Rəng | Qara |
| Məhsul Ölçüləri | 32 x 19 x 32 sm |
| Çəki | 5 kq |
| Motor Gücü | 350W |
| Emiş gücü | 35,000 Pa-a qədər |
| Sürətlərin sayı | 5 (including Auto Mode) |
| Səs-küy Səviyyəsi | 55 desibel |
| İş vaxtı | 1 saata qədər (60 dəqiqə) |
| Batareya Tutumu | 2200 mAh |
| Doldurma vaxtı | 4-5 saat |
| Filtr növü | HEPA 13 (Washable) |
| Zibil Tutumu | 0.8 l |
| Güc mənbəyi | Batareya |
| Tövsiyə olunan səthlər | All floors (carpets, hard floors) |
| Xüsusi Xüsusiyyətlər | 2-in-1 Vacuum & Mop, LED Display, Auto Mode, Pet-friendly, Lightweight |
10. Zəmanət və Dəstək
Olvy products are manufactured to high-quality standards. For warranty information, technical support, or service inquiries, please refer to the contact information provided with your purchase documentation or visit the official Olvy websayt. Zəmanət iddiaları üçün satınalma sübutunuzu özündə saxlayın.


